Ventilation in a private house is needed. How to conduct it competently in residential and utility rooms, in the basement, on the roof? What system to choose and how to calculate the ventilation of a private house? After reading this article, you will be able to solve the problem of ventilation of a private house with your own hands.
The principle of operation and types of traction
The most popular among the owners of suburban private houses is still the principle of ventilation based on natural draft. The action of the system is based on physical laws: warm and humid air rises upward, and cold comes in its place. The owners of a private house only need to install ventilation openings for the outflow and inflow of air. According to the same principle, the ventilation of septic tanks in private homes, sheds and cellars works.
The massive use of natural ventilation is explained by accessibility and simplicity. However, the second side of the coin is the instability of work. Therefore, for residential premises there is a more modern solution based on the use of mechanisms:
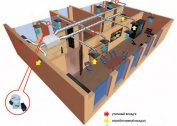
- mechanical exhaust ventilation, the principle of ventilation in a private house, in which the exhaust air is discharged into the street by a fan. Fresh air is sucked in through specially equipped air inlets, open air vents or slots in the enclosing structures;
- mechanical ventilation, in which filtered air of the required temperature is forced into the house. Excess pressure is created, under the influence of which the exhaust air is forced out through the exhaust channels to the street;
- mechanical supply and exhaust system. Fully calculated ventilation of a private house with automated air exchange.
In private houses of a large area, it is advisable to organize a centralized ventilation system, in which all the equipment is concentrated in a single point, and air ducts disperse throughout the house.
Natural ventilation
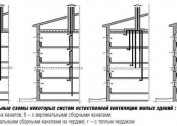
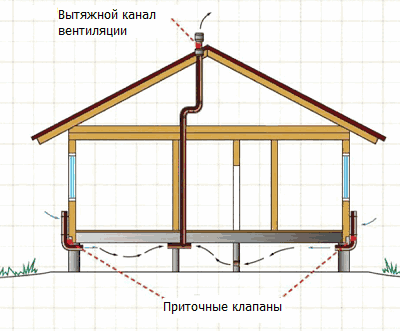
The easiest way to organize the natural ventilation of a private house with your own hands. From each ventilated room a vertical exhaust channel is laid, which ends above the highest point of the roof of a private house. Typically, exhaust ducts install:
- in the kitchen and bathroom, where the release of moisture, heat and odors is maximized;
- enclosed spaces: pantries, dressing rooms, laundries, if they communicate with the living quarters. If the doors open to the kitchen or corridor, a supply valve is mounted on the wall;
- a ventilation duct and a supply valve are equipped in the boiler room;
- in rooms separated from the nearest exhaust duct by 3 or more doors;
- starting from the second floor, if the staircase is separated by doors, ventilation ducts stretch out from the corridor or all the rooms listed above. If the stairs are not separated by doors, the inlet valves and ventilation ducts are equipped in each room.
According to the rules, it is necessary to arrange ventilation under the floor of a private house made of wood and a socle, outputting hazardous radon gas through additional channels.Ventilation under the floor is indispensable for wooden private houses, this will extend the life of the floorboards and prevent their decay. It is useless to install exhaust ventilation ducts from the attic of a private house, since a small difference in heights will not be able to provide traction.
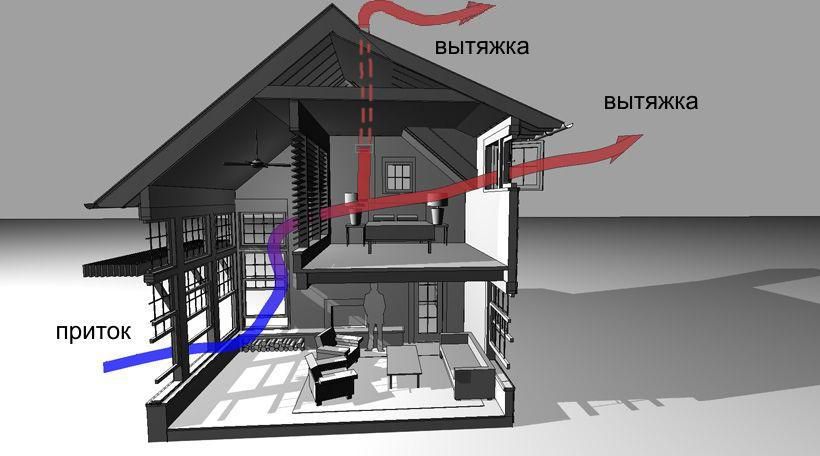
An inflow of fresh air, on the contrary, must be organized in the living rooms. The best way is to install a supply device (valve). The intensity of the influx can be regulated and the house does not remain without fresh air.
If there is no influx in the house, then the air will not be drawn out! This must be taken into account when organizing natural type ventilation in a private house.
According to the rules 55.13330.2011 in private residential buildings, ventilation must provide a single air exchange from residential premises, 60 cubic meters of air per hour from the kitchen and 25 cubic meters from the toilet and bathroom. In auxiliary rooms, the air exchange rate is 0.2 or higher per hour.
Sectional selection of ventilation ducts
The smallest acceptable duct diameter for natural ventilation of a private house of brick, stone or wood is 150 mm. The cross-sectional area of such a pipe is about 0.016 sq.m. If it is planned to install rectangular or square air ducts for an exhaust ventilation system in a private house, the side length must be at least 100 mm. If a height difference of at least 3 meters is provided, such an air duct passes about 30 cubic meters of air per hour through itself. You can improve throughput by increasing one of the values:
- the length of the vertical exhaust duct;
- diameter or cross-sectional area of the duct.
If the length of the vertical section is less than 200 cm, there will be no traction. When ventilating in a private house, one should take into account the height and shape of the roof, the number of storeys of the house and the presence of an attic.
Vertical exhaust ducts for all rooms on the same floor should be the same height. As a rule, the diameter and shape of the section are also chosen the same, it is easier to assemble such a design.

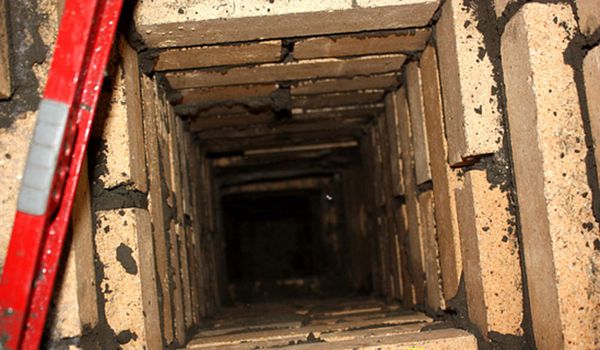
With a small number of exhaust channels, it is impractical to connect horizontal ducts to one common line, this reduces traction. Blocks are conveniently hidden in load-bearing walls, in special hollow concrete billets. You can lay ventilation in a private house made of brick in specially laid out rectangular channels of 14x27 cm or square 14x14 cm.
The external stone block of the ventilation ducts is supported on a reinforced concrete slab or foundation. In light frame or wooden houses, canals are made of plastic or galvanized pipes, which are placed in a single box.
In order to increase the productivity of the channel without changing the height, it is necessary to increase its cross-sectional area. Channels of different materials have different bandwidths, the smoother the inner walls, the higher it is, this must be borne in mind when calculating ventilation in a private house.
| Height (cm) | Room temperature | |||
| 16 | 20 | 25 | 32 | |
| 200 | 24,16 | 34,17 | 43,56 | 54,03 |
| 400 | 32,50 | 45,96 | 58,59 | 72,67 |
| 600 | 38,03 | 53,79 | 68,56 | 85,09 |
| 800 | 42,12 | 59,57 | 75,93 | 94,18 |
| 1000 | 45,31 | 64,06 | 81,69 | 101,32 |
Table 1. Productivity of the stone ventilation duct with a cross-sectional area of 204 sq.cm.
Sewage ventilation
Ventilation of a sewer riser in a private house will prevent the spread of unpleasant gas accumulating in the pipes. For the removal of gases, septic tanks are also equipped in private homes.
Rules for installing a ventilation sewer riser in a private house:
- the outlet of the exhaust duct for sewer ventilation should be located 1 meter above the roof of a private house, it is not covered by a cap;
- if there are several sewer risers in a private house, ventilation pipes use the same (11 cm (for two or more floors) or 5 cm);
- It is forbidden to combine the sewer ventilation of a private house and other premises;
- from the tip of the exhaust pipe to the window should be at least 3.5 meters, from the ground - at least 4 m;
- it is not advisable to install the pipe under the roof overhang, since in winter it can be broken by ice.
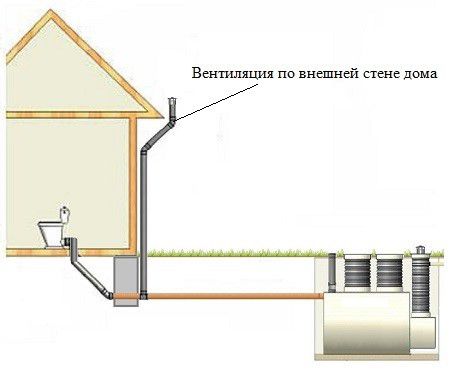
In sewer drains, fermentation and decay processes are constantly taking place, helping to decompose the contents. These processes are possible only in the presence of oxygen. Therefore, it is necessary to make the ventilation of the cesspool in a private house. Ventilation of a septic tank and sewage system in a private house is stretched by plastic pipes. A special channel is left for the pipe outlet during design.
How to arrange ventilation of the sewerage in a private house if the pipe cannot be laid? For this, vacuum valves have been developed - the device is mounted in the house at the outlet of the sewer riser.
Ventilation of a septic tank in a private house is equipped with PVC pipes. A pipe for sewer ventilation in a private house is installed vertically in the roof of a septic tank and is displayed half a meter above the soil level. If a cesspool in a private house has not passed waterproofing, ventilation is not required, since air enters through numerous gaps.
Foundation ventilation
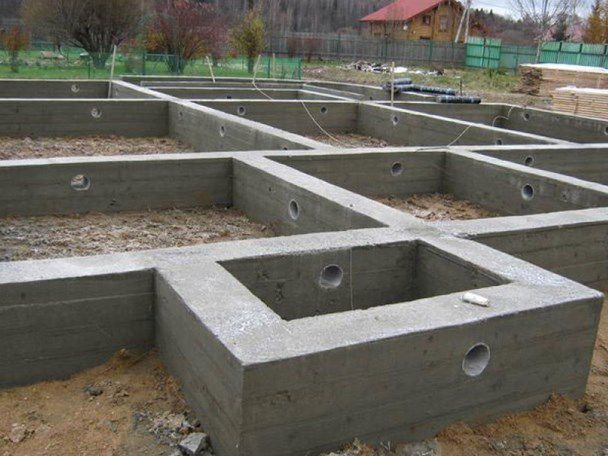
The ventilation of the foundation of a private house is ensured by a ventilation system. Products are openings in the basement of a building, the number and size of which depend on the area and location of the house.
Usually 1 duct with dimensions 10x15 cm or 25x30 cm is installed on 2.5 linear meters of wall. If a private house is located in a lowland and is not blown by winds, the ventilation of the foundation should be strengthened and the number of vents should be doubled. So that animals do not climb into the underground, products are covered with nets or gratings. Before the onset of cold weather, all ventilation of the foundation of a private house is blocked.
Basement ventilation
The heated basement of a private house is ventilated just like any other room. In each compartment of the basement, an exhaust channel with natural draft or a supply valve is installed. If there is a laundry room or a sauna in the basement, an exhaust channel is drawn from it.
If the basement is not used, it is necessary to place supply air devices and one exhaust duct in the corners. It is advisable to equip cold basements with a mechanical hood.
The ventilation of the basement of a private house is equipped according to the same principle. Many owners are limited only to the product system. But such a scheme of floor ventilation is in many cases insufficient, radioactive radon and damp are collected in the basement of a private house. Especially often this picture is typical for winter time, when the ventilation ducts for the ventilation of the basement of a private house are closed tightly.
Disadvantages of natural ventilation and how to eliminate them
Before you install natural type ventilation in a private house, consider its disadvantages:
- draft depends on the air temperature in the street and in the house, the direction and strength of the wind, humidity;
- if the channel cross-sectional area is incorrectly selected, the exhaust ventilation system in a private house will not work;
- the system is practically unregulated;
- in summer traction may be completely absent;
- in the cold season, craving increases, taking heat out of the house. In some cases, up to 35% of heat is lost through natural ventilation;
- it is necessary to insulate natural ventilation in a private house.
Despite the shortcomings, it is possible to make ventilation with your own hands in a private house quite effective.
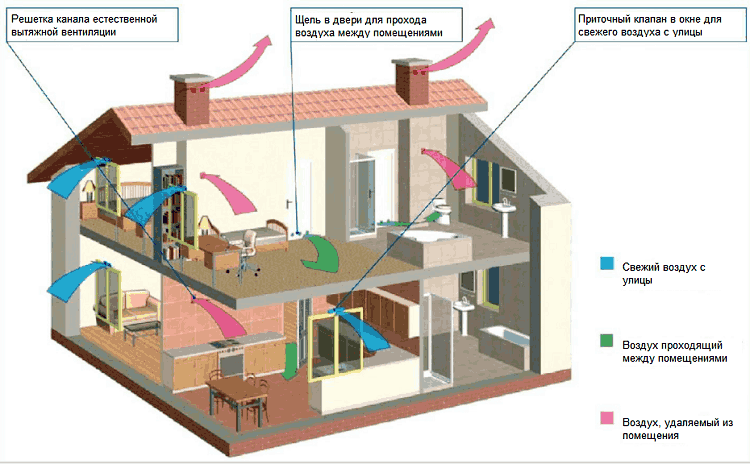
It should be understood that the decades-old scheme of natural ventilation of private houses is able to serve only bathrooms and kitchens. Living rooms are aired mainly by open windows.
Therefore, first of all, it is necessary to provide 2 conditions: air flow and unhindered passage of air throughout the house.
To solve the first problem, a wide range of supply valves is presented on the market:
- window;
- wall.
Installing a window supply valve
Window valves are mounted on the sash, it is quite simple to equip this type of supply ventilation in a private house. You will need the following tool:
- screwdriver;
- sharp knife;
- the ruler is not shorter than 35 cm.

Progress:
- We cut out the standard seal from the fixed frame in the place of the proposed installation of the valve.
- We install the seal that comes with the valve.
- We mark on the flap the location of the valve, it should coincide with the replaced area.
- Remove the seal portion on the flap.
- In the resulting gap we mount the valve plugs. They should fit entirely in the slit so as to subsequently attach a valve to them.
- The valve is glued to double-sided tape and fixed with screws to the mounts.
- A seal is inserted between the fasteners.
Now you can check the valve in action. A window inlet valve has several advantages:
- easy to install;
- during installation, all enclosing structures remain intact and intact;
- You can adjust the intensity of the inflow or completely block it.
And only one minus: in severe frosts, it can freeze. But there are branded models devoid of this drawback. They will have to pay more.
Another window valve model is the handle valve. A very convenient device, the installation of which will have to be entrusted to a specialist.
Installing a wall supply valve
The wall valve is also quite a convenient solution for the natural supply ventilation of a private house. It works without a power source, is equipped with noise isolation and a filter, thanks to the labyrinth form it reduces the air speed.
However, the ease of installation and low price makes these devices very popular. When choosing a valve, you should pay attention to the range of operating temperatures, as well as the dimensions of the internal module and throughput. As a rule, a valve is installed between the radiator and the windowsill. So cold air first drops onto the battery, warms up, and only after that enters the room. Therefore, it is important to determine the size of the device. A fairly popular location for the valve is at the top of the wall near the window.
Necessary tools for installing a ventilation valve in a private house:
- hammer drill with a special nozzle for drilling holes. You can do with a thick drill, but the process will be more time-consuming;
- sealant;
- level;
- roulette;
- screwdriver;
- sharp knife.
The main disadvantage of wall inlet valves, stopping many: to install the valve, you must make a through hole in the wall.
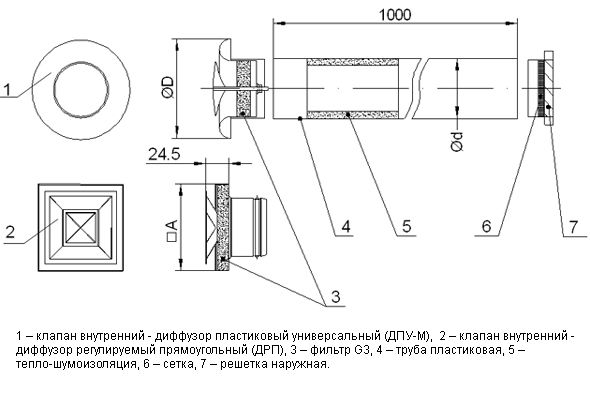
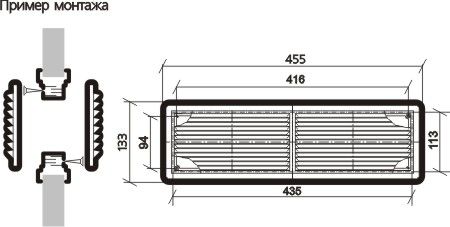
The supply valve usually consists of an internal module, an air duct and an external grille. Progress in installing the supply wall device:
- Disassemble the valve, if it was sold assembled and mark the place of the duct on the wall.
- Drill a hole of the desired diameter (see device manual). The ventilation pipe should have a slight slope towards the street for a stack of condensate, raindrops.
- The duct is wrapped with thermal insulation (sometimes it is sold already insulated) and inserted into the channel. Outside, the tube should be flush with the wall, in the house we leave about 1 cm of the protrusion.
- We fix the case inside the house, having previously installed insulation and filters in turn.
- We attach a protective grill outside.
The operation of the valve is controlled by a damper. At least 1 time per year (if the house is located outdoors) the device must be disassembled and cleaned, otherwise its throughput and filtering quality will decrease.
Installation of transfer grilles
Now it's time to pay attention to the movement of air flows around the house. For its free passage under each interior door there should be a gap with a height of at least 3 centimeters. If the interior doors are equipped with thresholds and are tightly covered, it is necessary to install transfer grilles.
In each door, the total area of openings for unobstructed movement of air should be at least 200 cubic meters for residential premises. cm.
The minimum size of the grilles in the doors of any room equipped with a channel of natural exhaust ventilation is 800 cc. Transfer grilles are made of aluminum alloys and represent two frames between which horizontal blinds are attached. Transfer grilles are convenient in that, leaving freedom of air movement, they block the access of light and sound to the room. If the installation of grilles for some reason is not possible, there is a simple and effective solution: holes are drilled in the lower part of the door and covered with ventilation rings. Rings can be simple, equipped with a mesh or sound-absorbing.
If between the inflow point and the exhaust duct there are more than 2 doors with overflow holes or grilles, the air movement will be inhibited.
And the most budget option is undercutting the door. A strip of 3-4 cm is cut from the bottom, the cut is sealed with an end edge. Such a scheme is not suitable for bedrooms and children's rooms, as it does not provide sufficient insulation of the room.
Supplementing natural ventilation with mechanical elements
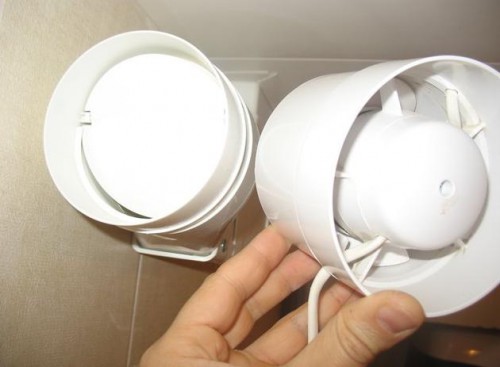
Exhaust fans in ventilation ducts and hoods in kitchens noticeably improve natural ventilation in a private brick house. They are good when it is necessary to clear the air of excess moisture or odors in a short time. Intensive work is accompanied by noise and a fairly high consumption of electricity.
| Characteristic | Model | |||
| Systemair | Vortice | Electrolux | Polar bear | |
| Productivity (cubic m \ hour) | 83 | 85 | 100 | |
| Rotational speed (r / min) | 2000 | 1400 | ||
| Power, W) | 15 | 15 | 15 | 40 |
| Noise Level dB | 48 | 31 | 33 | 45 |
| Additional options | sleep timer | Off timer, check valve | sleep timer | |
| Producing country | Sweden | Italy | Sweden | Sweden |
Table 2. Characteristics of domestic exhaust fans from leading manufacturers
Keep in mind: the presence of a fan in the ventilation duct seriously impairs traction. Incorrect connection of the hood also negatively affects the natural exhaust ventilation system in a private house. The exhaust grill must remain open! On sale there are special grilles with a separate socket for connecting an exhaust duct. But the exhausted air can instantly enter the kitchen through the grill. Therefore, for a private house, the optimal way out is to make the outlet for the hood autonomous, directly to the street. It is equipped with a check valve so that cold air does not enter the room.
Supply and exhaust mechanical ventilation
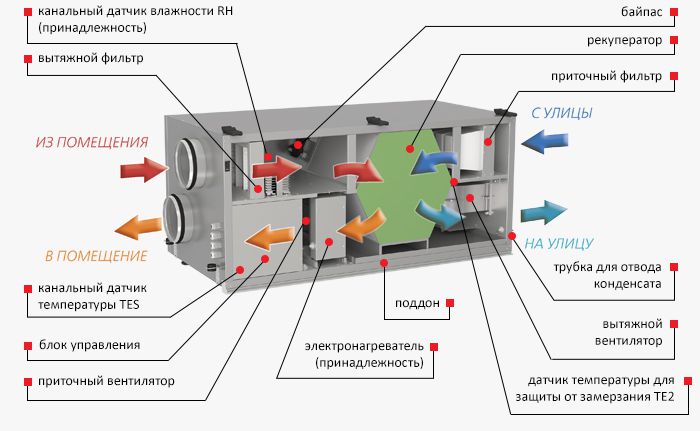
Owners of large and comfortable houses often install fully automated supply and exhaust ventilation. Its advantages are obvious:
- all indoor air indicators will clearly correspond to the calculated ones;
- equipment works without human presence;
- in case of failures, the system will signal the reasons.
Supply equipment delivers air, having previously prepared it. At the same time, an exhaust hood works with it, which removes the exhausted air masses.
The forced-air and exhaust installation is mounted, as a rule, in the attic, from it air ducts disperse around the house. Since the equipment is quite bulky, it is advisable to design it in advance. Then, during construction, you can plan openings, niches and highways for placement. Due to the complexity and large size of such installations, they are not assembled on their own.
Ventilation insulation
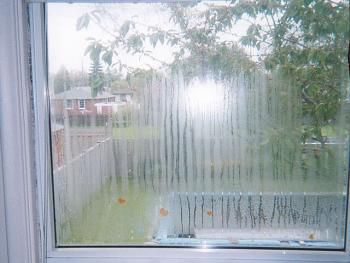
We examined the question of how to install ventilation in a private house, but did not touch on an important point. Some sections of the ventilation of a private house must be insulated. This applies to sections of ducts passing through cold rooms, attics, and the street. Neglecting thermal insulation, condensation settles on the pipe walls. Galvanized air ducts will fail faster, in frosty times moisture freezes, pipe clearance decreases and ventilation stops working.
Therefore, insulation of ventilation in a private house is mandatory. The conclusion of the pipe through the wall must be done through the insulated sleeve.
Recommended Materials:
- Minvata cheap, not burning. At the same time, it is difficult to mount and over time falls down;
- Foam "shells" easy to install, inexpensive and durable. Moreover, in case of fire they burn like gunpowder;
- PPU or foam "shells" a little more expensive polystyrene, but more durable;
- Polyethylene Foam widely used in pipe insulation, sold in the form of split pipes of the desired section;
- Penofol withstands low temperatures, is a foamed polyethylene foam.
Self-adhesive insulation based on polyethylene foam is very convenient. The thickness of the sheet of self-adhesive from 1 cm, if necessary, you can impose several layers on top of each other. The material is simply mounted, withstands mechanical stress, including rodent attacks.
Video about ventilation pipe insulation: