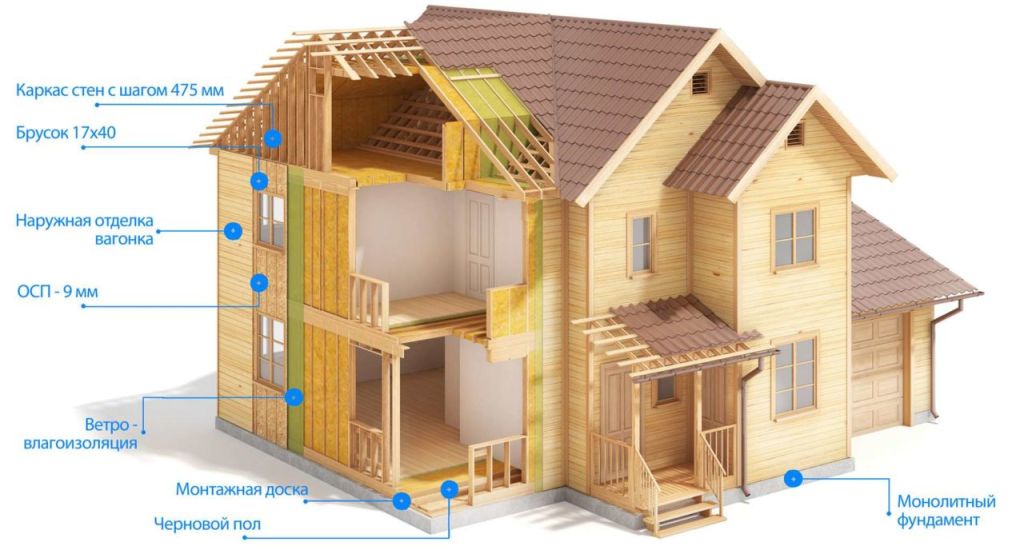
Warming of a frame house is one of the stages of construction, which should be approached carefully and responsibly. Not only the level of comfort indoors depends directly on this, but also the service life of the building itself. The advantages of such buildings are the speed of assembly, affordable cost and the possibility of construction at any time of the year. The downside is the lack of thermal insulation. This flaw is easy to fix with your own hands. To do this, you need to study the properties of insulation, the technology of their installation, make the right decision and get to work.
Insulation requirements for frame house
Panel houses are widespread in Finland, which is famous for its harsh climate. Similar weather conditions are often observed in Russia. Frameworks easily tolerate severe frosts, while keeping cool in the summer heat. This is achieved through the competent use of organic and synthetic insulation materials.
When making a choice, you need to focus on such qualities:
- Durability. Fillers must maintain their performance throughout the life of the building. Otherwise, you will have to make a complicated, long and expensive repair.
- Excellent ventilation qualities. The materials are located in vapor-permeable structures that ensure the removal of moisture from the premises.
- Ecological cleanliness. It is necessary to choose a placeholder in which there are no substances harmful to human health.
- Low thermal conductivity. This characteristic determines the building's ability to retain winter cold and summer heat.
- Constancy of form. If the material loses volume due to gravity, its performance deteriorates over time.
- Lack of hygroscopicity. The accumulation of moisture leads to an increase in thermal conductivity, the development of fungus and mold.
When deciding which insulation is best for a frame house, you can not focus on its price. To ensure the comfort of living in a house for decades, only expensive and high-quality heat insulators can.
The choice of thermal insulation material
The construction market is replete with materials of the most diverse composition, configuration and scope. The ranking of manufacturers is deservedly led by the trademarks Knauf and Rockwool, whose products are distinguished by the highest operational characteristics. If you finish the house with these heaters, you can forever forget about the heat, dampness and cold.
To choose the right material, you need to familiarize yourself with the basic properties of the goods on sale.
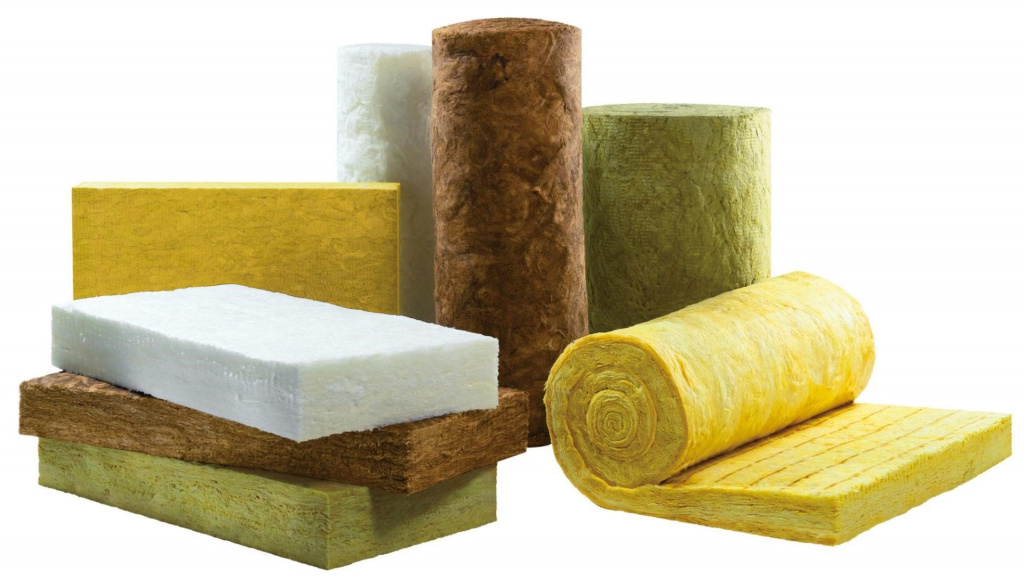
Mineral wool
Minvata is a multitude of space-oriented fibers woven into a dense and elastic fabric, the thickness of which is 5-20 cm.
The composition of mineral wool is divided into the following types:
- glass;
- stone (basalt);
- slag.
Products are supplied in the form of rolls and mats.
Advantages of the material:
- environmental Safety;
- variety of shapes and sizes;
- ease of installation;
- low thermal conductivity;
- flexibility and resilience;
- fire resistance;
- good sound absorption.
Along with the pros, mineral wool has minor flaws. It is hygroscopic and absorbs moisture well. Sealed exterior finish required. When installed in the air, many microscopic fibers hazardous to health are released, which requires the use of additional measures to protect the skin, eyes and respiratory organs.
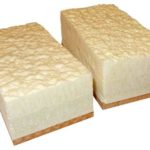
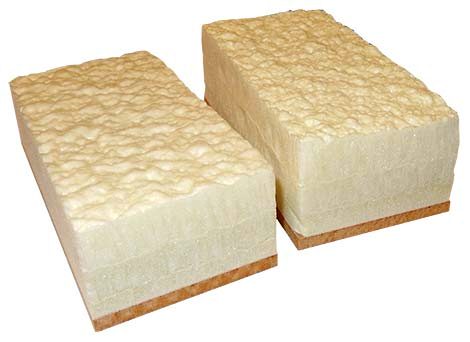
Expanded polystyrene
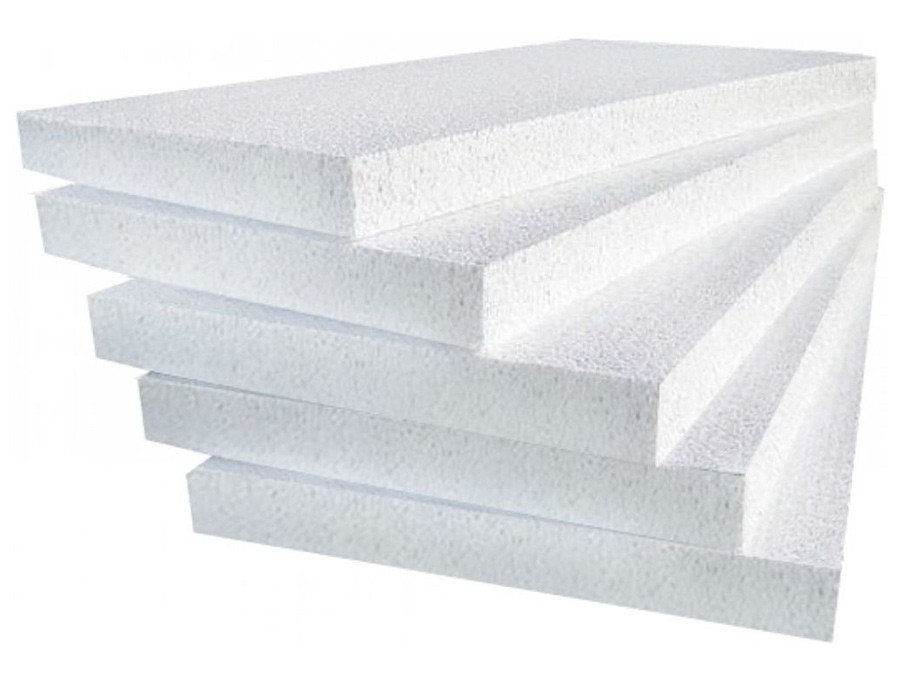
Expanded polystyrene has proven itself in private and industrial construction. Available in the form of plates 100 × 100 cm, a thickness of 50, 100 and 200 mm. The foam is low density, consists of many soldered porous balls.
Material Advantages:
- ease;
- ease of cutting;
- durability;
- affordable cost;
- water resistant.
There are also disadvantages. PP is flammable, when ignited emits toxic smoke. The insulation is unstable to ultraviolet and transmits sounds well.
Natural materials
Natural materials include:
- Expanded clay. The product of vulcanization of clay in the form of balls is characterized by light weight, environmental cleanliness and low thermal conductivity. Despite this, it is rarely used, since it has a limited shelf life due to shrinkage and loss of performance.
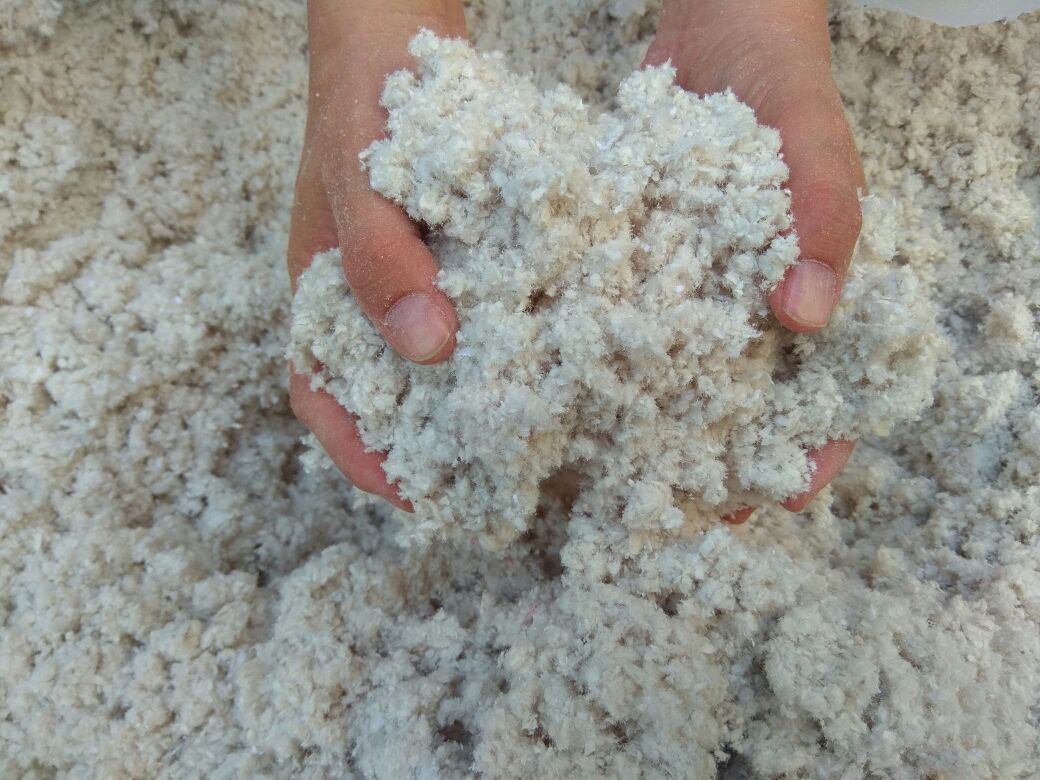
- Ecowool. It is a split cellulose bound by lignin. It is applied by hand or using a special spray. The material is completely safe and has excellent thermal insulation properties. Due to its high hygroscopicity it requires high-quality sealing.
-
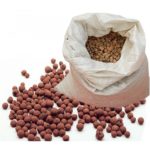
- Expanded clay

-
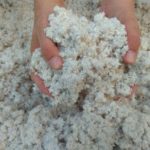
- Ecowool
For warming, you can use sawdust mixed with clay, hay and peat. However, modern heaters are much superior to them in many respects, so these substances are practically not used.
Other heaters
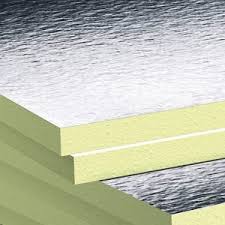
The owner of the buildings on screw piles is forced to solve the problem of isolating the supports. Foil foam foam is best suited for this. The combination of the porous layer and the metal ensures the preservation of heat inside and protection from cold from the outside. The downside is its fragility. Because of this, foam can only be used to finish surfaces in the access area.
Polyurethane foam is well established. In the process of spraying, foam penetrates into all inaccessible places, after hardening forms a dense and waterproof porous layer. The disadvantage is that it is expensive - for independent work you will have to use up a large number of spray cans.
-

- Foiled foam
-
- Polyurethane foam
Types of insulation
 When planning work on thermal insulation of a frame structure, it should be borne in mind that this must be done on both sides of the supporting structures. Various technologies may be used for this. An integrated approach allows you to achieve better results in terms of isolation and aesthetics. In this case, the pros and cons of each method must be taken into account, varying them to achieve the intended goal.
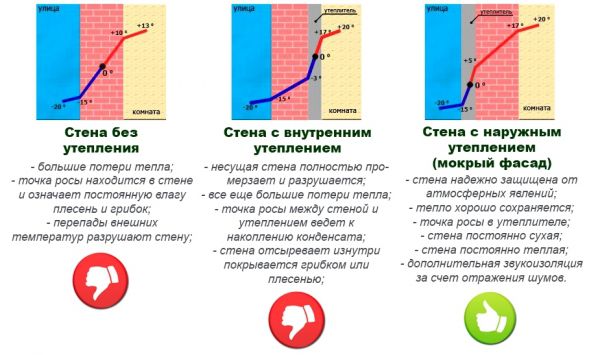
Internal
Such a decision is rarely made, since taking into account the thickness of the insulator, the volume of premises is seriously reduced. In addition, external surfaces remain unprotected from the destructive influence of natural factors. The purpose of insulation from the inside is additional sound insulation from street noise.
The only plus is the convenience of work. Performing various actions is much more convenient and safer under the roof, in warmth and without wind.
Outdoor
The advantage of insulation from the outside is that the dew point moves away from the supporting structures. Due to this, they are not affected by temperature differences, moisture and ultraviolet radiation. All this contributes to the extension of the service of knowledge and the creation of comfortable living conditions. In addition, the application of insulation and finishing on the outside can be done without any restrictions on their thickness. This is positive in terms of achieving optimal insulation and maintaining the internal volume of the rooms.
How to properly insulate the frame
When conducting thermal insulation, you need to remember that the frame structure must retain its ventilation qualities. Otherwise, it will have increased humidity, condensation, which is an excellent environment for the development of pathogens.Achieving the desired result is possible only if all the supporting structures are insulated - floor, walls, ceiling and even the roof. To work without complications, it is necessary to make a layout of materials on all external and internal surfaces. Based on it, you need to make a calculation and purchase everything you need.
Walls and partitions
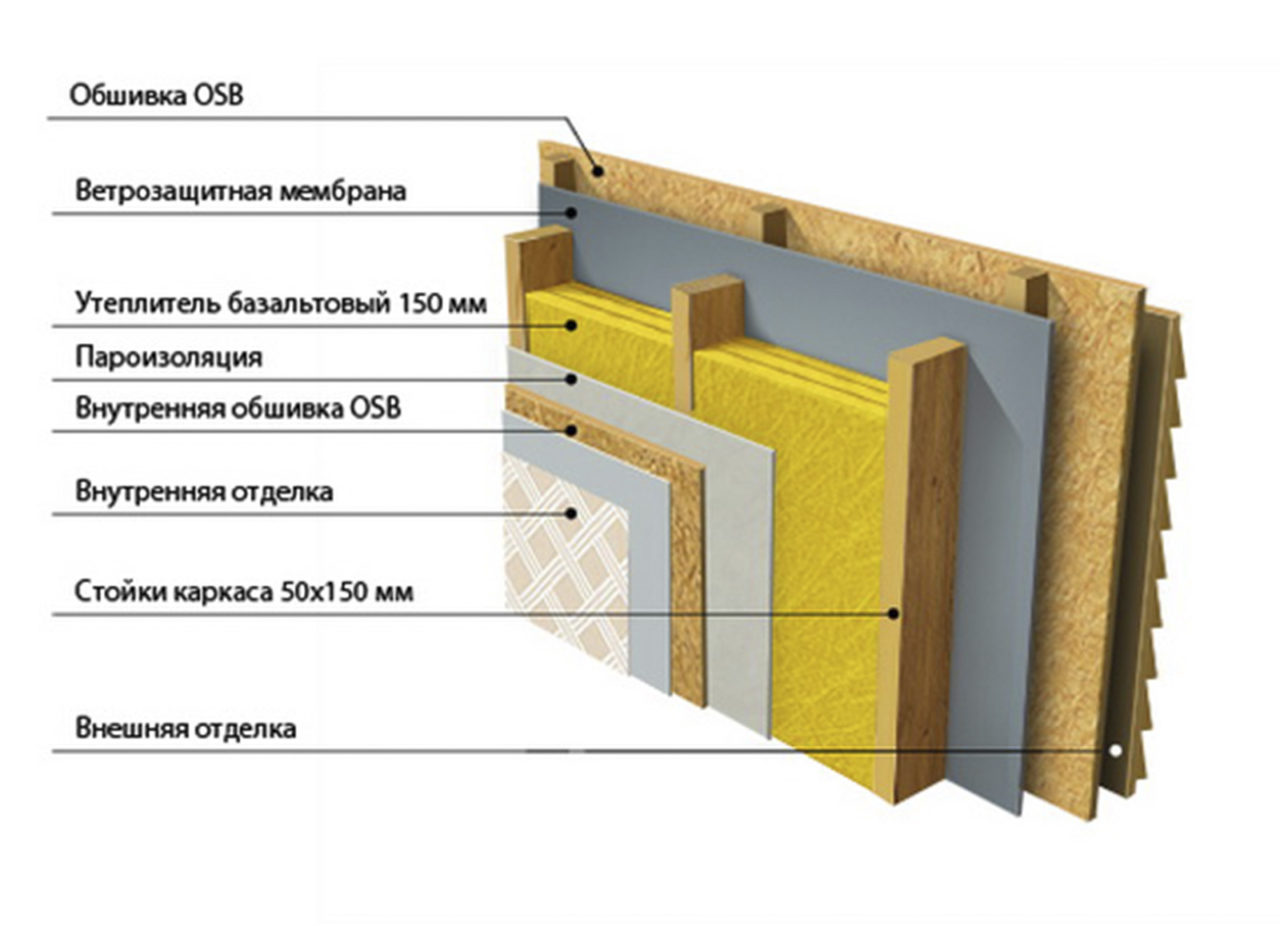
External insulation of frame walls is carried out in the following sequence:
- Insulation of the strip foundation. Foam, which is covered with facade plaster, is best suited for this.
- Waterproofing. For this, coating or film technology is used. The choice is made based on the characteristics of the building, climate and their own priorities.
- Creating a crate from a wooden beam or steel profile. The mesh size is adjusted to the insulation parameters.
- Laying and fixing heat-insulating fragments. This is done by installing them due to elasticity or on glue.
- Attaching the membrane using a household stapler. The fabric provides a one-way outlet of moisture from the house to the street.
- Closing the frame with shields. To do this, OSB boards or plywood sheets are screwed to it. Then the shields are treated with an antiseptic and a primer.
- Finishing Acrylic paint, curtain panels, wall paneling and other products that allow air to pass through are used.
Another popular and common technology is the wet facade. When using it, the walls are sheathed with a solid waterproof material, on which insulation boards are glued. Then they are covered with a paint net, facade plaster and paint. The finished surface can be given any texture and color, effectively adapting it to the surrounding landscape.
From the inside, it is better to paste over with foam, then close it with drywall or slats made of natural wood. You should choose safe materials that do not emit harmful substances.
Floors
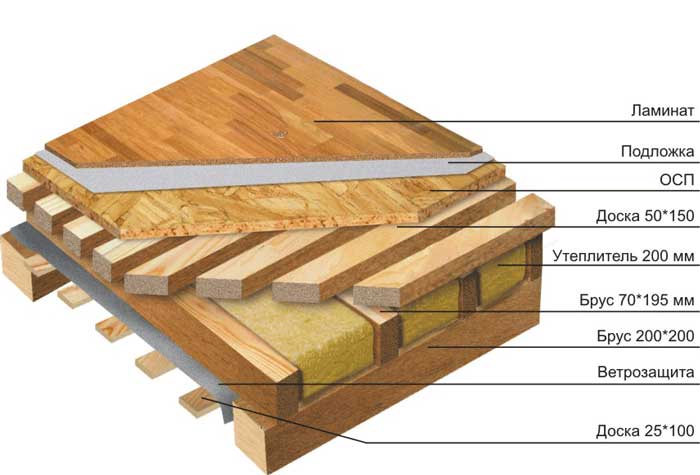
It is advisable to insulate the floor from below. This decision is justified by several reasons, the main of which is the decrease in usable space by raising the lower level. In addition, you will have to look for a floor finish, the top layer of which has the proper strength to withstand the weight of people and furniture without deformation.
Step-by-step instructions for floor insulation:
- Laying of rough boards on supporting posts. Previously they need to be treated with a hydrophobic agent and antiseptic. The remaining slots are sealed with foam, sealant or tape.
- Laying a vapor-permeable membrane film. This fabric simultaneously performs the function of waterproofing and ventilation. Fastening is carried out with brackets using a stapler. The strip overlay is done at 15-20 cm, the joints are fixed with tape.
- Create a crate. It is made of boards with a width of 20-25 cm. The distance between them is selected taking into account the width of the insulation, if it is planned to lay foam or mineral wool boards.
- Placement of thermal insulation in the cells. Depending on the material chosen, it is poured, inserted or blown into molds. If gaps remain, they are sealed with foam.
- Laying finishing boards. Their thickness is selected so as to withstand the weight of objects pressing on top.
The final step is to apply the finish flooring. It can be varnish, paint, linoleum, parquet or carpet.
Ceiling
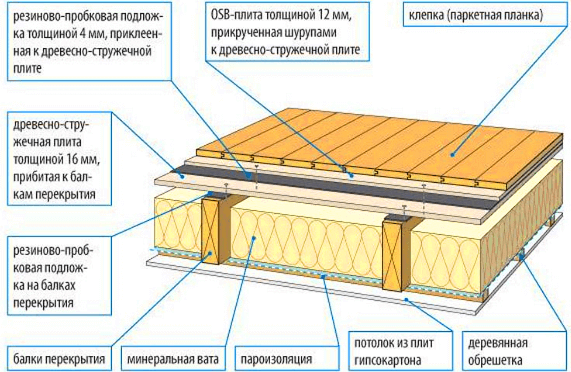
Insulation of the ceiling is best done at the end of the conclusion of the walls, until the erection of the roof.
The event is held in the following sequence:
- A vapor barrier film is nailed to the bottom beams.
- Sheets of plywood, OSB or boards are screwed over the film.
- Between the beams is a heater. Slots are sealed with one of the available sealants.
- A vapor-permeable film is stretched over the frame, the joints between the strips are sealed.
- The finishing coating is laid down and fixed - shields or boards.
If insulation is carried out during operation, this design is attached from below to the existing base.
Thermal insulation thickness
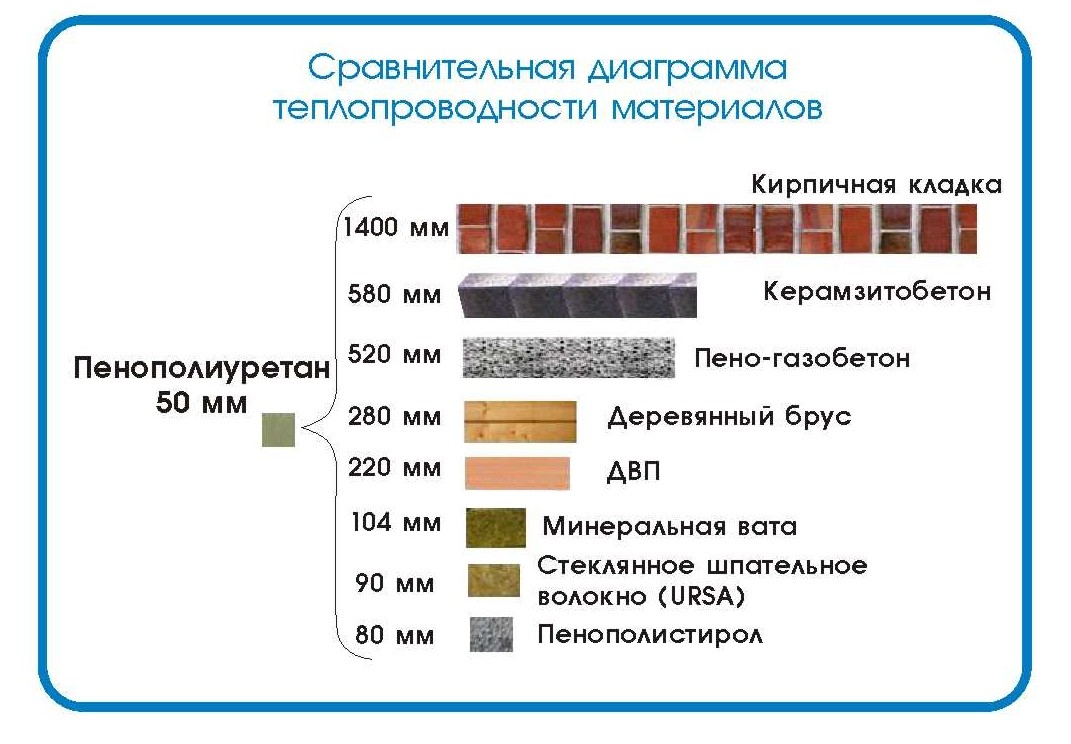 The calculation of the thickness of the insulation for the walls is carried out taking into account climatic conditions (regional factors) and the technical properties of materials. These indicators should be multiplied, the result will be the desired number.
The average value for the middle part of Russia is:
- polystyrene - 100 mm;
- mineral wool - 150 mm;
- sawdust in clay - 40 cm;
- ecowool - 100 mm;
- expanded clay - 300 mm;
- polyurethane foam - 80 mm.
These are the minimum numbers. Add to them 10-25% based on abnormal temperature fluctuations.