An old Russian stove is an effective device for heating a house in a village and cooking. The device can be assembled with your own hands, using drawings, photos, descriptions and instructions. The design is simple, but you need to consider all the nuances and features of the installation of the heating device. Furnace work must comply with the standards established by the joint venture and SNiP.
Furnace classification
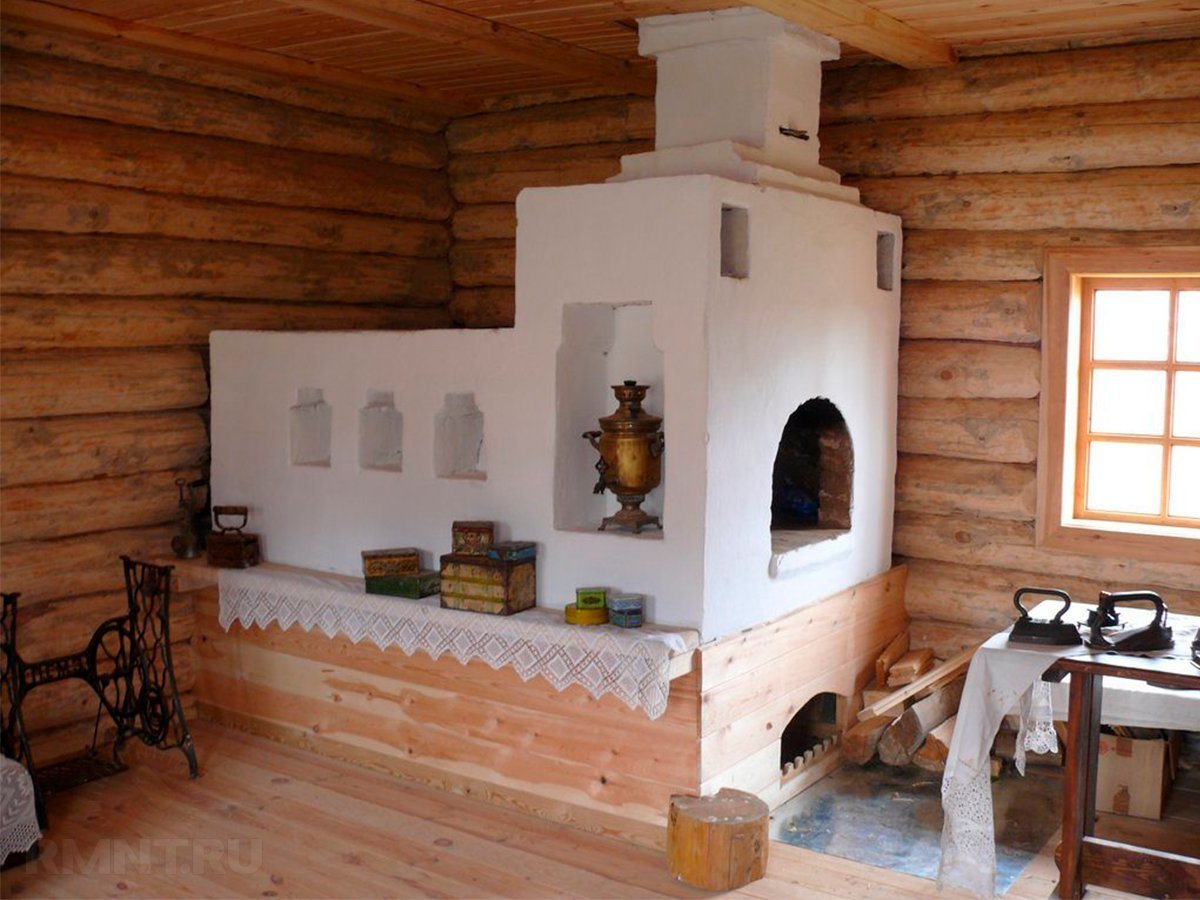
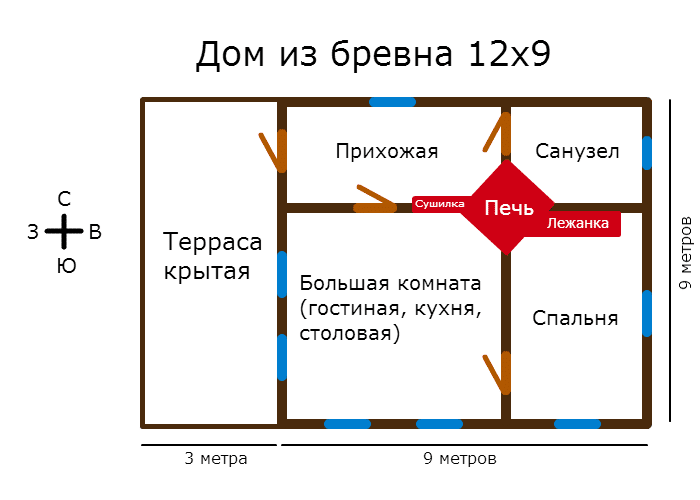
The Russian stove is a massive brick structure, which is used to heat the house and cook food. It can also have a stove bench, a stove, a fireplace.
The furnaces are classified by size, internal structure, functionality, appearance and other parameters.
In terms of size, three types of structures are distinguished:
- Big oven. This device, measuring from 1.5 × 2.3 meters with a stove bench, hob and a place to heat the liquid.
- Small oven. It has dimensions of 1.5 × 1.75 m. Suitable for installation in small kitchens, residential premises. It may have a stove and fireplace.
- Non-standard. Usually used for installation in a bathhouse.
By design, Russian stoves are divided into traditional and modern. In the traditional design there is an unheated lower part and a hollow hearth for storing wood and utensils. A modern oven is characterized by advanced functionality, heating the lower channel part. Upstairs set the hob and grill.
Varieties of Russian stoves
Modern versions of Russian stoves include a variety of designs for heating and cooking. The choice of model depends on the purpose, features of use and requirements for the device.
The classic model with a couch allows you to arrange an extra bed for up to three people. Modern models are designed for one adult or two children's places.
A stove with a stove, which is built into the structure, allows you to cook food. Often such options are accompanied by the installation of a large hob, oven and underfloor.
A model with a stove and a stove bench is suitable for a country house. The design has a large berth and a stove for cooking. The hob can be any - it all depends on the requirements of the furnace.
Mini Russian stoves without a stove bench are used in baths and small kitchens. They can have a different design, but without a plank bed and plates.
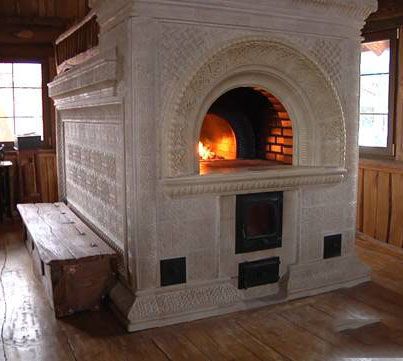
A stove with a fireplace is a more modern option for heating a summer house. Instead of an open cooking chamber, a stylish fireplace is installed, thanks to which you can heat another room through a partition. When using this option, you can not put a second profitable pipe.
Russian stove with underflooding is the oldest of the designs. It has a crucible. Products for cooking are placed in the chamber, and fuel is put through the mouth with a partition. With this option, you can simultaneously cook food and heat the room.
A barbecue device is considered a modern design option for the street. Instead of a classic hob, a grill for cooking over an open fire is installed.
Advantages and disadvantages
The advantages of the Russian stove include the following properties:
- Durability. Brick construction, subject to operating conditions, will last for decades.
- High degree of fire safety.
- Cooking takes place without direct contact with the fire.
- The oven cools slowly.
- Wide functionality of modern models.
- Low cost.It is connected with the simplicity of design and the lack of automation.
- You can build it yourself. A project of the future furnace is preliminarily created, and then laying work is carried out.
The disadvantages are as follows:
- Low efficiency (about 30%) compared to modern heating devices, in which the efficiency exceeds 90%.
- Uneconomical consumption of firewood.
- Uneven heating of the room. The difference between the upper and lower points can be 20 ° C.
- Uneven fuel burnout. Firewood in different parts of the stove burns with different strengths.
- It is impossible to observe the cooking process.
After studying the positive and negative qualities of the Russian stove, you can decide whether to make it in the house or not.
Self assembly
To assemble the device with your own hands, you need to know the device of the Russian stove. You need to fold the heater out of bricks and other durable materials with high resistance to burning.
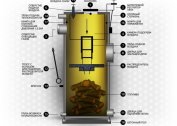
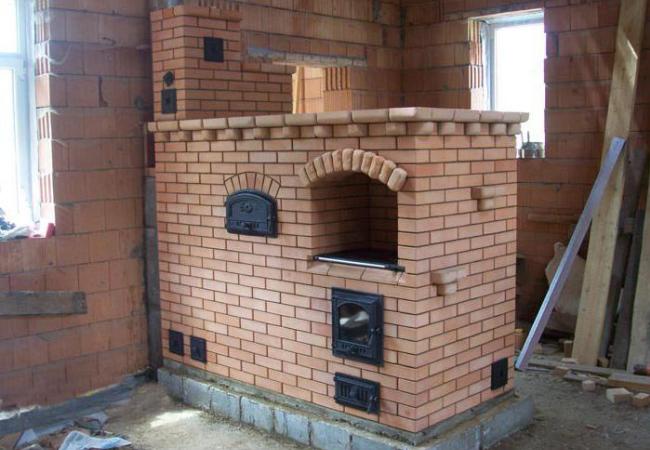
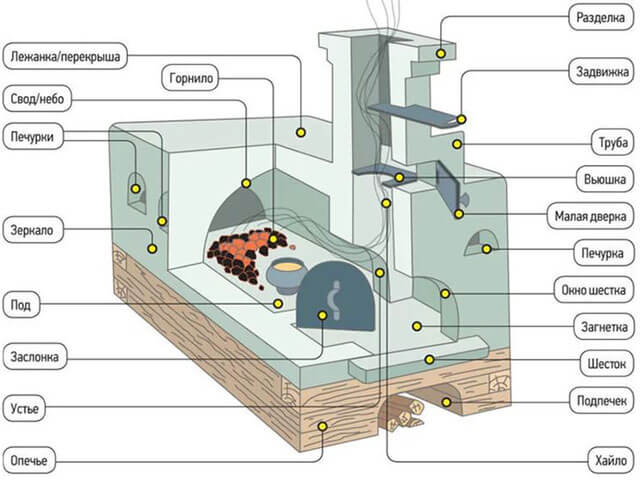
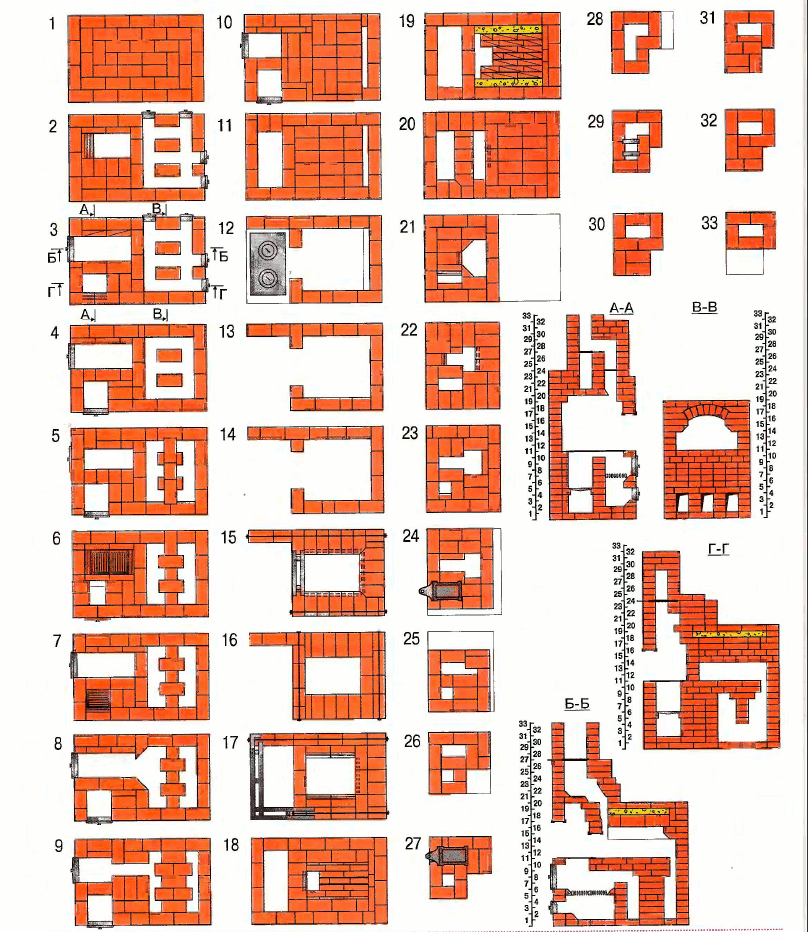
The main element is the crucible. This is a firebox, consisting of a vault and a hearth from below. Firewood is laid under it and dishes are placed with food for cooking. The opening in the crucible is the mouth. In the back wall there is also an opening, which is called the window of the hearth. They form a space between themselves - a hearth in which hot food is placed to maintain temperature. The sixth part includes a retube where smoke is collected, and above it is a hail, which is covered with a view. It limits the penetration of cold air masses into the stove. The overtube is closed with a special valve, due to which the draft in the chimney is regulated. There is a compartment for storing utensils under the hearth. Also in the lower part there is a subfire in which you can store firewood.
After getting acquainted with the design of a rustic Russian stove, preparatory and then installation work begins. The DIY assembly algorithm for the Russian stove with drawings is presented as a step-by-step instruction.
Brick selection
The selection of materials for the furnace is an important task, since they must comply with fire safety rules. For this reason, each structural element is made of its own material. Clay bricks are used for laying the stove and chimney. For the hearth and arch - refractory or refractory bricks. The facing material is plaster, tiles, natural stone. For fireproof insulation, clay brick, asbestos board, asbestos cement slabs and other refractory materials are chosen.
To create a chimney pipe, a mortar based on cement or sand and lime is used. You can knead it yourself or buy the finished mixture in the store.
When buying, it is important to monitor the quality of materials. The brick must have exact dimensions, a surface without chips and foreign inclusions. Clay is better to choose red. The sand is bought fine-grained with particle sizes of not more than 1.5 mm.
Tools
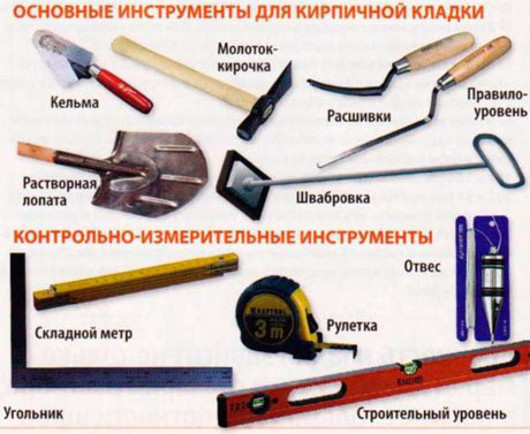 The wizard should have the following set of tools:
- ruler;
- pencil;
- Master OK;
- level;
- plumb line;
- pickaxe;
- rubber mallet;
- Bulgarian;
- bucket for solution;
- mixer in case of self-mixing the mixture;
All tools can be bought at a hardware store.
Choosing a place for the stove
Before starting work, you must select the installation location of the furnace. The following factors are taken into account:
- Foundation. It can be created separately under the stove and be ready. Be sure to make a waterproofing layer to increase the service life and performance.
- Free passage of chimney floors. Pipes must not damage or touch existing load-bearing structures.
- Convenience of location. The user should easily approach the furnace and use it for its intended purpose.
- Compliance with fire distances. A sheet of metal 700 × 500 mm is placed in front of the sixth window. There must be a distance from the furnace to the wall to be burned equal to the height of the furnace. There should be a minimum of 125 cm from the sixth to the opposite wall.Metal beams near the chimney should be removed 130 mm at least from the inner surface.
Following these guidelines will help you choose the best place for a Russian stove.
Step-by-step instructions for building a furnace
Work on creating a heating device is best done in warm weather. If the installation is carried out in the cold season, you need to monitor the temperature of the materials - it should not exceed 5 ° C.
Algorithm for laying a Russian stove or coarse:
- Two rows of bricks are laid on the foundation. Between them there should be a layer of waterproofing.
- Clay brick is wetted with water. The first row begins with the level of a clean floor. It is laid out with solid brick blocks. Seam thickness - up to 5 mm. All masonry is checked by the building level.
- Laying the second row. It is necessary to leave a gap for the ward. After laying the second row, the verticality of the surface is controlled using a plumb line.
- Between 3 and 4 next is a dressing in the corners. The fourth row is laid with solid bricks.
- After the fifth row, the calculation is made on the prepared wooden formwork for the arch of the underfloor. In the eighth row is the last row of a set of hewn bricks.
- Walling in one brick with transportation up to 10 rows.
- In the 12th row is created under. It is made of refractory bricks. Gaps are filled with sand.
- Stacking the furnace. Seams should be no thicker than 3 mm. First, they are laid on a rib along the inner perimeter. After the 16th row, the fornix arch is laid out.
- Laying the window of the hearth. It should look like an arch.
- When creating the 20th row, the walls of the furnace are erected with a decrease in the space above the sixth.
- In the 22nd row fit the channel of the samovar.
- 23 row - make a place for the accumulation of soot.
- 25 row is laid similarly to 10 with dressing of sutures. An overtube is formed above the sixth.
- 29 row - the connection of the samovar channel with the annulus.
- In row 32, the overtube is covered with solid brick. It is necessary to leave one hole, which is then closed by a valve.
- Chimney masonry.
5-6 days after the solution has completely dried, wooden formwork can be removed. Assembled stove can be used.