One of the varieties of space heating is the “Warm Floor” system, which allows the owner to save the necessary microclimate in the rooms. At the same time, he can set the required temperature with his own hands. Each of these systems is equipped with a special device through which such adjustment is carried out - a floor heating sensor.
Principle of operation
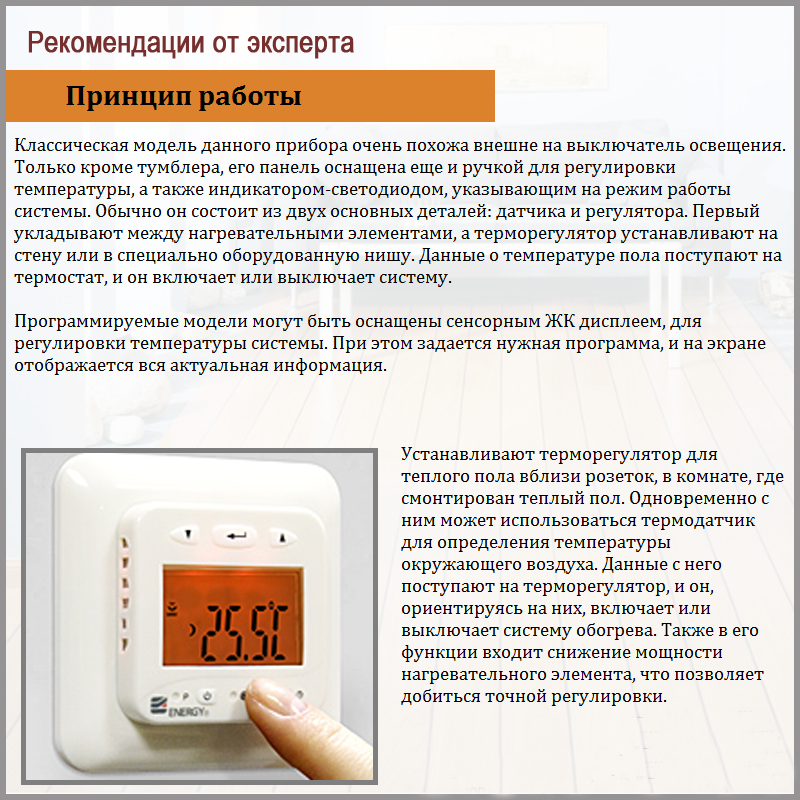
The guarantee of the correct functioning of the temperature controller is provided by a thermostat and a temperature sensor. The principle of operation is to fix the floor sensor or the air in the room with a temperature sensor, after which the electricity supply is blocked by the thermostat. After lowering the temperature to the set value, the system switches back on for heating. Thanks to such cycles, energy is saved, and the temperature set in the room is constantly maintained.
Features and Benefits
The floor heating system, in addition to the thermostat itself, includes a specialized floor sensor, or rather temperature. Installation of the second device is carried out using a plastic corrugation. This appliance is placed directly in the floor screed.
The latest generation thermostats have the ability to program, which is extremely profitable and convenient. For example, the landlord can set up the device in such a way that if it is absent, the underfloor heating will work in energy-saving mode, and for the time set before the owner arrives, the system will automatically switch to full heating, ensuring a comfortable temperature in the house.
The cost of programmable controllers is higher than devices without such a function. However, due to the efficiency in energy consumption, the difference in cost will be compensated for a maximum of 3 heating seasons.
Types of temperature sensors for underfloor heating
There are several types of thermal sensors, here are the main ones:
- With the energy saving mode - they allow to lower the temperature in the room by the set number of degrees for a certain period when the owners of the house are absent.
- With programming timer - temperature control is carried out using a pre-set timer. It sends signals to the temperature controller, adjusting the heating power at a specific time.
- Intelligently programmable - the display of the device allows you to set the alternation of the set heating modes.
- With a limit sensor - allows you to set the minimum and maximum heating power at a set ambient temperature.
Each of the above sensors allows you to protect yourself from potential overheating, which can harm the integrity of the floor screed.
Functions and selection of thermostat
 When choosing a temperature sensor for a warm floor, it is necessary to take into account such characteristics:
- Technical parameters: mechanical, electronic or electronic with the possibility of programming. The water sensor can be built-in type or remote.
- Device power - it is better to choose a thermostat with a little more power than is required for the system so that it does not experience maximum load.
- Mounting method - laid on, built-in or for connection from a DIN rail.
- Stylistics - the regulator can be of various colors and shapes (square, circle).
- Number of channels: single-channel or dual-zone.
- Type of control - can be mechanical, electronic or touch.
The most common are built-in single-channel thermostats. They will be the ideal option for apartments.
Advantages and disadvantages
Thermostats for floor heating are a necessary and irreplaceable thing. Their relevance is explained by a whole set of advantages:
- loyal value;
- simplicity in management;
- profitability in electricity consumption;
- easy installation;
- high level of ergonomics;
- turning on / off the heating system in automatic mode;
- reliability and durability;
- the ability to make settings in the device’s memory.
The thermostat practically has no minuses. Its main drawback is the complexity of primary programming. But this is not so critical, because the temperature settings are entered into the device once.
Selecting a floor sensor depending on the floor covering
Under each type of flooring, a separate type of sensor is installed.
The device is of the following types:
- Mounted under the cover of soft types: carpet, linoleum. The sensor in this installation is represented by a small cylinder, which is mounted at the end of the cable. It is installed only after the concrete screed is completely dry. A narrow groove is made in the finished screed for the sensor.
- Mounted under a hard-type coating - the sensor here is larger, covered with a gel shell, which protects the device from mechanical damage.
Sensors in the gel shell are the most reliable because they withstand high loads. They are ideal for laying under laminate and parquet.
Mounting the temperature controller and sensor
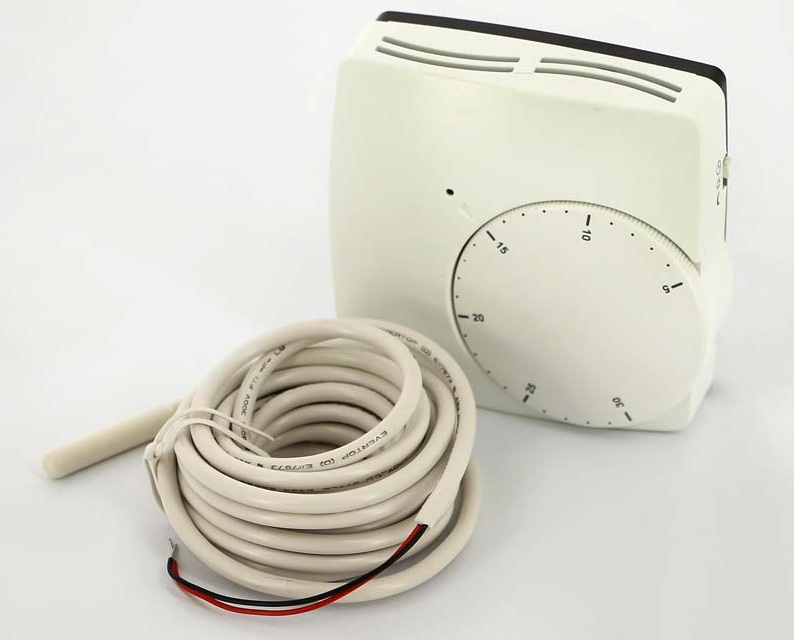
 Almost every heated floor comes with a thermostat. Otherwise, it must be selected individually. The power of such devices, as a rule, ranges from 3-3.5 kW.
If the heated area is large, the electric underfloor heating is mounted in separate units, each of which has its own control system.
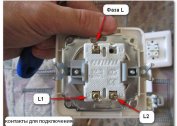
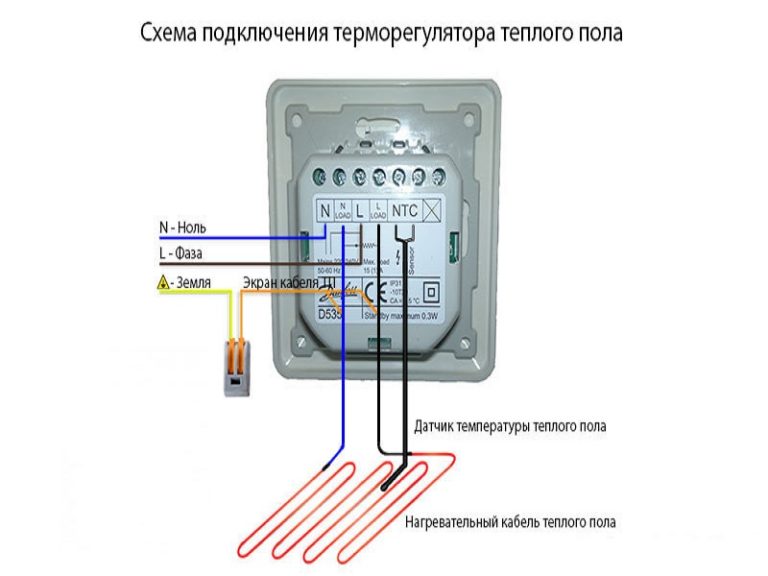
Before installing and connecting the thermostat, it is mandatory to disconnect the room.
Installation Scheme:
- A hole is made in the wall for the mounting box into which the thermostat will be installed. Below is a strobe for laying wiring. The box is mounted on a regular place.
- Wiring is being carried out. Power cables and temperature sensor wires are connected to the mounting box.
- The temperature controller is mounted in a box and is securely fixed, it is connected to the wiring.
- The main nodes of the system must be connected in accordance with the instructions attached to the device.
- At the end, the front panel is installed and fixed with screws. It is necessary to install it by level.
You can install a temperature controller with a sensor yourself. The main thing is to strictly adhere to the attached instructions.
Temperature Sensor Replacement
The cause of the temperature sensor malfunction can be checked using a tester. He discovers two reasons, both related to problems in contacts - he either is, or he is not, where he should be.
First, an input wiring test is performed. You need to connect power and check for voltage in the wiring. If the problem is not identified, the test is conducted on the output wiring. The heat circuit is disconnected from the controller when the power is on. If there is no voltage on the wiring, this means that the temperature sensor has failed. The old sensor for the warm floor is dismantled, and a new one is installed in its place.
Application and operation
 Basic rules for the use of underfloor heating sensors:
- the device must be mounted on the internal walls;
- installation height should not exceed 1 m;
- direct sunlight should not fall on the thermostat;
- Do not install the device near the door;
- the temperature regulator should not be covered with curtains or curtains.
Subject to the rules of operation, the underfloor heating will last for at least 10 years. Unqualified actions during installation and further operation can reduce this period by half.
Precautionary measures
The main safety measures are as follows:
- Before connecting the device, it is necessary to disconnect the room.
- The disassembled device must not be connected to the mains.
- The regulator cannot be used if the ambient temperature exceeds +40 degrees.
- The thermostat must be cleaned regularly of dust.
- It is strictly forbidden to wash the device with solvents.
A person who is far from an electrician, it is better not to perform the installation or repair of the thermostat yourself. So you can turn off the entire high-rise building, but also harm your own health.
How to be if the sensor is not installed
It is possible to use a warm floor in the absence of a temperature sensor, but this is extremely risky - the floor covering can collapse. The problem is solved by several methods. The system can be equipped with an air sensor, but it is only suitable for cable type systems. In this case, the power of the heating circuit should not be more than 170 W / m2.