Connecting a 2-key switch is necessary if you want to control two light sources from the same power point. An additional advantage is the ability to adjust the brightness and illumination of the lamp in a classic and simple way. However, installation and adjustment requires certain knowledge and skills. In order not to make a mistake with the connection diagram, you need to familiarize yourself with the general points and recommendations of the masters.
Design and principle of operation of the two-gang switch
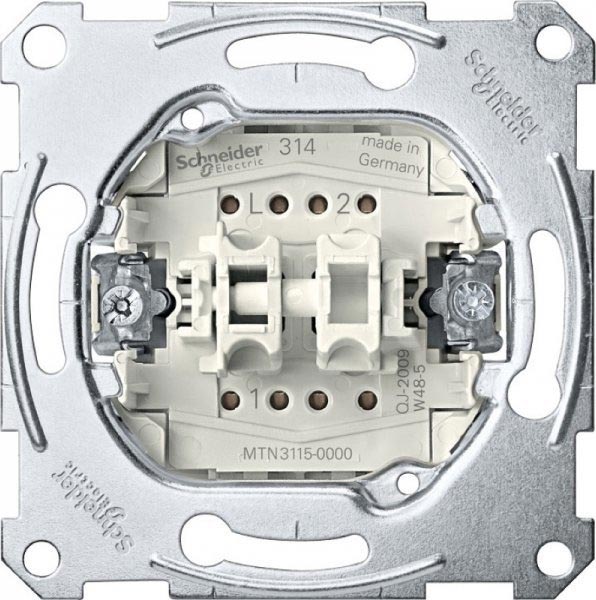
Switches and switches have a simple structure and a small number of parts. The main elements are:
- buttons (up / down switching elements);
- case - an external panel, is removed before starting work;
- terminals - contacts that connect to the wiring harness.
The latter can be screw clamping (depending on the design). Screw terminals are looped or directly connected. Such reliably hold the end of the cable, for a long time they do not weaken and do not fail. The recommendation of the installers is to check and tighten the terminals once every six months.
Modern devices are complemented by new details - backlight, adapters, surge protection and others. These elements are optional, designed to increase the level of convenience.
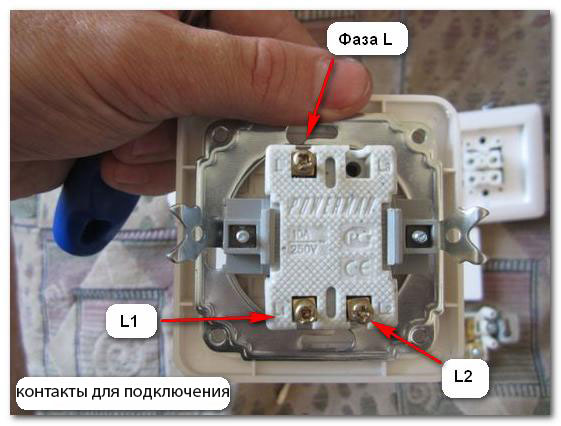
The light switch with two keys is connected via three wires - two parallel wires (usually connected from above), one phase from below. Some dual devices consist of two separate switches under one enclosure, these are called modular (have more wires).
If you need to control several lamps with one device, use stranded wires. A model with two buttons allows you to work with such cables.
The principle of action is as follows:
- inclusion of one key - glow of one lamp or group;
- when you connect the second - the level of illumination changes (relevant for multi-tube schemes);
- while turning on - the light comes on at full power.
Pushbutton switches with two modes allow you to save energy, reducing lighting if necessary. The overall level of room safety is also increased - mechanisms reduce the number of power points, which reduces the likelihood of short circuits and fires.
Safety precautions
Work with electricity and networks are classified as the most dangerous. If the requirements are not met, a current shock can be obtained - the consequences depend on the voltage level and individual characteristics (to a lesser extent). Basic rules (common to all types of actions with wires):
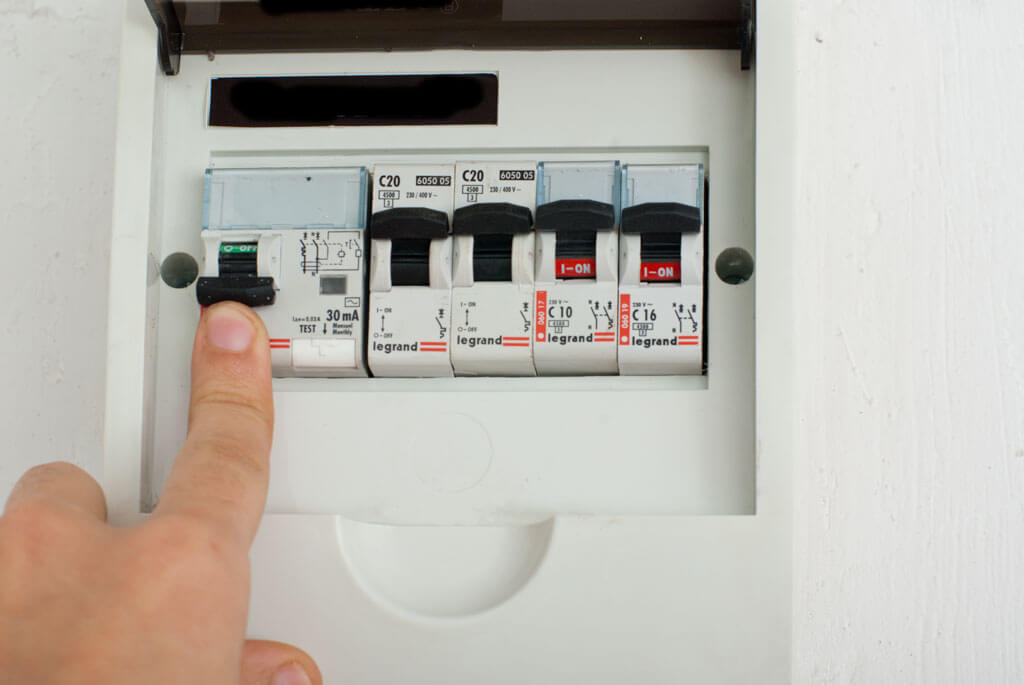
- blackout of the site - the first and most important point;
- checking the wires for voltage - before directly connecting the cable is tested with special devices (an ohmmeter and the like, can be assembled at home from improvised materials);
- use of additional protection - dielectric gloves, tools with rubberized handles, similar;
- study of instructions for devices, recommendations of masters;
- the exclusion of any contact with water (e.g. wet surfaces, puddles on the floor).
Failure to comply with the minimum set of safety requirements will lead to irreversible consequences (in some cases - fatal).
Preparation for installation
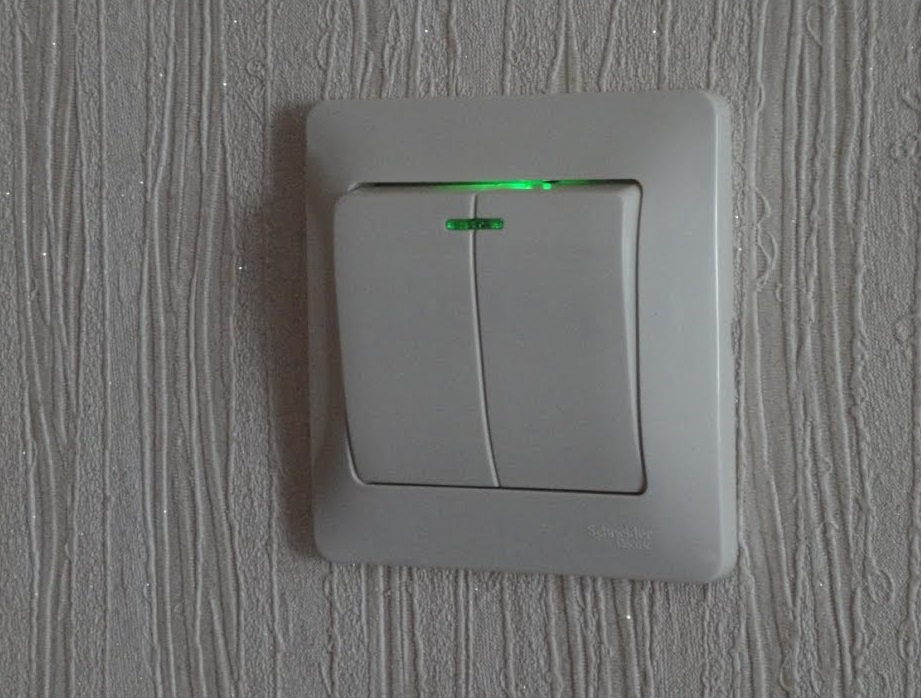
Standard devices today complement the backlight and indicators. The first one allows you to find the switch in the dark, the second shows that the network is closed and operational. Separate models are supplemented with moisture-proof and resistant to mechanical damage cases. Such can be installed in the bathhouse, bathroom and other rooms with high humidity (including on the street).
One more type is through switches (another name is switches). Devices allow you to work with one group of fixtures at opposite ends of the premises. Actual use in long corridors, bedrooms.
Features of choosing a place to install
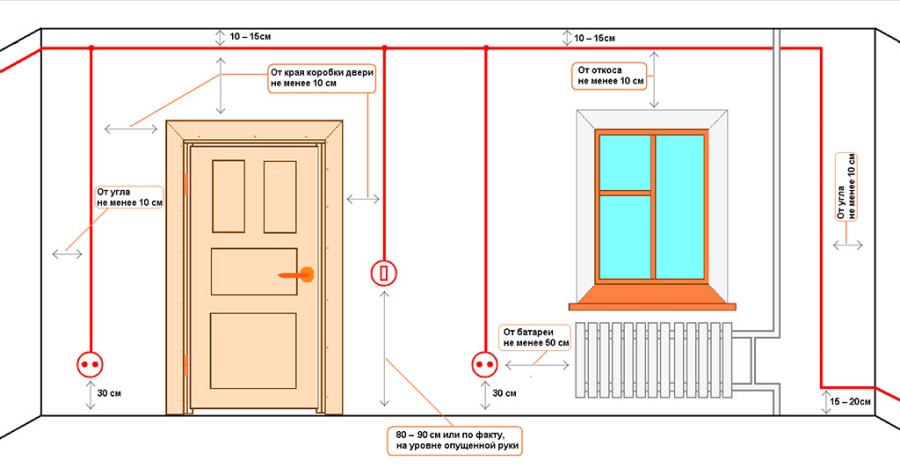
Specific requirements and stringent restrictions are not provided by law. The requirements enshrined by GOSTs, TU and PUE (electrical installation rules) are, in most cases, advisory in nature and relate to general safety, convenience and security. For example, the height is selected taking into account the average growth of users. The age of the children and the possibility of their access to food outlets are also taken into account.
20-30 years ago, it was customary to install switches at a height of about two meters, today - at the level of the location of the hand. In this case, the device becomes available to each user of the room.
Clear rules apply to rooms with high humidity and the presence of powerful electric heaters. For example, you cannot place the switch near an open shower or stove - in these cases, direct contact with water and excessive heating of the elements is possible.
Preparing for installation
To connect a switch with two keys, it is not necessary to invite an electrician. The procedure is considered one of the simplest in electrics, so you can connect the device to the wiring yourself. First of all, it is necessary:
- familiarize yourself with safety requirements and take appropriate steps;
- understand the marking, designations on the wires and the case of the switch;
- check wiring and materials for compliance (voltage level, conductivity, size, others).
After that, the tools are assembled. Standard set: knife for mounting, insulation tape, hammer, pliers, screwdrivers (indicator for checking the voltage in the network and curly). If the switch is internal and there is no corresponding socket, you will need to grind or cut it (depending on the wall material).
Defining wire parameters
 Without confidence in the cable marking, it is forbidden to proceed with the installation of the circuit breaker. Incorrect connection will lead to system shutdown, contact burnout and in rare cases to more serious problems. Such a mechanism will not work.
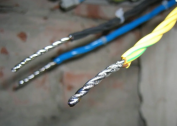
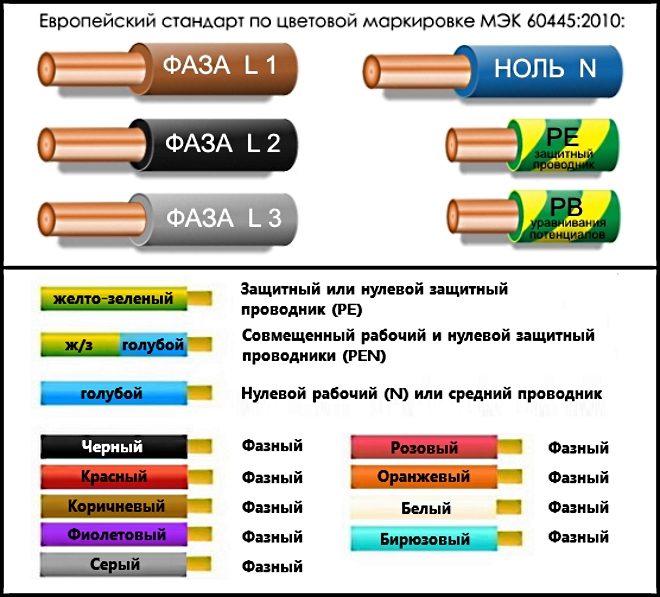
Color coding:
- neutral wire - blue (always);
- protective - green with yellow (always);
- phase - red or brown (in most cases).
Manufacturers do not always follow the indicated combinations. Therefore, it is important to learn to "read" the markings in letters and numbers. If during the purchase it turns out that there are no symbolic signs, it is necessary to consult with the seller, look at the packaging. After this, the wires are marked on their own. For example, a multi-colored thermoshrinkable tube.
Identification of conductors with a multimeter
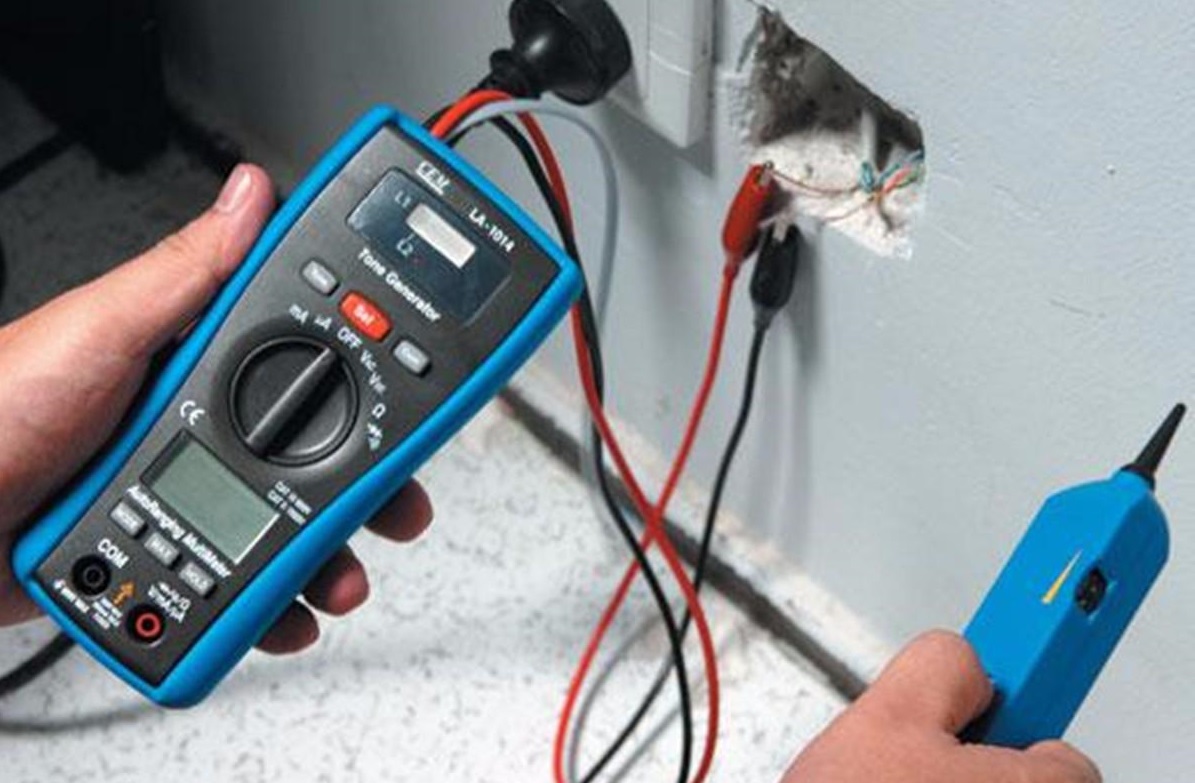
The need for additional verification is due to several factors. Firstly, standards and designations of characteristics changed quite often, so there may be confusion. Secondly, some manufacturers deliberately go for all sorts of tricks (in order to reduce production costs or increase the cost of the product).
To verify the correctness of the selected wires, use a multimeter and a screwdriver for indication. For single-phase networks, an indicator is suitable that will help determine the phase and neutral cables. After turning off the power, it is necessary to strip the ends (remove the insulation coating).
It is important that the stripped wires do not touch each other, otherwise a short circuit or even fire will occur during the test.
After that, the power is connected, one of the wires is touched by a screwdriver. If the light comes on, the cable is phase, otherwise it is zero. For networks that are equipped with grounding, you will need a multimeter. The voltage value is set (household in apartments - 220 Volts), one probe is connected to the phase, the second is brought to one of the remaining ones. Neutral will show a figure within 220V, grounding - a lower value.
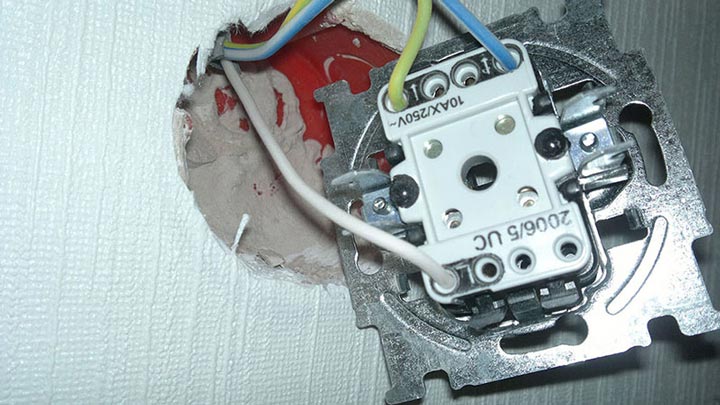
Installation of an electric switch
First remove the keys and the external protective panel. Use a thin knife (special or ordinary), carefully pry the first key, then the next, then the decorative cover. In some models, the parts are unscrewed. The internal mechanism is mounted on clamping or screw elements.
The last step is to disconnect the conductors from the de-energized network, if necessary, dismantle the socket.
Wiring Options
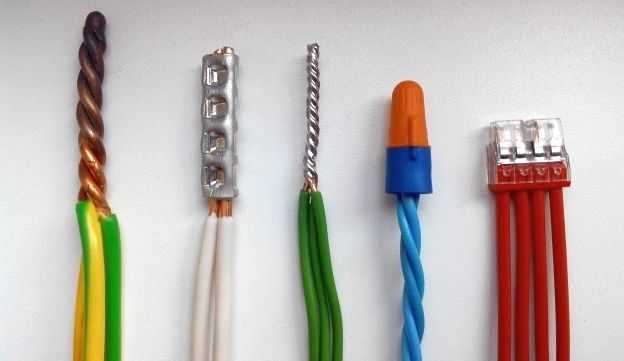
Places where cables are interconnected are the weakest in the circuit. In these areas, most of the problems occur. Basic fixing methods:
- manual twisting - often used, you need to additionally isolate;
- terminal block - a mechanism connecting wires;
- adhesion is a rarely used method, special equipment and certain skills are required, the adhesion is reliable, but the complexity does not allow the method to be used often.
Heat shrink tubing helps insulate connections and hold them together more.
Connection diagram and procedure
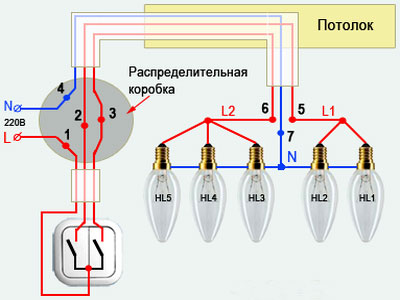
If wiring is installed in the room, the wiring diagram for the two-gang switch is quite simple. A two-core cable is drawn from the main shield. The circuit is fixed by a transformer through which the neutral conductor is drawn. The main disadvantage is the low degree of security.
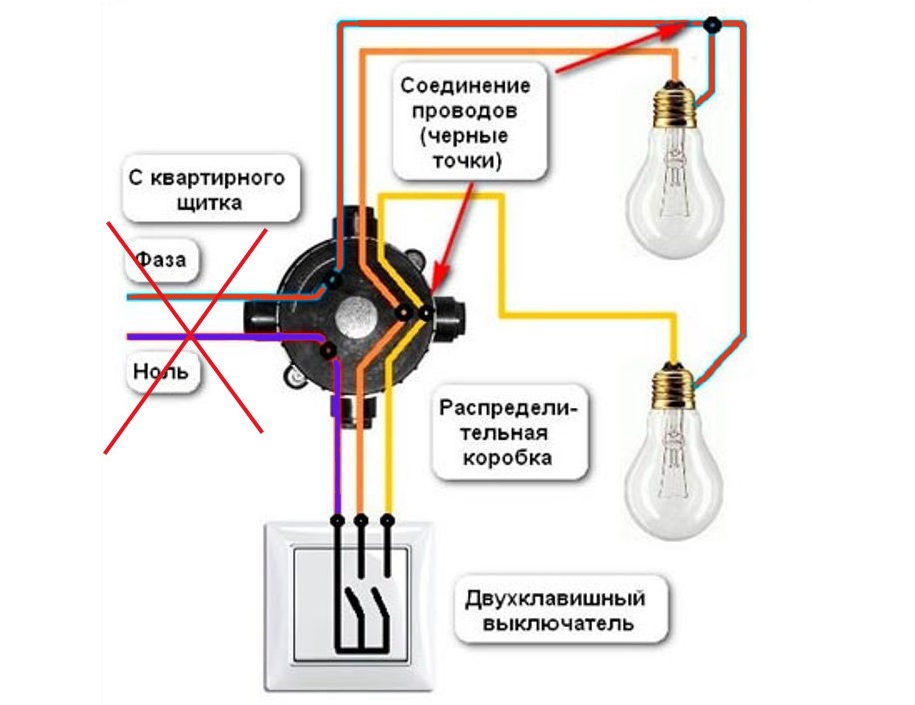
In the general case of the circuit breaker, a single phase cable is connected to the main terminal (L), wound to the fasteners and fixed with screws or clamps. The remaining ones are connected to separate microcontacts, then to the distribution box and lamps. If there are more than one lighting fixtures, the connection between them is carried out in series.
To the two-button switches from the shield, a phase cable is fed. If you connect a zero instead, even a simple change of the bulb will become dangerous.
Installation of connections in the electrical box
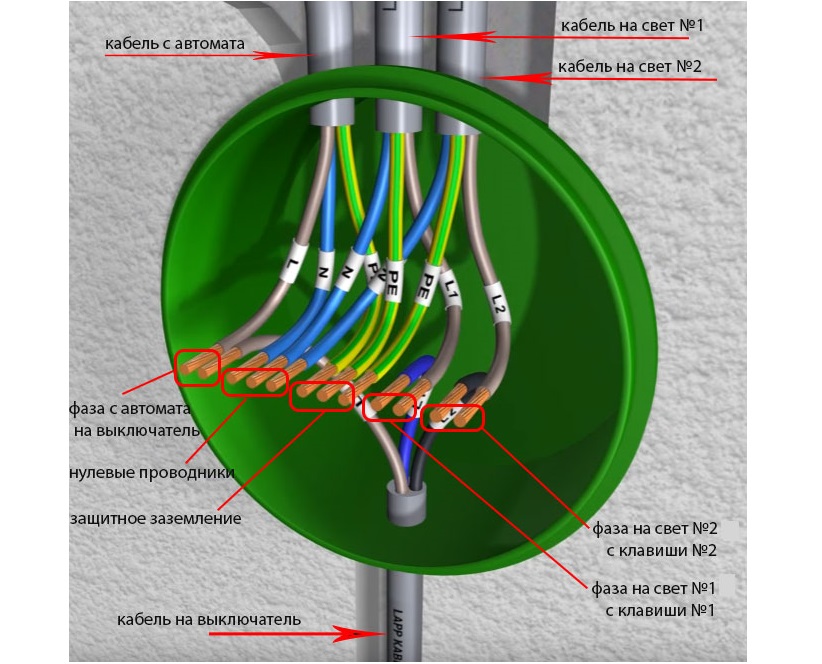
Certain wires are brought to the junction box or junction box: power from the shield, cable to the switch, conductors to the lamps. To avoid errors, you must follow a certain sequence:
- zero - do not lead into the switch, lay directly to the bulbs;
- protective or grounding - not always available;
- phase.
Two circuits are connected separately from each other to get independent control.
Connection on a chandelier or lamp
With this connection, terminal elements are more often used. The wires are connected in accordance with the color coding. Factory mechanisms have the correct color designation. In this case, the grounding wire can be fixed to the terminal or directly under the screw on the fixture panel.
Connection errors
The most common problem for laymen is to set the circuit breaker to zero, not phase. The device must break the phase connection, there can be no other options. If you do the opposite, the voltage will always be on the chandelier or lamp. Therefore, it will be possible to get an electric shock even with a conventional bulb replacement.
An additional nuance is the glow of the indicator when checking the neutral wire. It occurs mainly due to the backlight of the switch. A small amount of current in this case still passes through a special device due to the backlight contacts. This is the main cause of flickering of LED bulbs when turned off. It is necessary to turn off the additional backlight and flicker disappears.
Another serious mistake is the institution of the power cable to the outgoing contact, and not to the main one. In this situation, the connection scheme of the two-key switch will be violated - the lamps will light up only when both keys are turned on. The device must be disassembled, disconnected and connected correctly.
To connect a two-gang switch, it is necessary to familiarize yourself with the general points and strictly observe safety requirements when working with electricity. A beginner can deal with the details. Inviting a wizard is optional. Before buying, you should decide on the network settings.