You can do the piping in a private house with your own hands from a centralized network or from a well, well. The principles of arrangement, the main nodes of the highway do not actually have differences.
Types and arrangement of water supply systems in a private house
 There are two methods for bringing water to points of use. The selection of the wiring diagram depends on the network parameters, as well as on how intense the water consumption will be.
Serial or tee connection
A water supply scheme of this type in a private house implies that the faucet, shower and other points are connected one after another.
Advantages of such a solution:
- ease of installation - no special knowledge is required when connecting additional elements;
- low cost - half the pipe lengths are used;
- compactness - tees are mounted directly near the water outlets.
However, there are also disadvantages. If all consumers are turned on at the same time, a significant drop in pressure in the water supply network occurs. Connecting a new user is problematic. It will take one more tee.
Collector or parallel connection
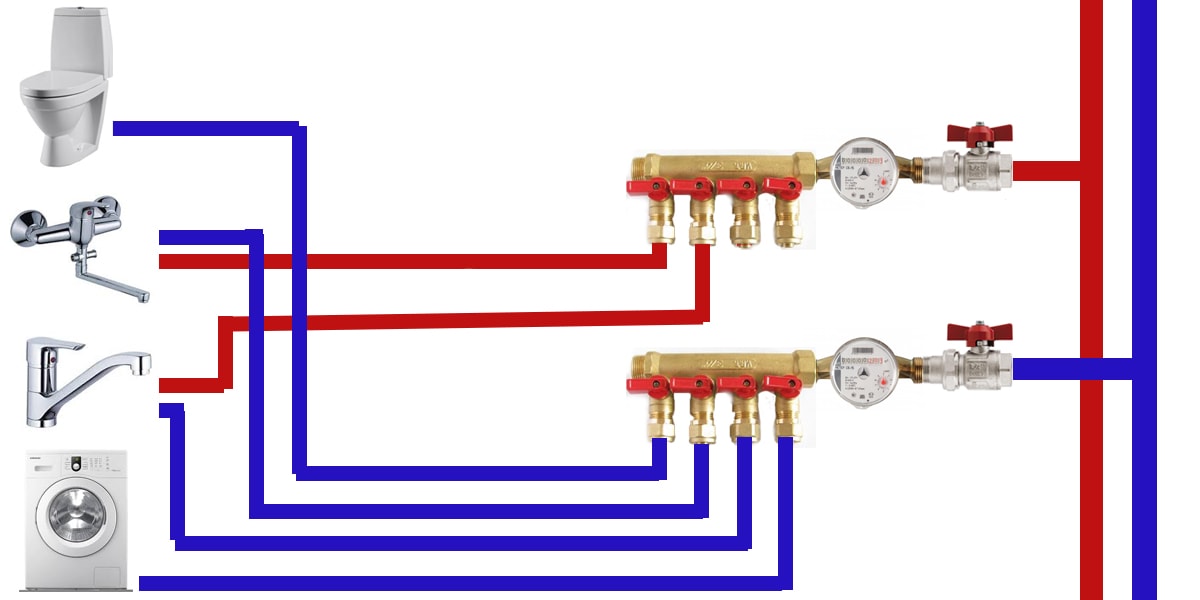
It represents the installation of a splitter or two - for hot and cold water supply, to which branches connecting to each consumer are connected. To make an eyeliner of such a plan, a larger footage is required, but at the same time its principle of operation helps to maintain a constant pressure.
Advantages of the collector system:
- convenience - all nodal points are in one place;
- reliability - one pipe is supplied to each consumer, which significantly reduces the possibility of leaks;
- pressure stability - the manifold evenly distributes the pressure between all users, so even if you open all the taps at once, the pressure in the system will not drop.
The disadvantages include the high cost due to increased consumption of materials and the need to allocate space for installation and connection of collectors.
Water supply principle
The water supply is installed by a dead end, circulating or combined method. “Blind” branches ending with a stub are more economical, but inconvenience arises with hot water supply. When opening the tap, you need to wait a while until the water reaches a dead end.
Closed circulating branches are more practical and convenient, but for the implementation of such a project not only more pipe sections will be needed, but also a special pump.
The best option is the combined type - dead-end wiring of cold water supply is combined with a hot circulation circuit.
Automatic water supply equipment
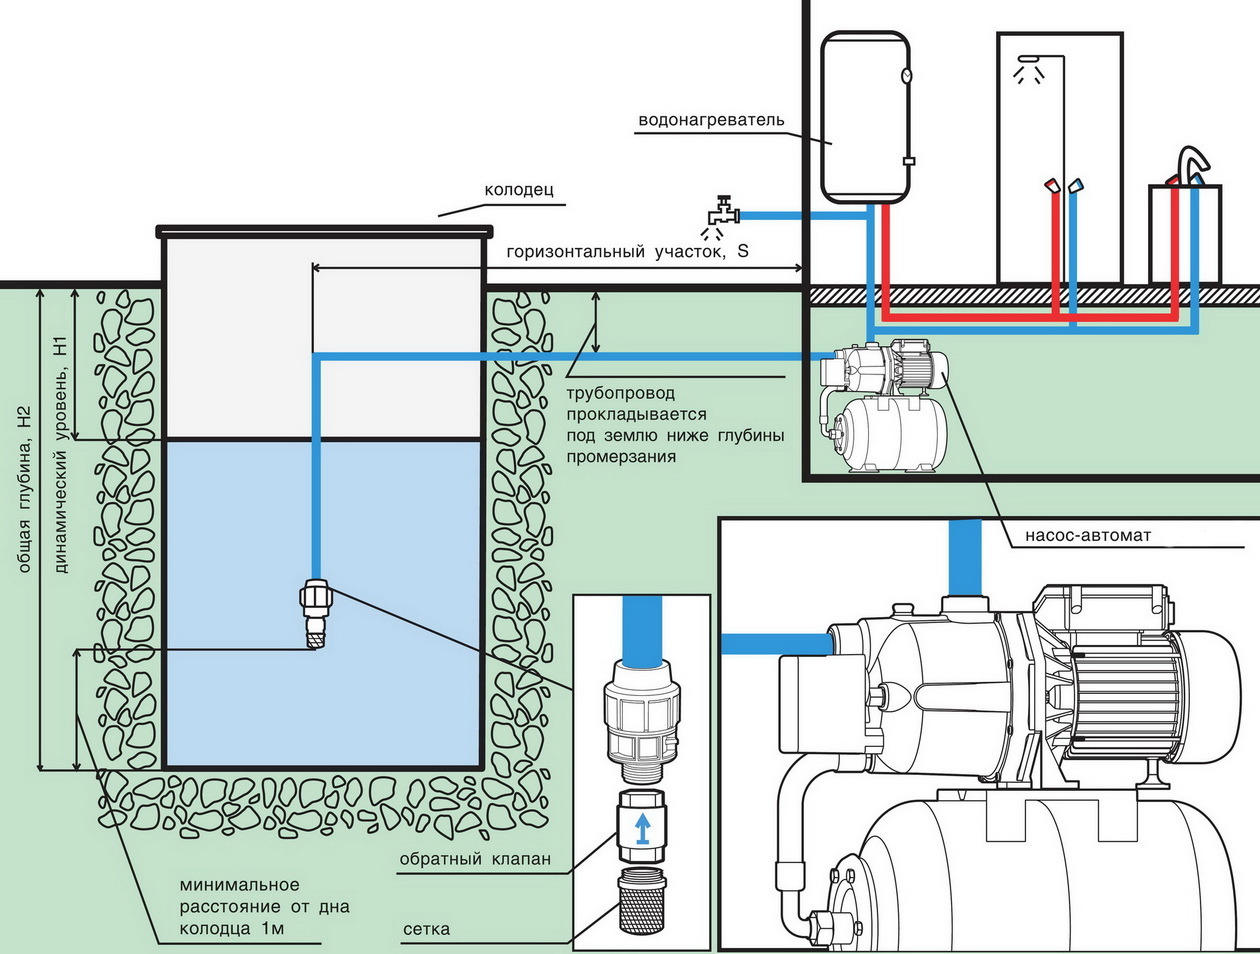
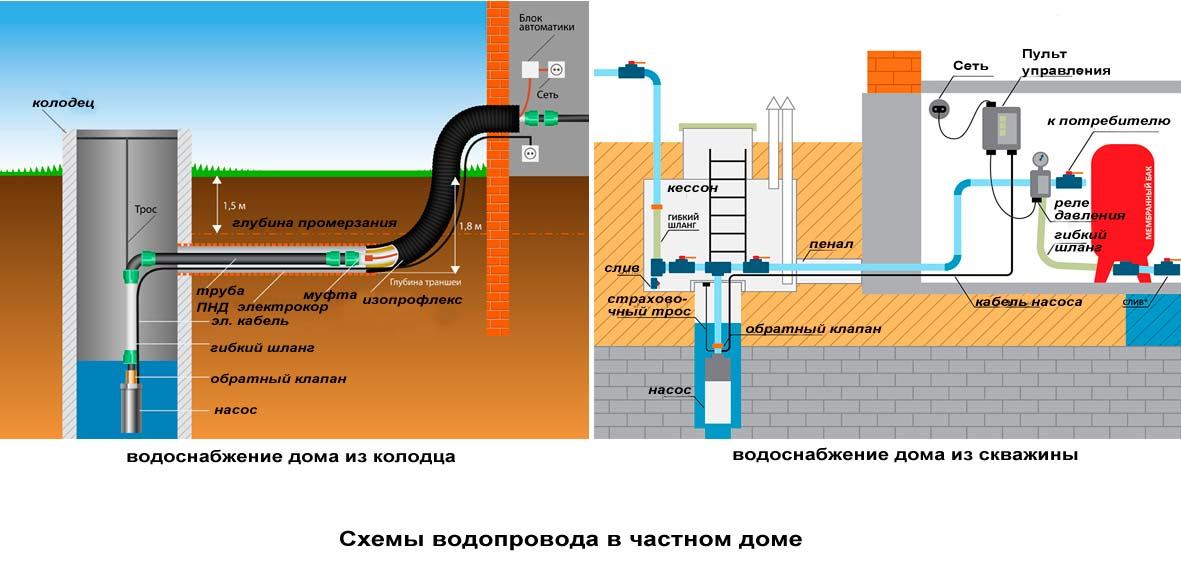
The choice of the method of laying and assembling the water supply network of a country house begins with an assessment of the type of water intake structure, its depth and functionality.
An automated system consists of the following parts:
- a pump or a finished pump station;
- filtration system for water purification;
- containers for accumulation and adjustment;
- pipe lines inside and out;
- devices for automatic regulation.
The equipment of such a plan is mounted for the water supply of a large country cottage. In a tiny private house and in the country there are enough pipes and a pump.
Design and calculations
In order not to deal with the alteration of trunk nodes, you will need the correct layout of the wiring diagram.It should include all water intake points, through-flow elements and valves. The drawing shows the cross-section of the pipes, the location of the water heater and pump unit.
It should also be noted drainage lines: where the drains will go - to the central system or cesspool, septic tank, deep cleaning station.
When choosing pipe segments, connecting elements, it is necessary to calculate the throughput of the pipes depending on the cross-section, the length of the line and pressure. This can be done using tables, formulas and computer programs.
DIY installation steps
 Installation of a water pipe made of polyethylene, polypropylene or PVC with your own hands does not differ in complexity. First, the outer part of the highway is made with the pressure device connected, then the inner section.
It will not be required to carry out works of complex equipment, the whole tool is in home workshops: a pipe cutter and a shovel for outdoor work, as well as press tongs for crimping bushings that are put on the pipe. If the connection will be by hot welding, you will need a device for soldering pipes and nozzles to it. From materials, in addition to pipes and fittings, a fum tape, sealant, gaskets can be useful.
Installation of an external network is carried out as follows:
- A small ditch is dug up to a depth of freezing plus 0.5 meters.
- At the bottom there is a pillow made of compacted quarry or river sand.
- Level the bottom with a slope of 20-30 mm per meter.
- They insulate the part of the pipeline laid above the freezing level before entering the foundation foundation.
- Install the pipe and fall asleep with clean sand without clay inclusions.
Where the trunk needs to be fixed to the wall, special clips are used. Rigid fixation is not applied to polypropylene pipes - it is necessary that they can move smoothly when expanded under the influence of temperature extremes. The clips are installed in increments of 1-2 m between them.
If it is required to fix a pipe segment of a large cross section or mass, clamps should be used for reliability.
When external laying of the pipe through the walls and ceiling is passed in sleeves - covers made of non-combustible material, which are filled with a sealant, for example, mineral wool. This is necessary to reduce noise during the passage of fluid. Cutting of the sleeve is allowed at the level of the walls and ceiling, but it should protrude 3 cm above the level of the finishing floor.
Do-it-yourself installation of the inside of the system:
- They mark the passage of the future water system - on the walls, in the screed or under the ceiling.
- Beat the strobes in the walls or hide the pipes in the screed. On the ceiling they are fixed by means of clips of the desired diameter. In the case of installing the pipeline on the floor, it should pass at a distance of no more than 15 cm from the wall and at least 20 cm from future furniture.
- Connect the pipe segments by means of fittings or by welding.
- The valves and water heater, booster pump, plumbing are connected, installing gaskets where necessary.
Leave approximately 15–20 mm of empty space between the wall and the pipe. In the future, this will facilitate the repair of the water main in case of emergency or leakage. For each branch from the riser to plumbing fixtures, it is worth installing your own shut-off valve. So in case of an accident there will be no need to shut down the entire system.
Basic network installation errors
Frequent misses must be known in order to eliminate these problems in the process of self-assembly of the network:
- Pipes with hot water, hidden in the walls or under the screed, forget to insulate.
- They strive to “stick” all pipe segments through one hole in the wall or ceiling.
- Do not fully tighten the compression nuts of the fitting elements.
- Do not install stop valves in front of each plumbing fixture.
- Do not put overhead taps separately for each riser and each bathroom, if there are two or more.
- Do not observe the slopes of the pipe lines.
Often during installation, the end parts of the pipes are not drowned out, because of which garbage gets there.
All these shortcomings lead to the fact that the system functions poorly, leaks occur. Having thought through all the nuances in advance, it is easy to avoid problems and independently assemble a working network.