Insulation of a wooden house from the inside is quite rare, usually when its owners want to preserve the beauty and originality of the facade from polished timber, logs or wild logs. Despite the fact that this solution has a number of negative aspects, with the right approach, you can insulate a wooden house from the inside so that a comfortable and healthy microclimate is preserved in it without much damage to the interior. This event can be done with your own hands, without resorting to the services of hired craftsmen. In order to guarantee the desired result, you should familiarize yourself with the varieties of heaters on sale, the technology of their installation and make a rational decision.
Preparing the wall of a wooden house for insulation
It is better to insulate a residential building at the stage of its construction, when there is no furniture in it and no decoration has been applied. In such conditions, working is much more convenient and safer. In addition, you do not have to subsequently remove interior items from the premises, look for a place for temporary residence and carry out general cleaning throughout the house.
Thermal insulation followed by topcoat is a kind of preservation of load-bearing structures. After installation is complete, access to them for inspection, maintenance and repair will be closed. Based on this, it is necessary to carefully prepare the wood for insulation.
The event consists of the following steps:
- Inspection of the surface, identification of rot, mold, cracks and places where there may be insect nests. Attention is also drawn to the possibility of wood damage by parasites.
- Mechanical restoration. The holes are expanded, the surface is cleaned of material affected by rotting and fungus.
- Filling holes and gaps with facade sealant, which retains the ability to deform for decades.
- Wall treatment with antiseptic, flame retardant and hydrophobic agent. This will protect the tree from decay, insects, mold and fire.
Each solution should be applied at least two times, repeating the process after completely absorbing the liquid and drying the walls.
Do-it-yourself insulation installation
When choosing materials and technologies for warming a wooden structure, factors such as the average annual temperature, precipitation intensity and internal dimensions of the structure should be taken into account. When the rooms are cramped, it is worth taking an integrated approach, installing thermal insulation inside and out. If you choose the right materials, even the old log house will be dry, warm and comfortable, regardless of the weather outside.
Cotton-based
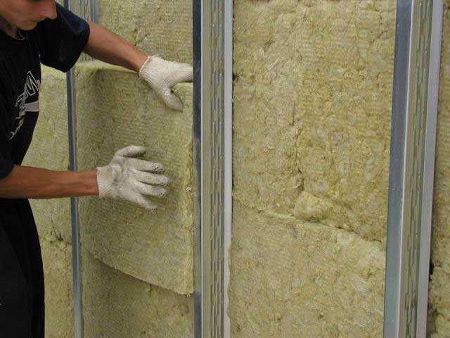
Minvata is a substance consisting of fine fibers bonded together. The raw materials used are glass, basalt and steelmaking slag. The material is very popular in private and industrial construction due to numerous advantages. On sale you can find mats and rolls that are characterized by low density, excellent insulating properties and a long service life. In addition, the products are notable for their affordable price and ease of installation. The insulation is able to breathe, letting steam gather in the rooms. The most popular brands are URSA, Rockfall, Thermolife, Isover, Technonikol, Knauf.
The disadvantage of mineral wool is its hygroscopicity. This minus is offset by the installation of a vapor-permeable membrane fabric.
To work, you will need:
- roulette, level;
- long sharp knife;
- screwdriver, hammer, putty knife;
- ladder;
- membrane film, drywall;
- construction tape, sandpaper, mounting tape sickle;
- steel profile or edged board;
- vertical suspensions;
- putty, primer;
- stapler with staples 6 mm.
Installation is carried out in the following sequence:
- Marking in accordance with a pre-compiled project.
- Attaching a vapor permeable film. This is done in stripes from bottom to top using staples. An overlap of 10-15 cm is closed with tape.
- The manufacture of the frame. First, suspensions are screwed, then vertical and horizontal profiles are attached to them. If boards are used, they are fixed to the wall with long self-tapping screws, nails or corners.
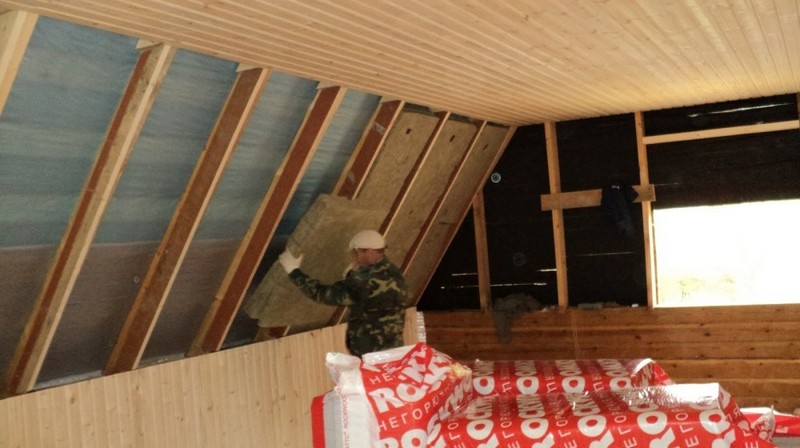
- Installation of plates. They are inserted into the frame with a slight compression to ensure a tight seamless connection. If gaps remain, they are blown up with foam. Blowing should be metered so that the foam does not squeeze the cotton wool strongly.
- Closing the frame with a vapor-permeable film. It is necessary to make slack up to 10 mm, so that when cooling the fabric does not tear from temperature shrinkage.
- Sheathing construction hard coating. On the street, it is better to use wood stylized siding or clinker panels. For interior decoration, you can use lining, drywall or plastic panels.
When working with mineral wool, many tiny fibers are separated from it, which hang for a long time in the air. It is not recommended to mount the material with bare hands, without a respirator and tight glasses.
Expanded polystyrene heaters

Polyfoam is a good external insulation, characterized by low heat conductivity and lightness. Available in the form of square meter plates with a thickness of 5 cm and 10 cm. The choice is made based on climatic conditions and the installation location. The downside is that the plates are fragile and you need to handle them with extreme care. It is also necessary to take into account the instability of penoplex to ultraviolet. To finish it, you need to choose a facing resistant to solar radiation.
For installation you will need:
- electric drill;
- wood hacksaw;
- stationery knife;
- hammer;
- mounting grid;
- notched trowel;
- vapor permeable glue;
- stairs;
- putty;
- finish finish;
- steel profile;
- dish-shaped dowels.
The work is performed in the following sequence:
- Screwing to the bottom of the wall or base of the steel profile. The product will serve as a support for the plates so that they do not slide down under their own weight.
- Dilution of the adhesive. Putting it on the insulation and applying it to the wall. After that, you need to knock on the stove with your fist to ensure tight contact.
- Drilling holes for fasteners. You need to make 5 holes - in the center and in the corners.
- Driving in dowels so that their caps are recessed 1-2 mm.
- Laying slabs is carried out in rows. Each new level begins with an offset by half the panel. Extreme details are cut out in size, cracks are blown up with foam or sealed with penofol.
- The material is covered with a thin layer of glue into which the mounting grid is recessed. Each subsequent strip is glued with an overlap of at least 10 cm.
- Application of a layer of plaster 2-3 mm thick. After the mortar hardens, the surface is treated with a hardening primer.
- Finishing. If external insulation is carried out, it is better to use colored facade plaster. Inside, you can stick wallpaper, cork or ceramic tiles on the wall if the kitchen or bathroom is insulated.
If it is required to carry out insulation of the second floor, stable goats should be used. Work on the stairs is uncomfortable and dangerous.
Ecowool insulation

Ecowool is a crushed cellulose, in which a natural adhesive - lignin is added. When wet, the material becomes sticky, but does not condense. After solidification, the substance gains strength, while maintaining porosity and the ability to pass air. In this regard, ecowool resembles mineral analogues. Moreover, the material is absolutely safe for health, does not absorb water and does not emit volatile compounds when applied to the surface. Due to the presence of natural antiseptics, the development of fungus and mold is excluded.
To work, you will need:
- ecowool in the quantity corresponding to the calculations;
- a vacuum cleaner with an outlet pipe or a compressor with adjustable power;
- glass jar 3-5 l;
- special cap with a spray for the neck of the vessel;
- two-handed saw;
- material for the frame (edged board or steel profiles);
- safety glasses and gloves.
Step-by-step instructions for proper insulation with ecowool:
- Mark the base for fixing the frame.
- To make a grate, inside of which an adhesive wood composition will be applied.
- Nail the vapor barrier to the wall with brackets. The fabric will ensure the removal of moisture from the housing, its protection from penetration from outside of moisture and insects.
- Make a frame. This can be a cage made of boards screwed to the wall, or a grating made of steel profiles mounted on plumb lines. The recommended thickness of the applied layer is 10 cm.
- Dilute ecowool with water in accordance with the manufacturer's instructions. It is advisable to immediately add compatible antiseptics and flame retardants to the solution. This will avoid future mold and fire problems.
- Proceed with filling the skeleton with the prepared substance. The procedure can be performed using a trowel or by technical means. Stacking should be done so that the substance protrudes beyond the frame by 2-3 cm based on shrinkage when dried.
- Cut off excess material after hardening with a two-handed saw. Check that there are no sharp edges.
- Beat the crate with a vapor-permeable cloth. To give special removal to the joints of the strips, which are glued with adhesive tape.
- Close the frame with the selected coating. For interior decoration, you can take sheets of plywood, drywall or OSB. Vinyl siding and plastic panels are well suited for outdoor decoration.
The main criterion for finishing is its breathability. If you close the insulation tightly, condensation will form in it, which will lead to wetting and lower insulation qualities.
Frequent mistakes when warming wooden walls from the inside with your own hands
Inexperienced masters during the insulation of wooden log cabins make such errors:
- Work begins when the wood from which the walls are laid is not sufficiently dry. Because of this, the supporting structures are deformed, which leads to the destruction of the insulating layer.
- The use of an excessively thick layer of insulation for internal work. The consequence is a decrease in usable space. In some cases, you have to buy new furniture, since the old one does not enter the renovated room.
- Ignoring the use of a vapor permeable membrane. If it is not installed, moisture accumulates in the heat insulator, which leads to the formation of fungal mold, which soon captures the wood. If instead of a membrane cellophane is installed, the effect of a thermos appears in the room. Moisture does not come out of it, but condenses on the ceiling and walls.
- Saving on material. Too thin a layer freezes in winter and does not retain external heat in summer.
To avoid such mistakes, you need to carefully study the features of the selected materials and technologies, strictly follow the plan and manufacturer's instructions.
The correct implementation of the insulation of wooden walls does not guarantee that the building will have a comfortable microclimate.Large heat losses occur through the floor, as well as through the ceiling and roof. These structures must be given no less attention. For thermal insulation, you can use materials that were used for wall decoration. At the same time, one should not forget that the tree must be ventilated; installation of a membrane film is mandatory everywhere.