The dry foundation and construction of the building is the key to the strength and durability of any structure. Most private houses are built of wood, they especially need protection from any moisture. For this reason, it is important to build a water drainage system on the site.
Types of drainage systems
There are two main principles of drainage in the area: closures (deep drainage) and surface drainage.
Closed-type drainage is characterized by the fact that all the systems with which water is removed from the site are not on the surface, but are laid under the upper soil layer. This method of drainage is suitable for areas that are located in the zone where the groundwater is close to the surface.
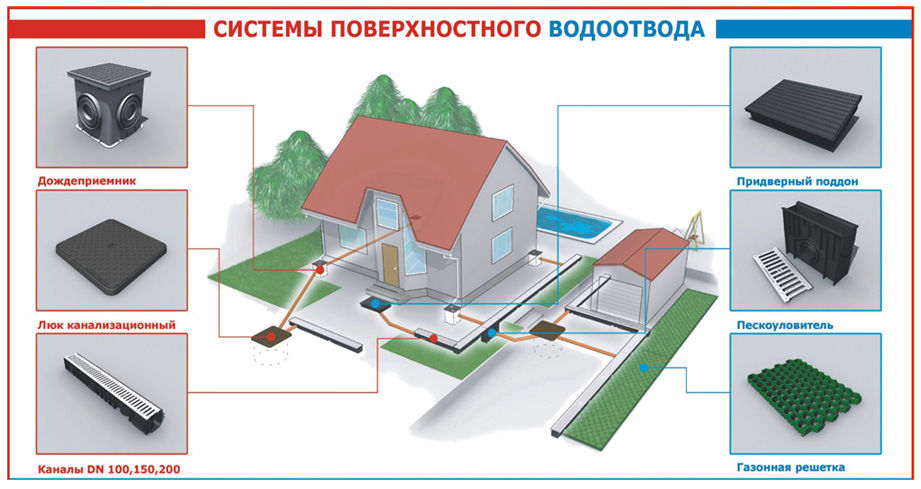
The second type of drainage for a suburban area is surface. It performs the function of getting rid of water that gets outside: rain, snow, floods, puddles from another area, if it is higher. In turn, surface drainage can be of two types: linear and point.
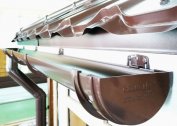
The linear type of water discharge works on the principle of its accumulation with the help of elongated gutters that are installed throughout the site. They are set so that water flows under the action of gravity into drainage funnels.
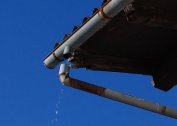
The point type of surface drainage helps to get rid of water from roofs of houses or other surfaces located above ground level. The design consists of a system of vertical and horizontal pipes with storm water inlets.
System Selection Criteria
 The main criterion to pay attention to when choosing a drainage system is the size and type of site.
An open or surface type drainage system is mandatory for installation in places where there is a high average annual rainfall, so that water after regular heavy rains is where to go. The same applies to climatic zones where there is a lot of snow in winter: melt water in the spring can fill the soil with excess moisture and flood the basement.
A closed type of drainage system is needed on the site, which stands on groundwater close to the surface. Thicker than 1-2 meters thick, drainage is needed so that the soil is not too loose, otherwise all buildings and structures will be at risk of subsidence or even collapse.
Rules for designing a drainage system
 Before you make a water drain on the site, make an action plan and layout of communications.
Consider how the general system designs should look so that they are appropriate for the project. Consider the following factors:
- Dimensions and total surface area from which to remove excess water.
- What waters predominantly flood the site in this region. If the location is characterized by the proximity of groundwater to the surface, and rains with snowfalls do not cause great inconvenience, you must give priority to closed drainage. And subject to frequent torrential rains, you need to take care of emergency water diversion from the site by surface.
- The depth of underground pipes for closed drainage depends on the quality of the land. The looser the soil, the deeper the line is laid.
- Define the boundaries of the drainage system within the site.
- Calculate how much water is needed for the passage from the receiving to the branch parts of the structure.
An artificial or natural body of water will help to solve two problems at once: to get rid of washing structures of buildings with liquid and to give a beautiful appearance to a suburban area.
Self-assembly of a drainage system
 To do the water drainage on the site with your own hands, purchase the necessary materials: pipes for moving water, elements of the connection of communications between each other and with the facade of the building, cement and concrete for pouring gutters, sand, water intake funnels, sewer grills, etc.
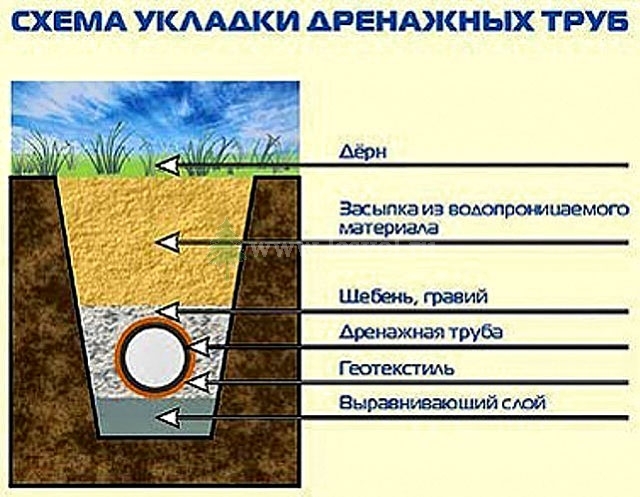
First you need to dig trenches to install drainage pipes. Next, it is necessary to evenly pour a layer of sand and gravel at the bottom so that the communications do not sag and are not deformed. Lay along the entire length of the pipe and connect them with sockets. For better tightness, it is worth covering the joints with adhesive solution.
The pipe system must be connected to the place where the water will be discharged. If it is an artificial pond, dig a foundation pit in advance and fill it with concrete, not forgetting to first put pipes into it. Drains can be discharged into any container, from where liquid will be periodically pumped out. Even an old 200-300 liter canister will do.
When the whole system is closed, trenches can be buried. To do this, sprinkle the pipes with gravel or rubble, then sand, and finally with the same soil that covers the entire area. Press each layer tightly.
For surface drainage, screw the drain pipes along the entire length from the roof to the base of the house with screws. Along the perimeter of the roof, install gutters on the rafters that will not allow water to drain in arbitrary places. They should be slightly inclined so that all precipitation falls into the water intake funnel.
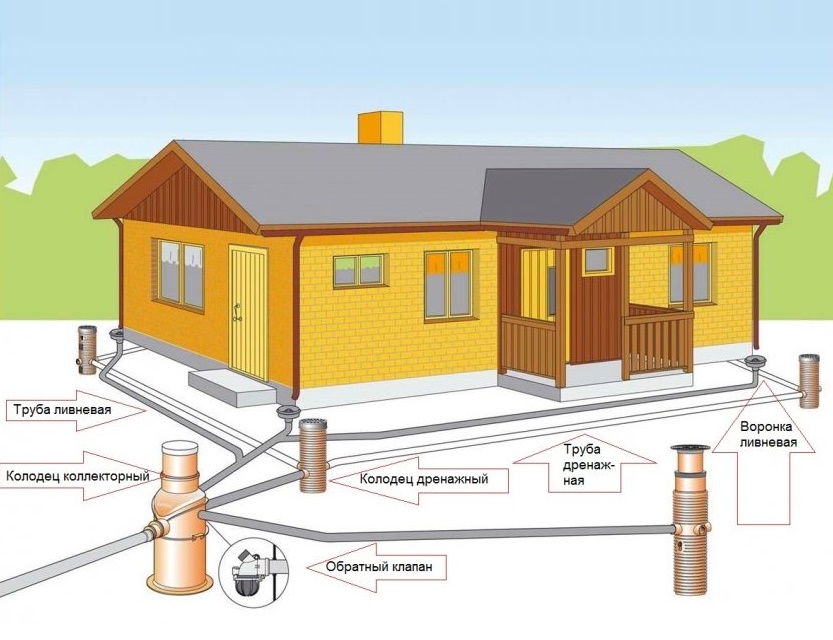
The general drainage system combines surface and indoor drainage. To do this, draw drainpipes underground and attach to the drainage.
It is advisable that the drain go straight under the grate, and not be located above it. This will allow in winter to avoid icing of the space near the walls and pipe.
How to avoid installation errors
Do not install the gutters on the roof horizontally, otherwise the water will not drain, but stagnate. In winter, this is especially dangerous, as it freezes and blocks the drainage. The pipe must not come in contact with the wall. It should be at a distance of several centimeters from the facade so that it is not soaked with water and does not lead to dampness in the interior.
The number of rain funnels is also important. Consider the average annual rainfall in the region. If there is not enough catchment, the system will not cope with the load and will leak through the edges of the gutters.
Choose the right time to start work. Outdoor temperature is important when installing certain materials. For PVC, it is considered optimal when the window is not lower than +5 ° C. Avoid bad weather, start working when it's dry and sunny.