If the land on the site is excessively wet, the trees on it will grow poorly, and garden crops will hurt. The abundance of moisture causes the foundation to erode. Because of this, the shrinkage of the house and other buildings occurs, the cellar is flooded in the spring. Wet ground, freezing, rises and presses on the blind area around buildings and garden paths, which leads to their cracking. To avoid all this, it is necessary to make the correct drainage of the house or summer cottage.
Types and arrangement of drainage systems
 Excessive accumulation of moisture is characteristic of clay soil. Such soil does not absorb water well, as a result of which stagnation of sediments occurs in the upper soil layer. Another reason for waterlogging is the location of subsoil sources close to the surface. Groundwater is a serious problem for the foundation and basement, especially during snowmelt.
To drain the territory, use the appropriate type of drainage: surface or deep. The first is often used with alumina. For abstraction of subsurface water, only the deep method is suitable.
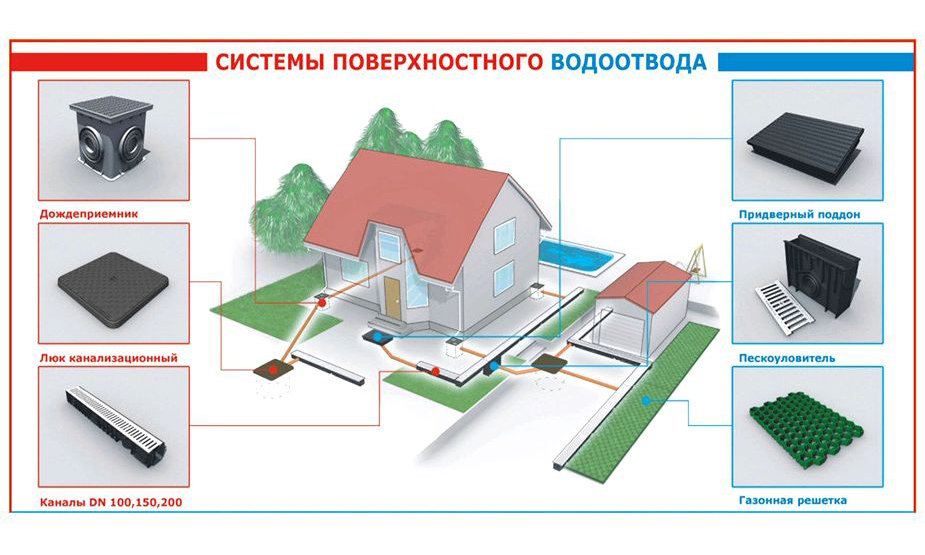
Features of surface drainage
The system can be point or linear. The first option is used to drain water from local places. Special water collectors are installed at moisture accumulation points. Such a network is considered the most budgetary, and it does not need drawings and diagrams.
Linear drainage will cause more difficulties in designing and arranging.
This method of drainage will help:
- remove excess moisture from buildings;
- prevent leaching of the fertile layer;
- protect the entrance to the territory, paths in the garden.
With linear drainage, a grid is designed that consists of slightly deepened drainage ditches with the required slope. They are located around the perimeter of the household territory and in areas of maximum moisture accumulation.
Soil drainage is organized not only by the open trench method, special drainage trays with gratings are also installed. A closed system looks more aesthetic, but it costs more and is more difficult to install.
Depth system arrangement
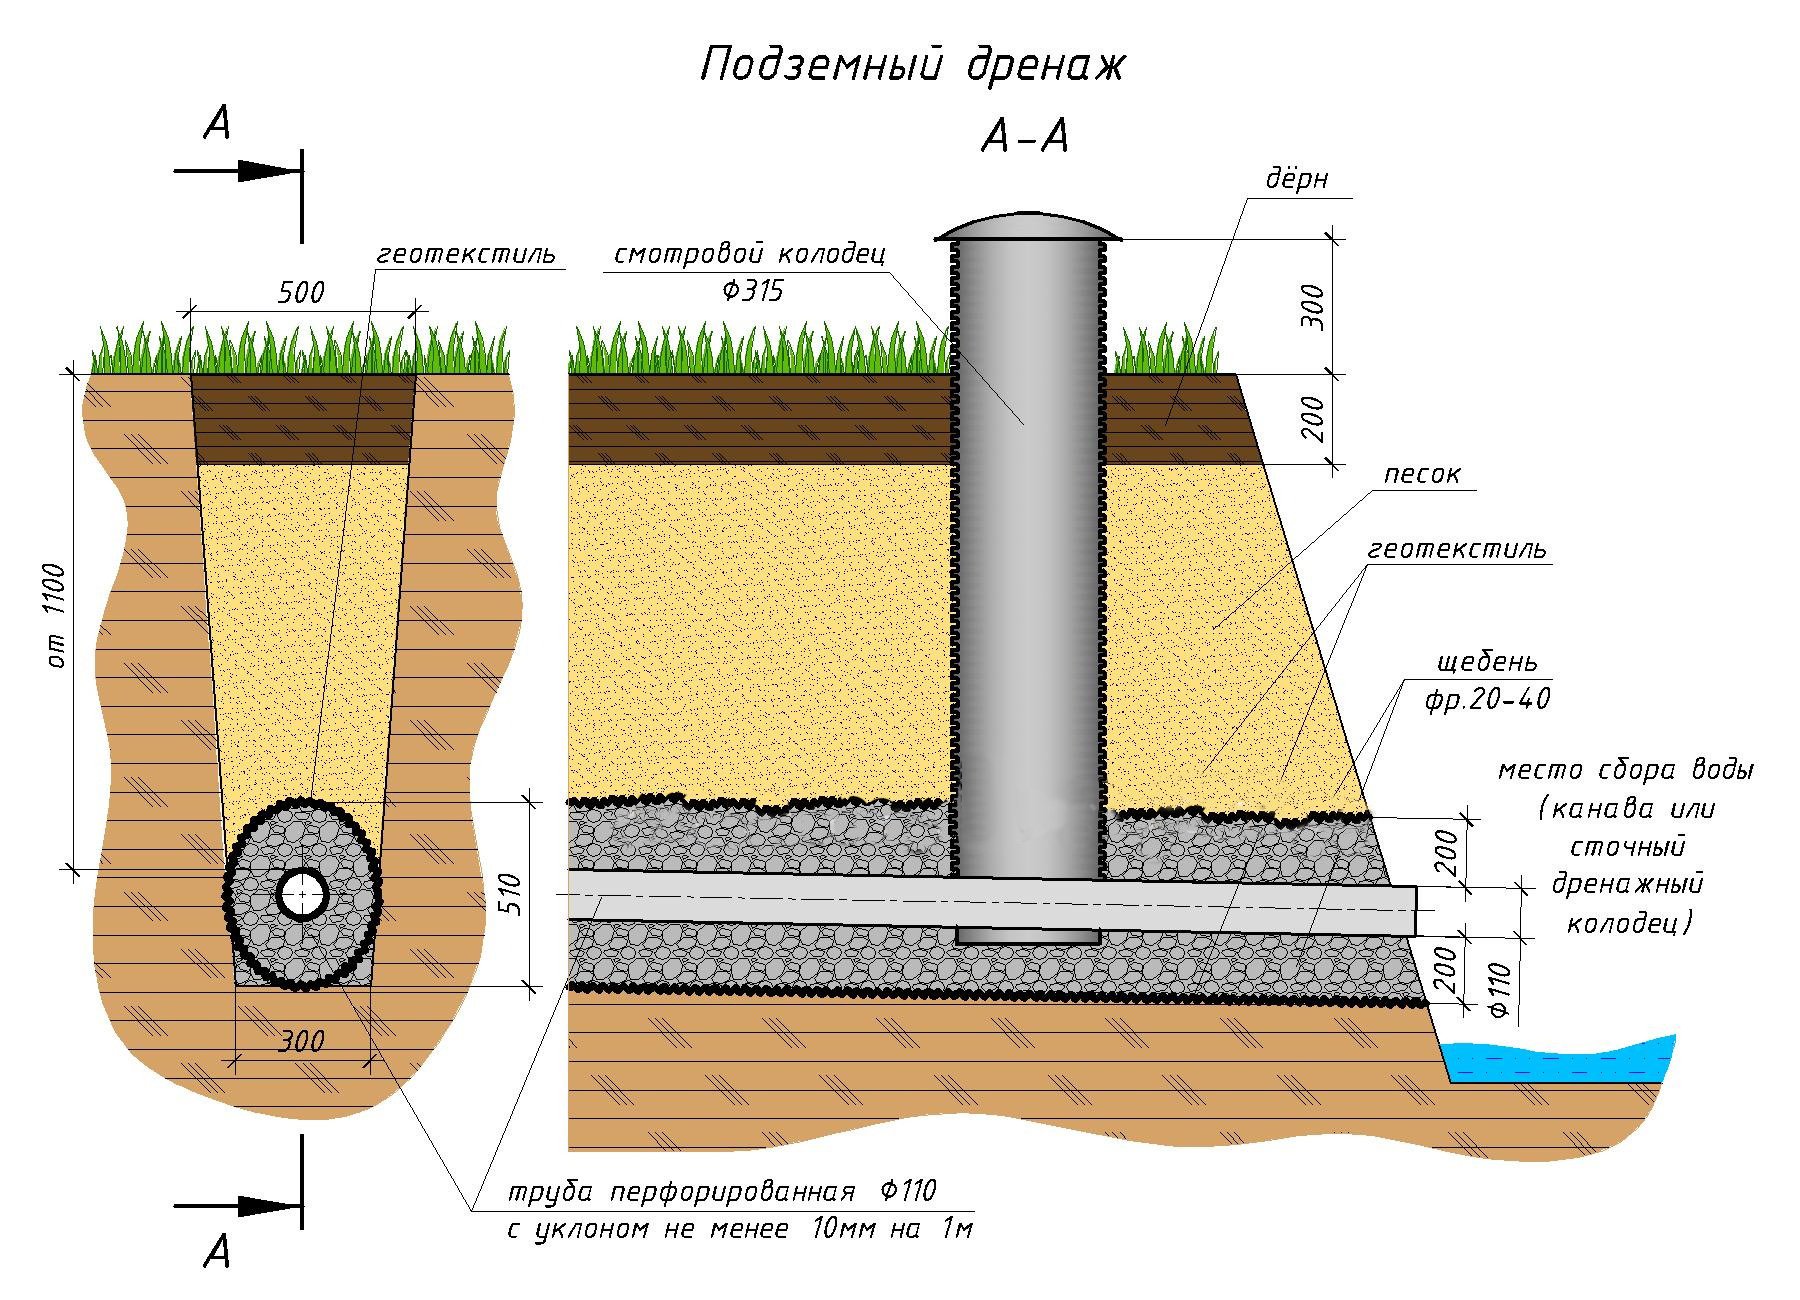 For these purposes, special plastic pipes are used - drains with a cross section of five to two hundred millimeters. Perforations were made on them with a hole size of 1.5–5 mm. On some products, a factory installation of filter protection is possible, which prevents clogging of holes. If not, it is recommended to use geotextiles.
As with the arrangement of the surface drainage network, it is necessary to form a drainage channel into which moisture will collect from all the drainage pipes. He goes into the water receiver - a gutter, a pond or a well reservoir.
Design work
Before installing a drainage system near a private house or summer house with your own hands, you need to study the terrain using a level and a laser range finder. For lack of geodetic tools, it is possible to establish the places of accumulation and the direction of movement of moisture after heavy rain.
As a result, a large-scale drawing is created in which the depth of the trenches or installation of the drainage pipes will be displayed and their location will be shown.
When creating a project, the location of the wells for maintenance is taken into account. Pipe installation is carried out with a slope of 2-10 mm per meter in the direction of the water receiver.
The creation of a drainage system is associated with a significant amount of excavation. You need to do this before planting garden crops, and even better - before starting to lay the foundation foundation of the house or outbuildings.
Stages of installation of the drainage system
 It’s easier to build a surface drainage network yourself, because you don’t need to dig deep ditches for this. The main drainage systems are located along the perimeter of the site with a slope in the direction of the catchment, and the auxiliary ones - from places where moisture accumulates the most. Arrangement of additional ditches is carried out with an inclination towards the main highways.
The depth of the trench is 50–70 cm, the width is about 0.5 m. The moat is dug up with beveled walls with an inclination angle of 25–30 degrees. The task becomes more complicated only when it is decided to equip the rain sewer with trays.
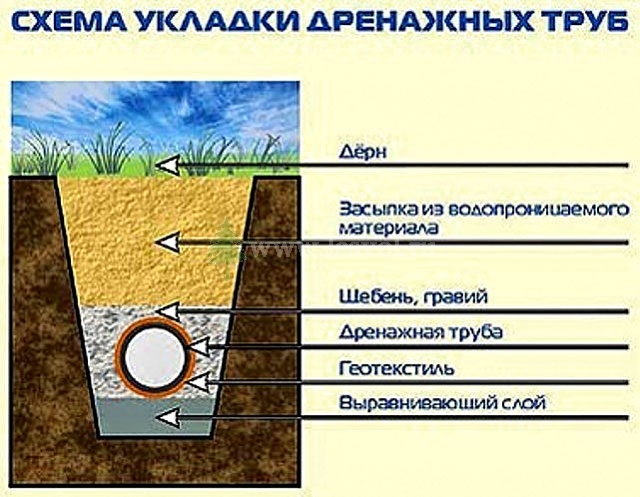
To make a deep drainage drainage system around the house and on the site yourself, you must systematically go through all the stages of installation:
- Dig trenches under the drainage net.
- Fill the bottom of the moat with sand mixture 7-10 cm thick and ram.
- Lay the geomaterial so that it protrudes beyond the edges of the trench.
- Spread a 20 cm thick crushed stone cushion over the geotextile to filter out impurities. Crushed limestone is not suitable, since salt marsh may appear.
- Lay the pipe sections on the gravel. When installing drainage pipes for drainage of groundwater, make sure that the perforation is directed downward.
- Pour the crushed stone layer onto the pipeline and cover it with the edges of the geotissue, which will filter the liquid from suspended impurities, which will prevent the system from silting up.
- Bury the trenches with earth; on top of it you can lay a turf.
In order to monitor the drainage process and to clean the system, the inspection wells are being arranged at the lowest points of the site. They can be assembled from concrete rings. With a drainage depth of not more than three meters, compact corrugated pipes can be selected. Facilities must be equipped with covers to prevent debris from entering them.
On direct branches, installation of revisions is carried out every 35–50 m, and on every second turn with a “broken” trench. Water can be diverted from a well into a natural reservoir, ravine, or general stormwater.
Common mistakes
Errors of drainage of the site can be detected as soon as the autumn rainy season begins or in the spring with a flood. The main problems include:
- A slight slope that is unable to remove moisture from the area by gravity. All water will remain on the territory. To fix the problem, you will need to dismantle the wells and remodel the trenches to the desired slope.
- Inadequate drainage with a basement or basement flood. Requires the installation of a drainage system inside the basement or around the perimeter of the foundation foundation.
- Inconsistency of drainage pipes with soil type. Perforated drain will clog in clay soil and cease to function. To prevent this situation, experts advise using high-quality geotextiles.
Moisture in the territory may stagnate due to one of these errors or a combination thereof.
To extend the life of the drainage network, care must be taken. Inspect open channels, inspection wells once every two weeks from the beginning of snow melt in the spring until the arrival of winter. Prepare drainage for spring floods, clean clogged structures, remove thickets of grass and bushes near trenches.
A well-designed project, correctly installed installation and systematic maintenance of drainage channels can prevent troubles caused by stagnation of water on the site.