LED lamps are rapidly gaining popularity, due to this a large number of advantages in comparison with analogues: cost-effectiveness and environmental friendliness of use, long service life. For use in everyday life, lighting devices with an operating voltage of 220 and 12 Volts are manufactured.
How to connect an LED lamp to 220V
The main advantage of such lamps in comparison with those operating from 12 Volts is that they can be directly powered by a switch. As a result, additional financial costs are not required for the purchase of a power supply, and installation does not cause difficulties. There are several ways to install LED lights:
- serial connection;
- parallel;
- radiation.
Each is used in different situations and has its own advantages and disadvantages.
Sequential
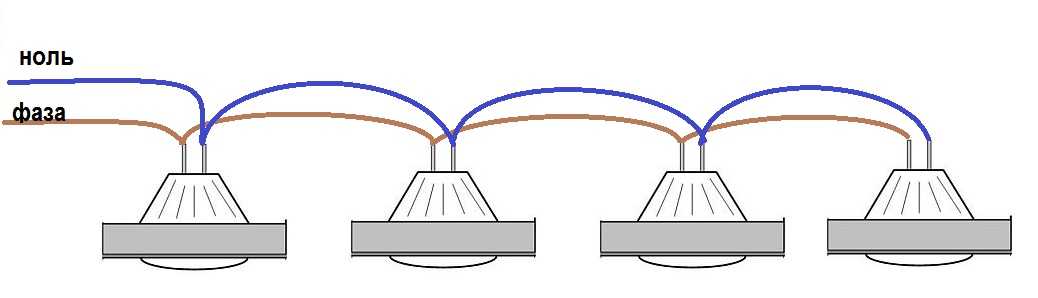
Serial connection is used if you need to save cable footage, and there are no special requirements for the room. For implementation, you will need several double or triple wires. Up to six LED bulbs can be installed in one circuit, otherwise the brightness will be low. If one lamp fails, you will have to check the performance of each in order to eliminate the breakdown.
The connection itself should not be difficult. A phase is carried out to the first lamp from the switch, then from the first switch the cable extends to the next device. Zero is laid to the last luminaire, which goes from the junction box.
If you make a mistake in the circuit and mix power with zero in places, the lamps will be under constant voltage, which is unsafe.
Parallel
Parallel connection is more practical and is used more often. In the process of implementation, each lamp will give out the brightness that is declared by the manufacturer. The only drawback that can be distinguished is the increased consumption of the conductor in comparison with the serial connection.
It is recommended to give preference to VVG cable ng 2 * 1.5 or 3 * 1.5. The designation indicates the presence of a PVC shell - a high-quality insulating material. In the marking, the mark “ng” indicates the incombustibility of the model. If special requirements are made to the room, sometimes wires with an additional marking “ls” are used, which means that a small amount of smoke is emitted during ignition.
To connect the lamp through the switch from the junction box, pull the cable. It is alternately connected to each lamp. After the first lamp, the cable is cut and fed to the next until all the devices are connected to one common system.
The advantage of a parallel connection method is that even if one lamp fails, the circuit will be fully operational.
Beam
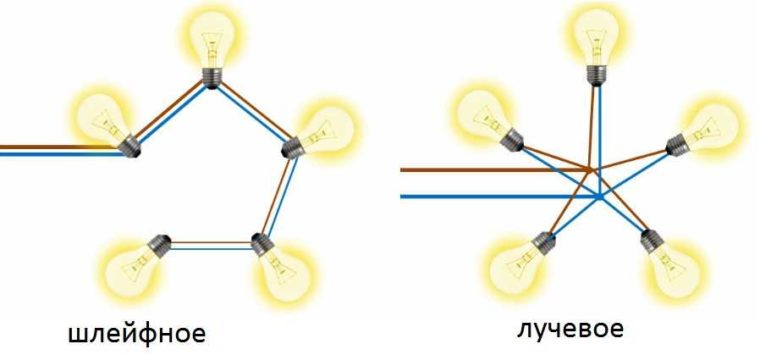
By its nature, the beam pattern refers to parallel connection, often used for chandeliers. The principle of implementation is to lay the cable to each lighting fixture individually. This method is the most time-consuming and requires large financial costs due to the large amount of wire used. To save money, the cable from the distribution panel is carried out to the center of the room and from there to each lamp.Next to the phase and zero lead single-core wires that are laid to the fixtures.
Even at the design stage, it is important to decide how the cores will be connected to a separate cable. If there are few lamps, twisting is enough. For safety, it is securely crimped with pliers and a soldering iron is welded together. There is an alternative to this method - to purchase terminals with a certain number of outputs. A connector is put on each core and only after the wire are pulled to the lighting devices.
The connection scheme of LED lamps in all cases has no fundamental differences.
Necessary tools

To connect lighting fixtures with your own hands, you will need the following working tools:
- screwdriver set (flat and Phillips)
- a tool designed to expose wires (remove the insulating layer);
- pliers.
As practice shows, the installation of the device with your own hands takes no more than 10-15 minutes.
Features of mounting and connecting ceiling lights
 Lighting devices with LED lamps are most often produced in cases that are equipped with everything necessary for mounting. Installation difficulties are rare, since LED lights are light enough. For these purposes, usually use plastic or metal dowels, turboprops.
Depending on the appearance and design features, the installation of a particular model on the ceiling may vary. Algorithm for mounting the lighting device on the ceiling:
- In the place intended for the ceiling, holes are made for the mounting plate near the wire outlet.

- Holes for fastening need to be done only in a solid base. If the mounting plate falls into the void when working with a brown punch, it is necessary to make holes in another place, respectively, to transfer the lighting device.
- Mounting plate securely locked in one position.
- If the LED lamp is not attached to a solid base, first you need to take care of reliable mounting.
- The RCD or the meter is de-energized, the contacts of the lighting device are connected to the electrical main.

- An already connected lighting fixture is put on the eye of the mounting plate and is securely fixed using fasteners.
- Transparent parts, such as safety glass or a cap, are put on a fixed LED lamp.
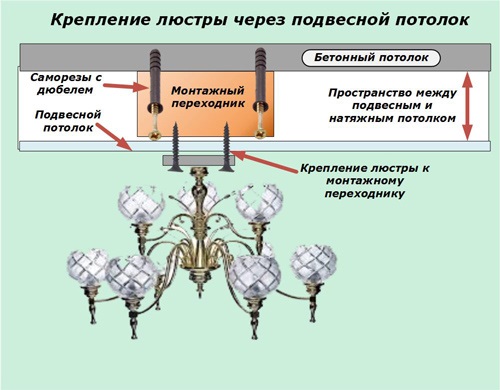
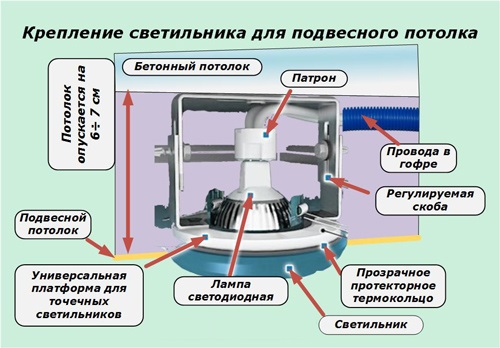
The final stage is a mandatory check of the operability of lighting devices.
Precautionary measures
During the execution of work, you must remember to observe personal safety precautions.
It is necessary to de-energize the room and at the outlet where work is to be done, check the voltage with an indicator screwdriver. It is also important to provide free space around the lighting fixture. If you ignore this rule, the lamps will overheat, which will lead to their rapid failure or fire.