Strobing is an important stage of overhaul. Allows wiring in the walls in accordance with the new layout. As a result, all the power points in the room (sockets, switches, lighting devices) are shifted in a given direction. An experienced craftsman can pave the furrows in brick or concrete walls. He knows how to shatter walls for wiring without dust. With proper dexterity, work is done quickly, accurately.
Basic norms and restrictions for gating
 During the formation of new channels for wiring, the master must adhere to the following rules:
- Strobing is performed only vertically or horizontally. It is strictly forbidden to make diagonal or zigzag cuts.
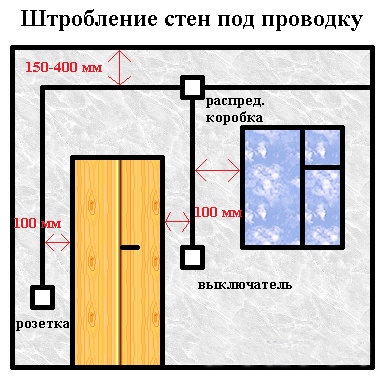
- Deep walls cannot be formed in the bearing walls and ceilings. Optimum values are 25 mm.
- The length of one continuous strobe should not exceed 3 m.
- When strobing pitched surfaces (walls of the attic), the channel must be positioned so that it is parallel to the junction of two surfaces.
- The distance from the gas pipe to the furrow must be at least 40 cm. It is also forbidden to make vertical channels here.
- Be sure to draw a detailed diagram of the location of the gate in the walls. This will refresh the wiring progress in the event of an emergency or the need for a new repair.
- The remoteness of the lines for wiring from windows and corners should be at least 1.5 m.
- From overlapping plates to horizontal channels, a distance of 15 cm must be maintained.
When wiring, the cables must not cross each other. If such a wiring is done, then only as an exception and in minimal quantities.
Strobing Methods

To make the strobes for dust-free wiring, everyone chooses for himself the most convenient way in the presence of a specific type of tool.
Punch work
A fixture with an SDS + cartridge is best suited. Heavier equipment can damage the wall and pierce it through. The best option is a three-mode tool with a slotting function. As for the punchers from the "home" class, then after 2-3 hours of operation, their gearbox or cartridge assembly often fail.
Strobing with a puncher gives more small and large debris than dust. Therefore, when carrying out work, you can use a construction or household vacuum cleaner. It’s good if the master has an assistant who holds the nozzle of the device directly near the punch. For strobing, it is better to use a groove blade.
The Makita-2432 puncher already has a built-in vacuum cleaner. Equipment can be rented.
Work grinder
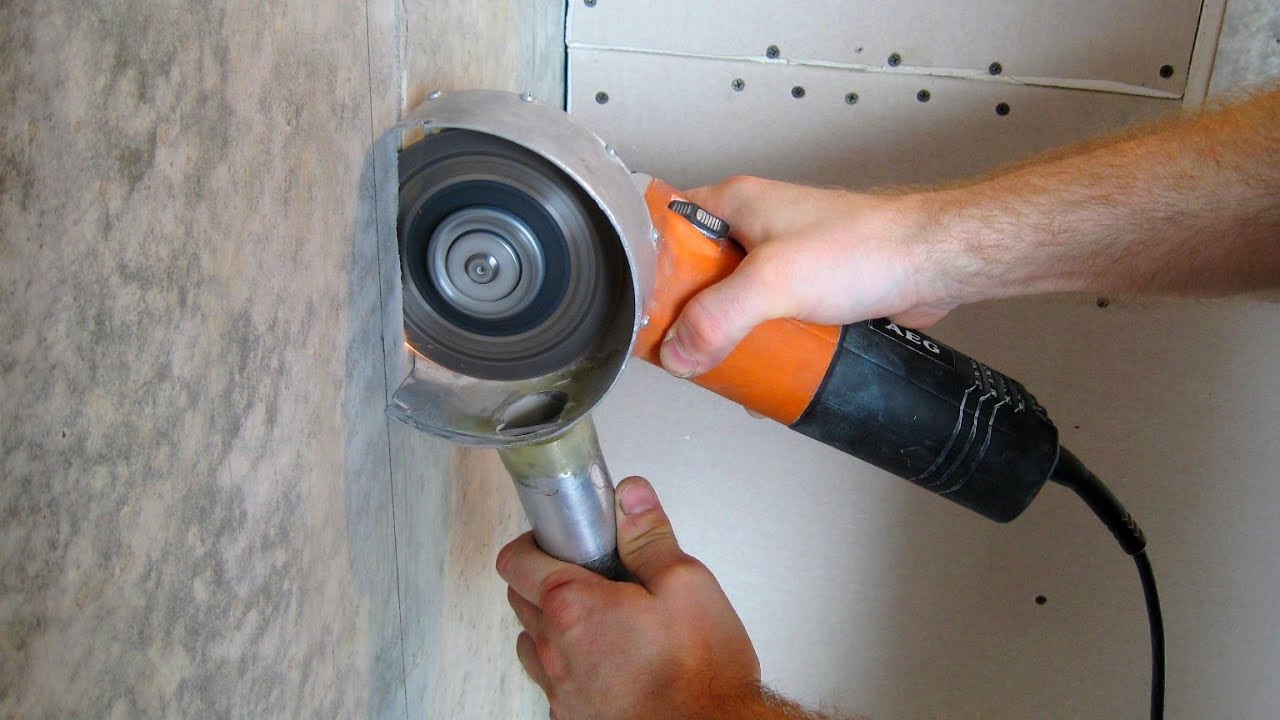
An angle grinder (it’s also a Bulgarian) is often used for cutting metal or paving slabs / other stone materials. In its pure form, a tool for forming furrows is not used. Using a grinder, first cuts are made on concrete or brick. And then punch the necessary lines with a puncher. This method allows you to adhere to a single furrow depth.
In order to avoid a large amount of dust when working with a grinder, professionals resort to two methods of strobing:
- The formation of a wet cut. The entire surface to be treated must be constantly wetted. Do not splash onto a running disc. Humidification of the wall is performed before turning on the tool. Such a gating of the wall for wiring by a grinder without dust is associated with constant waterlogging of the room, there is a high risk of flooding the neighbors from below.
- Using a vacuum cleaner. On the market there are special devices with which you can connect the suction equipment to the grinder and make furrows without dust. The cost of such devices varies between 1500-10000 rubles.
The grinder can be used on all types of wall materials.
Stroborez work
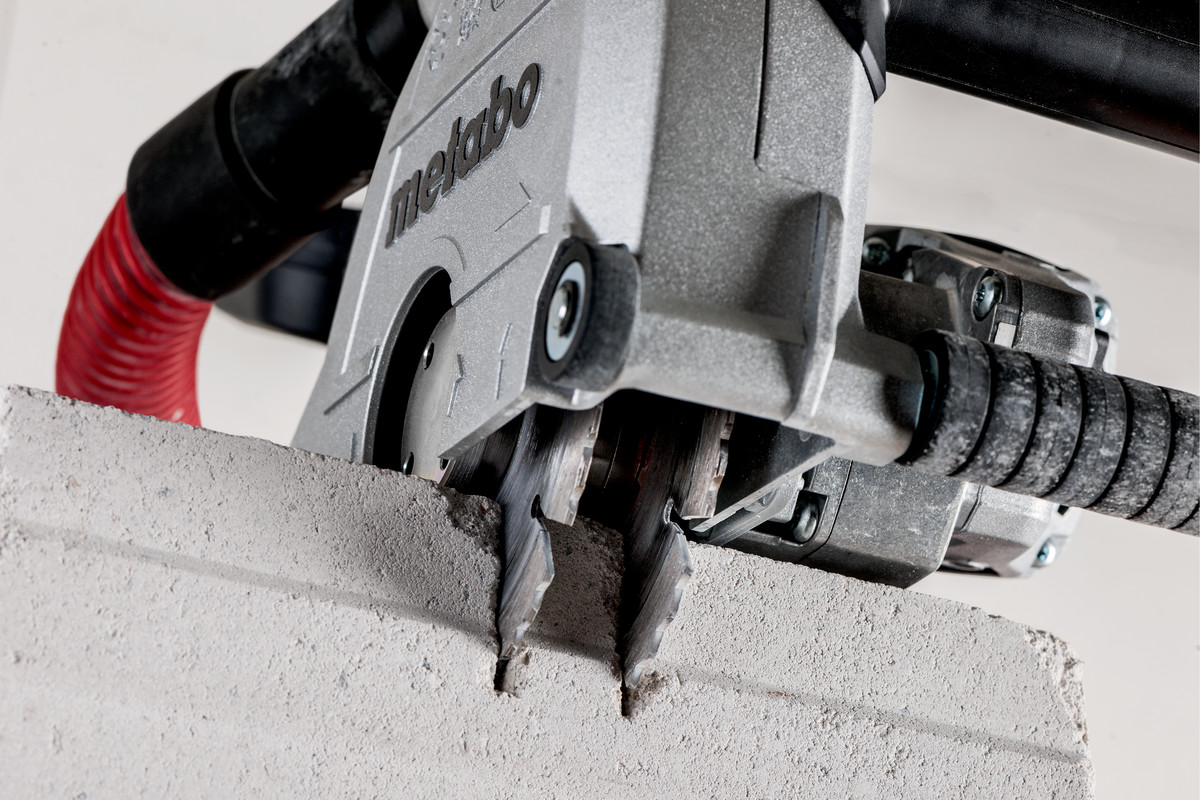
This version of the tool is especially good if bulk repair work is ahead. The principle of the chamfer is two discs located with a small gap. A special cutter is installed between them. At the time of formation of the grooves, the disks cut the edges of the tunnels. The cutter picks their core. Thanks to this, it is possible to achieve perfect evenness and depth of the grooves. The advantage of such a tool is that you can connect a vacuum cleaner to it to collect dust. The disadvantage is the orientation of the device to one type of building material. More often - on aerated concrete. It is possible to form furrows on brick or concrete. But this requires special types of chippers. They cost more. But their performance is lower.
Chisel / Chisel and Drill
This is the oldest way to make wiring grooves. On the lines of the applied marking with a pitch of about 2-2.5 cm, holes are made with the help of a drill of the required depth. Then, with a chisel / chisel and a hammer, furrows are knocked out manually as if by a dash. With this method of work, the master spends a lot of time.
DIY Stroborez
To grind the walls under the wiring with your own hands, you can make a homemade wall chaser. To make it you will need:
- Powerful angle grinder from 1.2 kW. Such an indicator is extremely necessary, since the tool will rotate two diamond blades.
- Pipe with an internal section of 50 mm (metal).
- Sheet metal with a thickness of 2 mm or more.
- Wheels or bearings in the amount of 3-4 pieces with a diameter of 2-3 cm.
- Metal gaskets for their device between two disks (it is better to order them in advance from a turner).
- Metal fasteners (nuts, screws).
- Two or three cuts of pipes of a small section.
In addition, you need to prepare a file, a vice, a welding machine, a hammer, a vernier caliper, a ruler, and a pencil. The finishing touch is the coating of discs with nitro enamel. Therefore, you need to prepare it.
The principle of the formation of a home-made chisel cutter is to fix two disks for cutting on concrete on an angle grinder. Between them with the help of gaskets maintain the desired distance (the width of the future strobes).
If the grinder does not provide a thread for fixing two disks, it is not worth the risk. In the process, one of the work items can fly off and injure the master.
Stroborez from a drill
Making the right tool from a drill with your own hands is easy. It is only necessary to fix the desired cutter in the drill chuck. But the formation of grooves using such a device is not entirely high quality. The grooves have different depths and widths.
Air conditioning
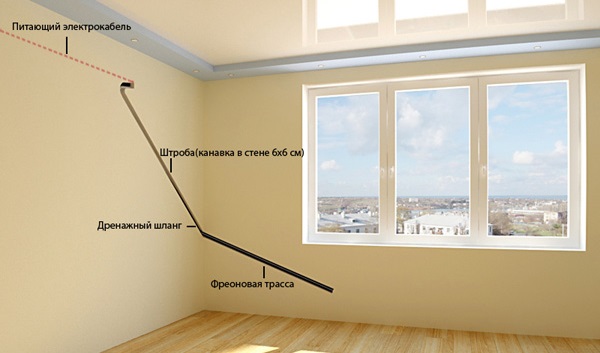
Under the climate control device in the room, the concrete walls of the panel house are often ditched. It is the chipper that is inappropriate here. It is better to use a grinder or punch. It is necessary to monitor the process so as not to stumble on the fittings in the bearing walls (after all, it is in the front panels that they make furrows for wiring). If the valve is damaged, this will lead to a weakening of the supporting structure. Further destruction of the building is possible. In order not to stumble on the fittings, it is necessary to use a metal detector before starting work. The channels for laying the cable to the air conditioner are 6 cm wide and 5 cm deep.
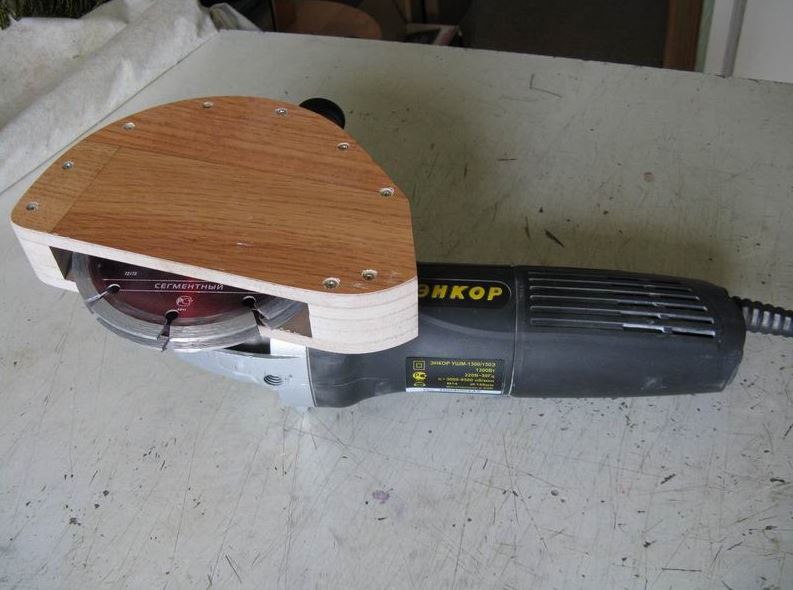
Homemade dust trap for grinder
Masters often resort to the manufacture of a protective casing on their own with a grinder for a vacuum cleaner. Such a curtain will help remove dust. For work you need to take:
- aluminum pan;
- measuring instruments;
- grinder;
- paint.
A casing is cut from the bottom of the pan along the diameter of the impeller of the grinder. Here you need to accurately calculate the depth of the disk. The height of the formed slice depends on it.
From the remains of the pan, the landing axis is cut. On the grinder try on the cross section of the exhaust device. Securely fasten it.
Using the same method, a nozzle for a hose of a simple household vacuum cleaner is assembled. The edges of the finished structure are carefully, in a single line, bent inward. This is necessary for attaching the side walls. They can be made of any material (metal sheet, etc.).
It remains to give the finished device an aesthetic appearance: to clean the joints and paint.
Before the start of the gating, it is necessary to mark the walls. This is necessary in order not to accidentally damage the old wiring, reinforcement of the supporting structures and not to violate the basic requirements of SNiP for such work. Marking is done using a level / ruler and a construction pencil.