The installation of a passage switch is optimal when it is necessary to control a lighting device from several different places. Knowing the wiring diagram, for such a system, you can use a traditional device. To ensure comfortable control of the light source, you need to know how to connect a switch through passage as usual.
Design features
Based on the number of switched electrical circuits, devices can be one-, two- and three-key. Terminals with screw or spring clamps. Also, the design depends on the functional purpose. The types of devices differ when used for external or internal wiring.
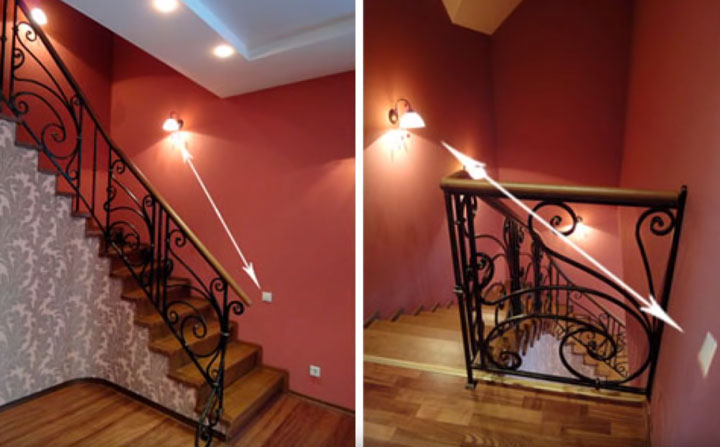
Such electrical equipment is designed to turn on and off from different places one or a group of lamps. There is no need to return to the other end of the room to press a key. Electrical appliances are used in large apartments, in corridors and on stairs, when lighting garden paths, in the bedroom. In addition to convenience, this provides energy savings.
Passing switches are also used in concert halls, in stadiums, in underpasses and tunnels, in the entrances of high-rise buildings.
Differences between straight through and conventional breaker
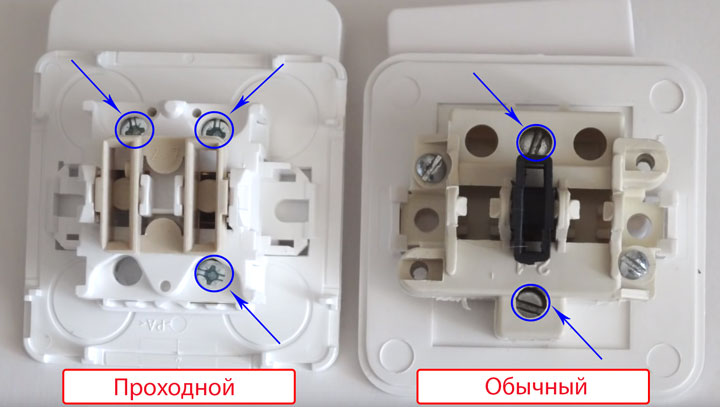
In appearance, the switches do not differ. The usual internal construction is provided with one input and output. It can have up to three keys, which allows you to control multiple light sources. More often installed near the entrance to the room. Connection is made using two terminals.
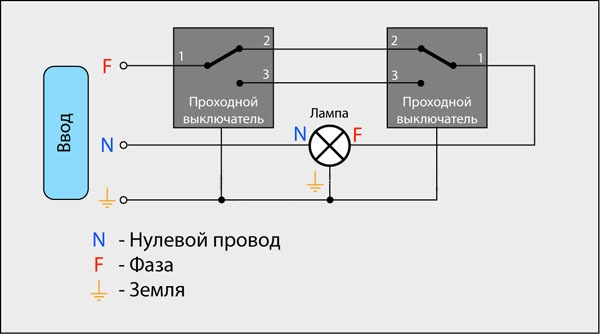
The classic walk-through has a pair of exits and one entrance. In this case, the electric current does not break, but is redirected to any other output. Under the body of the product is a diagram. The single-key walk-through is equipped with three-wire switching and three terminals with copper contacts. This is a switch that redirects current to other sections.
By design, installation method and type of control, switches can be:
- keyboards;
- push-button;
- sliders;
- traction;
- toggle switch.
They are also classified according to voltage and current strength, degree of protection, climatic conditions in which they are installed.
It is important not to confuse the appliance with a cross over or cross. A vertical triangle is indicated on the pass-through key, in the rest it is located in the horizontal direction.
How to connect a loop through device
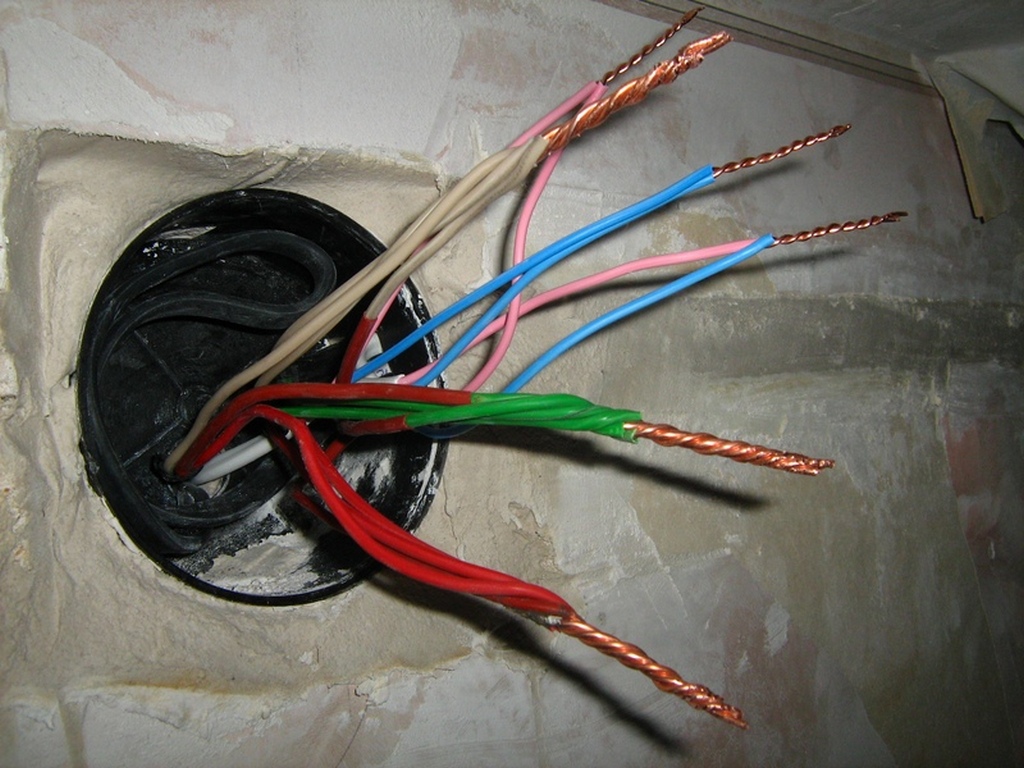
The current is supplied through a junction box. Choose a suitable place, install it and output a three-core cable. In addition to phase and zero, it is equipped with a grounding wire, which makes the system safe. Factory color coding of cores simplifies installation. More often it is a copper flexible cable, the cross-section of individual wires is from 1 to 1.5 mm.
Pre-do the markup, where the switches and lamps will be located. Then the walls are ditched and the conductors are laid out. Niches are drilled for mounting the switch mechanism. After preparatory work, you can connect the entire system.
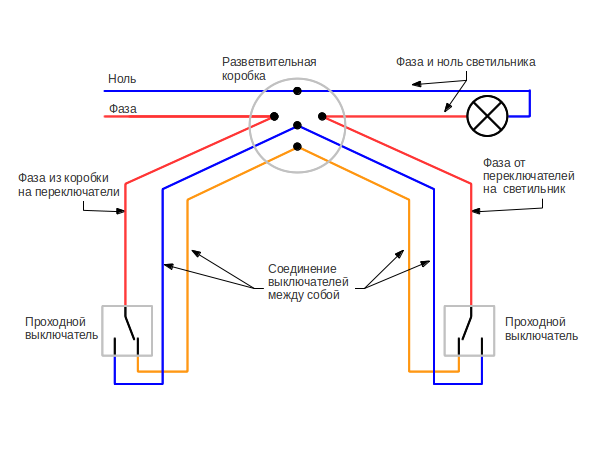
For a correct and safe connection, the following sequence must be observed:
- First of all, you need to make sure which wire in the box is the phase, usually it is red.
- Disconnect voltage.
- The phase is connected to a nearby switch and connected to terminal “1”.
- By marking on the terminal block, the remaining cores are connected, remembering the corresponding colors.
- Similarly, work is performed on another switch.
- The core from the second switch with the phase of the lamp is connected to a bright wire in the junction box.
- Two other wires from the first switch lead to the corresponding terminals of the second.
- Zero and ground from the box lead to the same colored cores of the lamp.
- All twisting must be done correctly, insulate the connection.
Then you can apply current for several hours and check the system. Each of the switches must turn off and on the light fixture independently of the other. If this does not happen, you should check the correctness of the scheme. Detected foci of heat are a sign of poor contact. It is necessary to disconnect the system and reconsider the connection.
Do not twist a copper and aluminum core.
How to make a checkpoint from a simple switch
To convert, you need two switches - one and two keys. It is better if they will be from the same manufacturer and the same in size. The essence of the alteration is the addition of one more contact to a two-key ordinary switch. First you need to make sure that the design allows you to swap the terminals.
On a ceramic base there is a group of general, private and “rocker arm” contacts. The electrical part is removed, one of the movable contacts is turned through 180 °. One site from the general group is cut off. The resulting mechanism is assembled by checking its operation.
The device is closed with a single lid. You can leave double keys by gluing them together. Thus, in one position, one circuit is activated. By switching the key, another will be connected.
Rocker switch
Equipped with two inputs and outputs, has four terminals, immediately switches a pair of contacts. It is used not so often, but in some cases is indispensable. Facilitates movement in the dark:
- in a large corridor or hall with many doors;
- in an apartment with three levels;
- a bedroom with a switch at the entrance and two next to the bed;
- being in the house, it is possible to control the lights in the garage, on the terrace, in the gazebo.
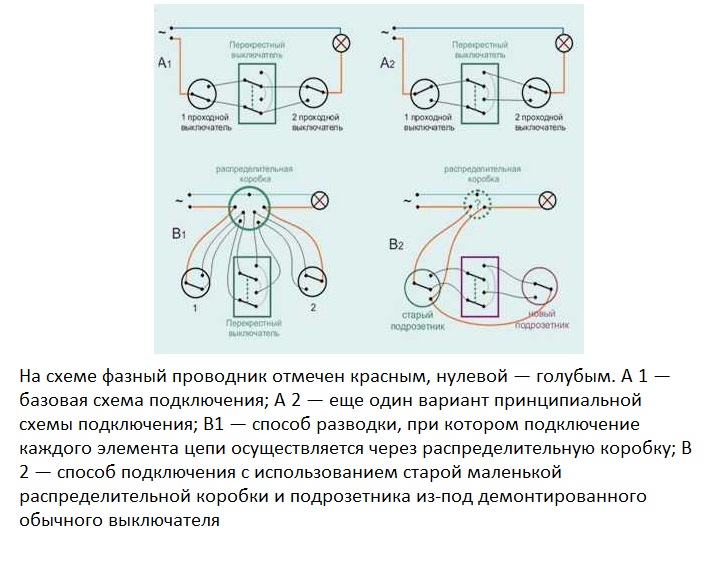
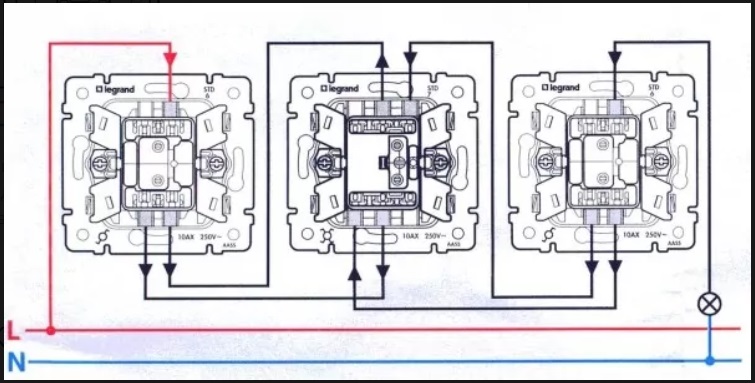
To equip the staircase lighting in a three-story building, you need to create three control points. The cross over switch is not used on its own. It must be connected in the gap between the passage switches. Knowing the order of connecting the pass-through, it is easy to figure out how to make the cross over switch.
Their number can reach up to 10, but they should always be located between the passage.
There are several schemes for controlling lighting from 3 or more places. You can assemble the circuit through the distribution panel, or bypassing it. It is possible to connect several types of fixtures at once.
Is it possible to use the passage switch as usual
Sometimes it is necessary to make an ordinary two-key switch from a passage switch. Install a walk-through device so that it works as simple. To do this, connect it without a pair.
However, then the meaning of the elements of its construction is lost. But the complexity of the mechanism and the number of parts affects the price. It makes no sense to buy an expensive switch through passage and use it as usual.
Disadvantages of pass-through devices
The position of the keys does not allow to determine whether the system is turned off or on. For example, you won’t be able to immediately understand if the light is turned off or the light bulb is blown. It is impossible to simultaneously control the light device from different places.A large number of connected devices means a lot of twists in the junction box. Connection errors force you to reassemble the entire circuit.
The passage switch has many functionalities. But to connect it, you need to purchase another device. The number of connecting wires is also increasing, which increases the overall cost of the system. An ordinary switch has a relatively low price indicator, but loses in functionality.
://