Every year, frame construction is becoming increasingly popular. It is explained simply - the affordable price of the material, simplicity and speed of assembly, excellent performance of the finished structure. For the construction of a residential building does not need to have special education and professional skills. If you decide to build a house yourself, the wiring in the frame house should not only be reliable and safe, but also convenient to use, organically fit into the design of the premises. To achieve this, you need to study the requirements of GOST, choose the best option for the placement of communications and devices.
Features of electrical wiring in frame houses
Along with numerous positive characteristics, frame structures have a number of specific features that must be taken into account when designing and implementing electrification.
The main nuance is the combustibility of the materials from which the walls and floor slabs are made. The cause of ignition may be a spark or a significant increase in temperature. Even the use of flame retardants does not always eliminate the likelihood of a fire.
The next property is the insufficient thickness and strength of the bearing surfaces. There is a difficulty in attaching lines and devices to plywood and drywall, which are used for interior decoration of rooms.
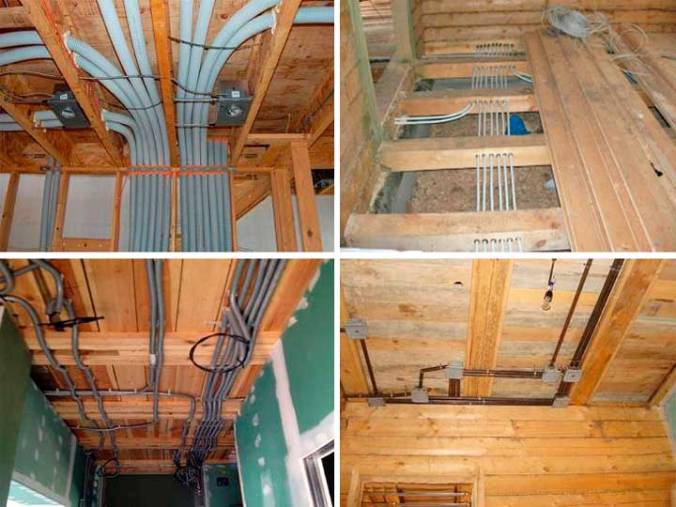
There is a specific cable management procedure depending on the method selected. This operation is carried out at the stage of erection of supporting structures or after finishing work.
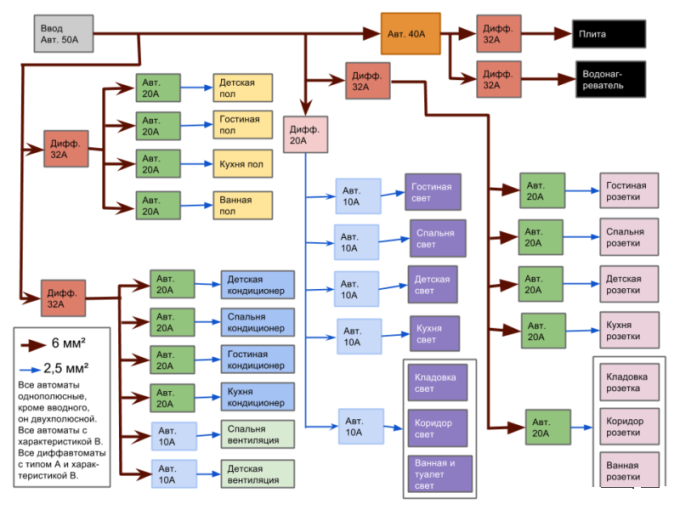
Wiring plan
Electrification work begins with planning. You need to draw up a diagram on paper or in a computer version.
The drawings should include the following information:
- roof and supporting structures;
- entrance and interior doors;
- window;
- water, sewer and gas pipes;
- cable entry into the house;
- distribution panel;
- grounding
- sachets;
- circuit breakers;
- sockets;
- lighting;
- Appliances;
- passing wiring;
- junction boxes.
By the number of consumers, it is necessary to calculate the load for each room and for the building as a whole. This will help determine the type and power of opening machines.
It is imperative to draw up a step-by-step plan, in which the sequence of all events will be described. This paper will help to avoid mistakes, as all actions will be performed in an accurate and thoughtful sequence.
Based on the project documentation, the types and quantities of materials and necessary tools are calculated. You should have a small reserve, as unforeseen circumstances may arise during the work.
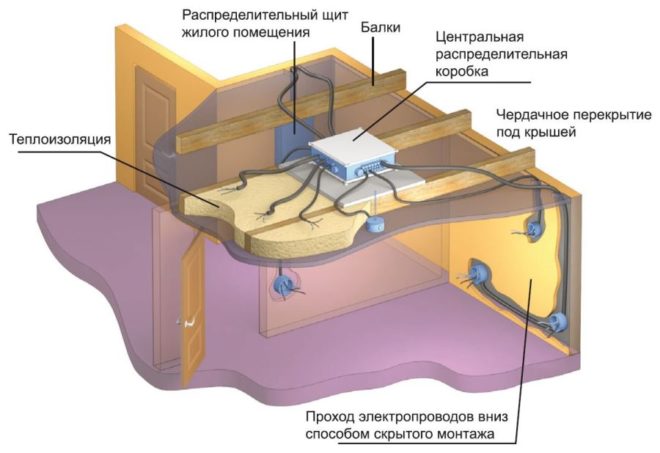
Entering the house

The input of the power cable into the house can be done by laying it through the air or underground. Based on this, holes are made in the ceiling plate or in the base. When connecting through the air, a steel cable is stretched between the building and the pillar and a wire is already hung on it with clips. If the underground option is selected, a pipe is placed into the trench first, into which the cable is drawn. This will prevent its rupture during heaving.A flexible steel adapter is inserted at the wiring entry point into the house.
In accordance with SNiP, the line is first wound up on the meter, which is installed externally. To protect against environmental influences, the meter is placed in a sealed box with a window. After the counter, a batch switch is installed, which interrupts the supply of energy in case of emergency situations on the line.
Switchboard
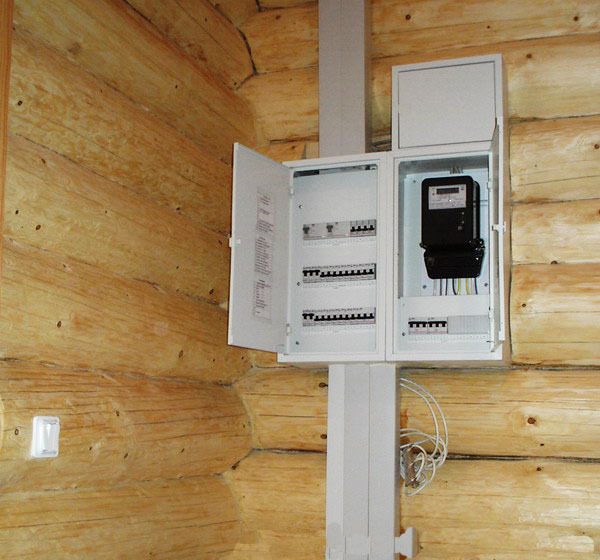
The distribution panel is located at the place where the line enters the building. You can make a cabinet yourself, but it is better to use a ready-made factory product.
Inside the shield, in accordance with the scheme, the following devices are placed:
- introductory machine;
- connecting busbars;
- residual current device;
- differential automata;
- circuit breakers;
- fan.
The doors of the shield should be equipped with a lock, which must always be closed after inspection and maintenance of the equipment.
What type of wiring to choose
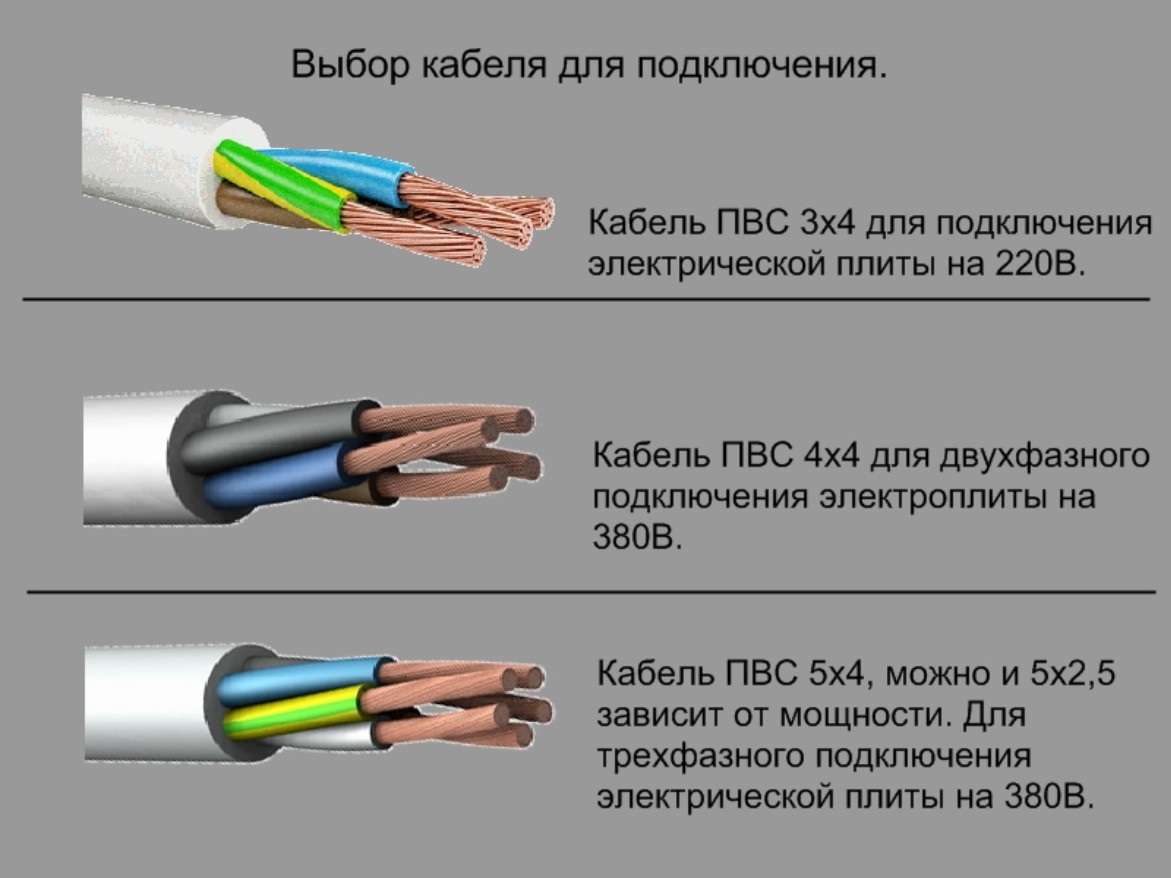 In accordance with the updated rules for the arrangement of premises for the electrification of a private house, only cables with copper conductors are allowed. If the building is equipped with aluminum lines, inspectors will not give permission for its commissioning.
Depending on the voltage that enters the building, a three-core cable for 220 V and a five-core cable for 380 V are selected.
The choice of wiring is based on the power of consumers who plan to connect to the network.
Optimum wire cross-section for various directions:
- upper level: lamps, chandeliers, backlights, alarm sensors, video cameras - 1.0-1.5 mm²;
- sockets in living rooms - 2.5 mm²;
- powerful appliances: stoves, ovens, water heaters - 4.0 mm².
In addition to the section, you need to pay attention to the composition and thickness of the insulation. A good cable does not change its characteristics from heating, and in contact with fire does not emit smoke and toxic substances.
Laying methods

Installation of wiring can be carried out in any way that suits property owners most of all.
An open version is the placement of cables and devices on the surface of walls and internal partitions. To place communications, plastic boxes, electrical pipes, ceramic insulators or steel strings are used. Installation is carried out after the construction of the building and the completion of the premises.
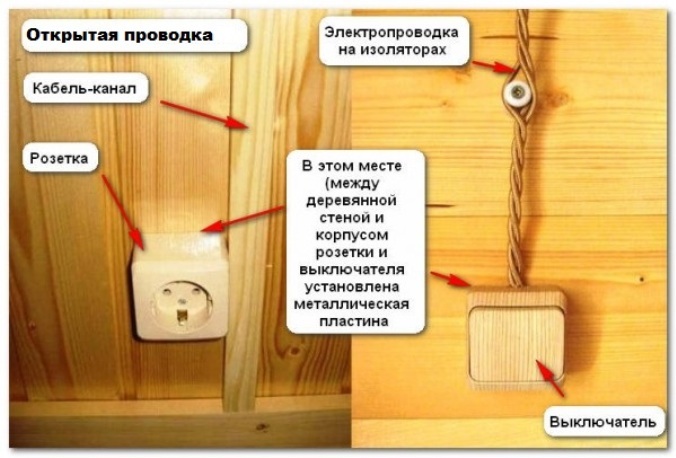
Advantages of the open method:
- simplicity;
- high speed laying;
- low price;
- free access for inspection;
- possibility of repair, replacement of some parts and modernization.
The disadvantage is that communications spoil the style of the room and there is a risk of damage to them.
Hidden wiring in the frame house is installed in the process of its construction, lines are laid in the frame until it is sheathed with shields.
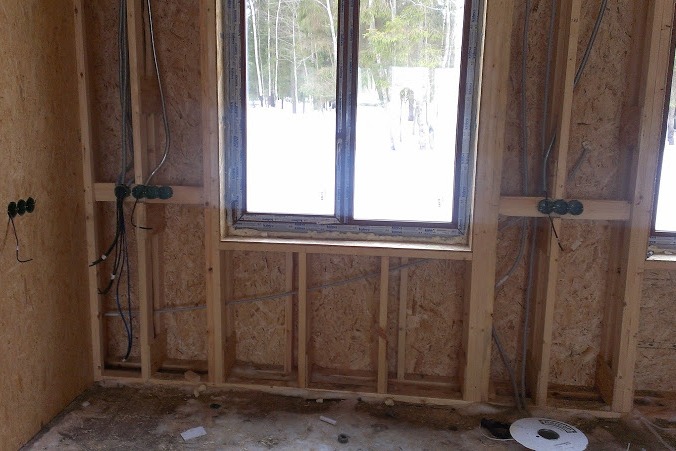
The closed method has the following advantages:
- the ability to hide communications under the skin;
- maintaining the integrity and harmony of surfaces.
However, the number of disadvantages of this solution is much greater:
- the switches and sockets are fixed permanently, it is no longer possible to transfer them or make new points;
- it is impossible to separate the wiring, if necessary;
- there is no access to cables and mounting boxes for inspection and repair;
- complexity and high cost of work;
- high risk of fire due to short circuit or heating of contacts;
- refusal to conclude an insurance contract.
Analysis of the advantages and disadvantages of each method suggests that the right choice is the external option.
Material selection and safety
When selecting cables and devices, preference should be given to quality products for which sellers can provide a certificate of conformity. The life of communications and the safety of people depend on this.
For eyeliner to the house, you can use a cable with thick aluminum conductors, the norm for internal wiring is copper wiring. Even in the design process, it is necessary to provide for the installation of a three-core cable in which one core (yellow-green) is provided for grounding. Fire safe cables should be purchased. For commutation busbars with copper or brass cores should be used.
Powerful household appliances must be connected to power outlets. Before connecting, carefully read the operating instructions for the devices. If you decide to make an internal gasket, you should use metal sockets.
Load distribution
Uniform load distribution between the lines is necessary to prevent them from overheating and burning contacts. The calculation is based on the operation of the system at a design capacity of not more than 30 minutes.
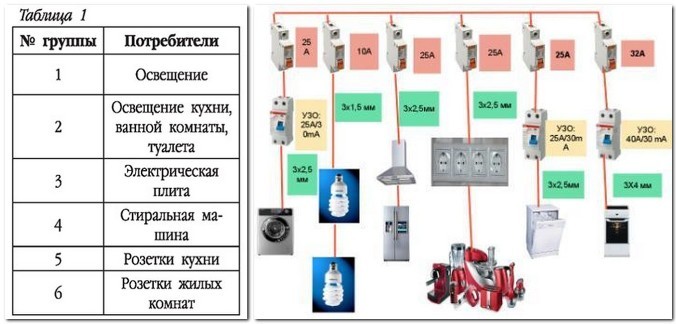
To obtain the initial data, you should use the following recommendations for grouping consumers into groups:
- similar products;
- summation of indicators;
- the selection of a separate group of powerful products with a long mode of operation.
After that, it is necessary to distribute the installations along the lines. Based on the calculations, the number of directions, the type of machines, the need for an RCD, the cross section of the wires and the types of outlets for each room are determined.
Installation in the house

After entering the cable into the house and connecting the meter, laying of lines, installation of sockets and switches is carried out.
This event is held in the following order:
- Securing mounting boxes and socket boxes.
- Installation of the route for wiring. Depending on the chosen method, pipes, cable channels, strings or insulators are installed.
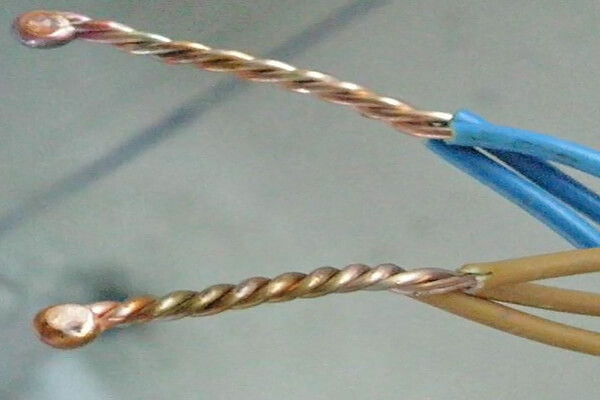
- The cable is laid. The connection is carried out by crimping, soldering, welding, twisting or in tires. Switching locations are isolated.
- Sockets, switches, lighting fixtures and sensors are connected. Checking the lines.
- Grounding is arranged. It consists of electrodes buried in the ground at 2 m, connected by a steel circuit.
After the assembly is completed, it is checked for correctness by ringing all the lines.
To enter the house into operation, you need to contact the management company with a statement containing a request for connection to a single power grid. The application must be accompanied by project documentation, technical specifications, an estimate of work, a receipt on payment of the state duty. After the conclusion of the contract, you need to transfer money for connecting to the network and prepare the equipment for the arrival of the inspector. At the end of the audit, an act is drawn up and voltage is supplied to the building.