One of the most popular sources of artificial lighting is fluorescent lamps. They consume 5-6 times less energy than standard incandescent lamps, but at the same time they shine with the same brightness. LED downlights with drivers are more economical, but due to their high cost, they were not able to push fluorescent lamps (LDS) out of the market. With prolonged use, fluorescent lamps may lose their performance. You can fix such problems, but for this you need to know how to check the fluorescent lamp, including using a multimeter.
The device and principle of operation of fluorescent lamps
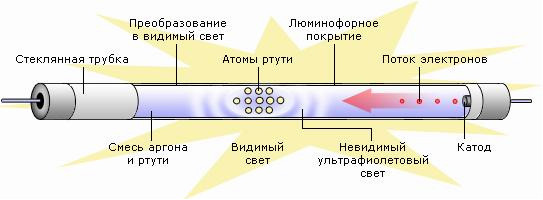 The mass of advantages of LDS is due to the fact that they are gas-discharge type devices in which ultraviolet radiation is formed due to electric discharges in mercury vapor.
There is one peculiarity here - visible illumination from a lamp arises only after ultraviolet radiation is modified. Such a transformation is possible only with the use of those compounds that contain calcium halophosphate or other compounds with phosphors.
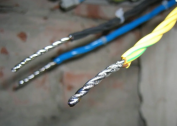
According to the principle of functioning of the LDS, it is possible to equate to gas-discharge type lighting sources. An inert gas is placed in a glass flask, having previously evacuated air from it, and then 30 mg of mercury is added to the gas. Spiral electrodes, similar to an incandescent filament, are installed on both sides of the vessel. They are soldered on each side to 2 contact legs, which are placed in plates of a dielectric type. The inner surface of the tube is covered by a phosphor layer.
The daylight is turned on using a ballast - electromagnetic or electronic type. An electromagnetic device includes a main element - a choke. This is a ballast type resistance in the form of an inductive coil with a metal core, which is connected in series with a fluorescent lamp.
A choke is needed to maintain uniform discharge and adjust current if necessary. When the bulb is turned on, the inductor suppresses the starting current until the spiral filaments heat up, and then gives the maximum voltage from self-induction, as a result of which the LDS is ignited.
Causes of Blown Fluorescent Tubes
 Often, the LDS burns out, which gives it similarities to a traditional incandescent lamp. When turned on, an arc of electricity is formed in the flask, as a result of which the tungsten spiral electrodes become very hot. Heat surges entail destruction and burnout of the threads.
To extend the service life, a layer of active alkali metal is applied to the tungsten filament. The discharge between the electrodes stabilizes and the temperature decreases, due to this the thread lasts much longer.
Increased on / off lamp entails the destruction of the protective layer, it just falls off. A discharge passing through bare threads warms the spiral at weak points, resulting in burnout.
Digital tester check
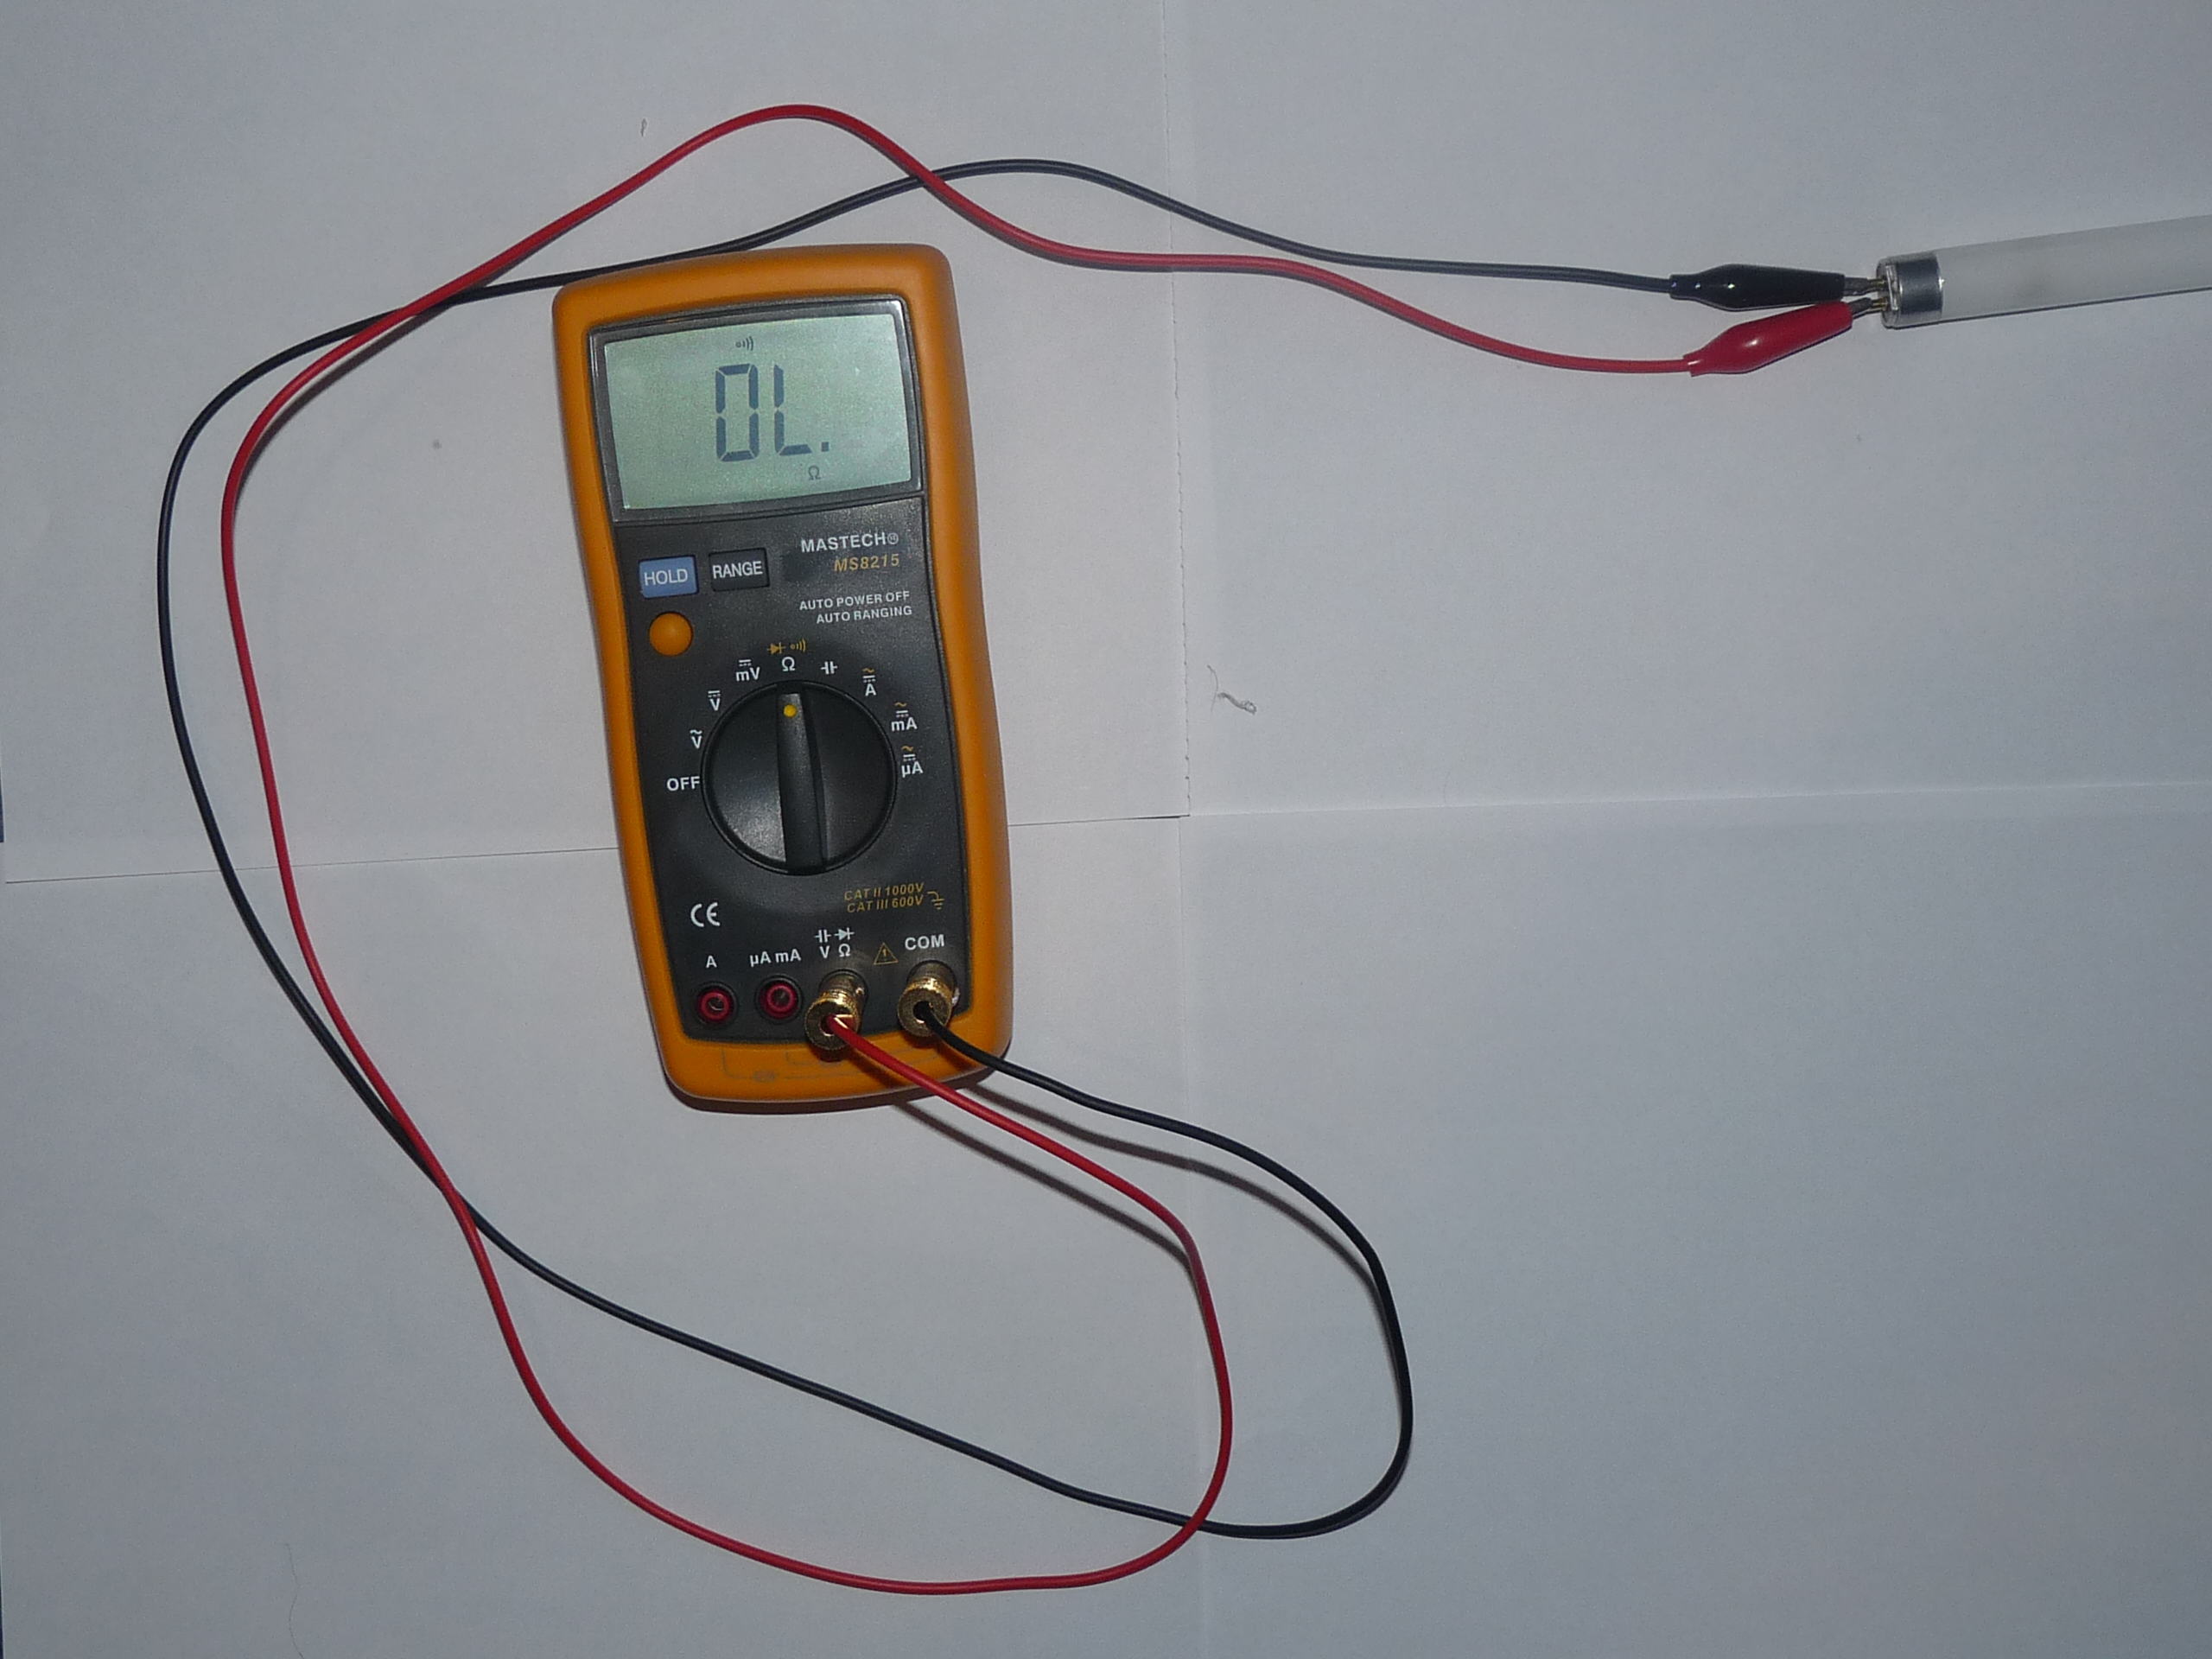
Using a digital tester, you can check the integrity of the filament. This can be done both in the dialing mode and in the resistance test mode. You must set the multimeter in the desired mode and check the spiral from both edges of the tube.
In dialing mode, if the spiral is working, the tester will produce a characteristic sound - a buzzer.
In the resistance test mode with a working spiral, the multimeter indicator will display a value of 5-10 Ohms.
Burnout of heating threads is the most common breakdown of fluorescent lamps, which is easy to detect with a digital tester.
Troubleshooting and troubleshooting
LDS is faulty in such cases:
- does not turn on;
- flickers temporarily before turning on;
- flickers for a long time, but does not turn on;
- buzzing;
- flickers when burning.
Electrode Coil Integrity
You can ring the spiral electrode for the presence of resistance with a multimeter. On the device, the resistance measurement mode is set, and after that the probes are applied to the legs of the bulb on both sides.
If the spiral is faulty, the multimeter will show zero resistance - the thread is torn. The whole spiral always shows a small resistance - up to 10 ohms. If at least one of the spirals is found to be faulty, the lamp must be replaced. It cannot be restored.
Malfunctions in electronic ballast
To check the operability of electronic ballast, it must be replaced by a working one. If the lamp lights up, then the cause of the breakdown was in it. Broken ballast can be repaired by yourself. First you need to change the fuse to a similar model with the same characteristics. If the filaments glow weakly, then there is a breakdown in the capacitor between them. It is also replaced by a similar one, but with an operating voltage of 2 kV. weak models will burn quickly.
Due to power surges, transistors can burn out. They need to be changed. You can take new ones from old ballasts. After replacement, check the fluorescent lamp with a 40 W lamp.
How to check the choke of a fluorescent lamp
Before checking the throttle of the fluorescent lamp with a multimeter, you need to familiarize yourself with the main signs of its breakdown:
- buzz of the lighting device;
- the lamp turns on and goes out after a while, darkening along the edges;
- LDS is overheating;
- “snakes” appear inside the tube;
- The lamp flickers a lot.
To check the throttle for operation, it is necessary to remove the starter from the lamp, and then close the contacts in its cartridge. Then the lamp is removed and the contacts in both cartridges also short-circuit. The multimeter is set to measure resistance, after which its probes are connected to the contacts in the lamp cartridge. If there is an open, the device will show endless resistance. With interturn circuit, the device will show a zero value.
How to check the starter
If the lamp began to flicker immediately after switching on, but at the same time did not light up, the starter failed. It will not be possible to perform its dialing separately from the LDS, since without voltage its contacts are open.
Checking the serviceability of the starter is possible by another method - by sequentially connecting it with an incandescent lamp to a standard electrical outlet.
The main reason for failure is the bimetallic plate wears out.
How to check capacitor capacity with tester
If the LDS capacitor is faulty, its efficiency index decreases to 35-40%. For lighting devices with a power of not more than 40 W, a capacitor with a capacity of 4.5 μF is enough. If it is less than this norm, the efficiency will be reduced, if it is more, the lighting will blink.
To measure, the capacitor must ring with a multimeter. When probes touch the outputs of a part, the device exhibits endless resistance. When this indicator is less than 2 megohms, this is a symptom of a significant current leak.
Turn on fluorescent lamp without choke
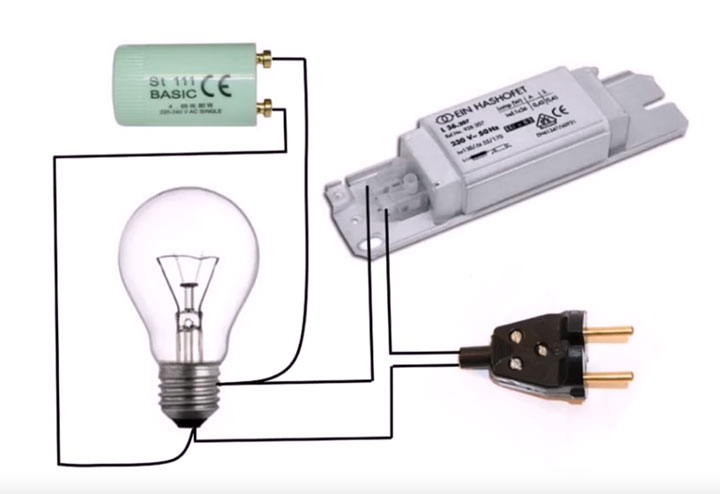
A burned-out daylight lamp can be returned to work if you connect it to the circuit using constant voltage, excluding the starter and throttle element. The use of a half-wave rectifier with doubling the voltage will help here.If after some time the brightness of the lamp decreases, it must be turned over in the lamp, as a result of which the connection poles will change.
This scheme involves the use of radio elements with a voltage index of not more than 900 V. It is this value that the LDS reaches at startup.
Connection diagram for blown bulbs
Due to burnout of the filament, fluorescent lamps often become unusable. You can return a second life to such a lamp using an unconventional starting scheme, repeatedly tested by craftsmen.
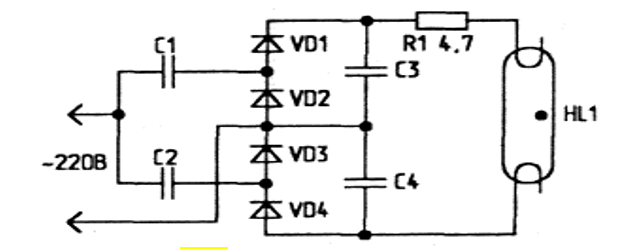
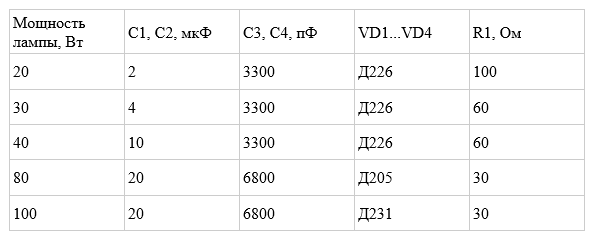
From the table you can find out the nominal values of radio elements for LDS with different power. The limiting resistors R1 must be made of wire.
You can repair LDS at home if you are guided by schemes and follow certain instructions. Such knowledge makes it possible to extend the operational period of the lighting device.