It is required to connect the chandelier after major repairs in the apartment or purchase of a new product. The idea to call an electrician looks attractive, but it has its drawbacks. Orders from professionals are scheduled for the weeks ahead, and an inexperienced craftsman can do more harm than good. Connecting the lamp can be done independently. To do this, stock up on a set of household tools, familiarize yourself with the rules of electrical work and safety measures.
Safety precautions
Negligence when working with electricity is fraught not only with a damaged device or burnt wiring. An electric shock can result in serious injury, disability, and even death.
To initially exclude such consequences, the following rules must be observed:
- Before starting the installation, de-energize the room by disconnecting the bag or unscrewing the plugs in the shield;
- use tools with protective insulation rated at 1000 V;
- work on a strong and stable support, eliminating the loss of balance;
- Do not use wiring with damaged insulation.
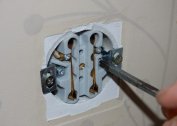
First of all, it is necessary to determine the polarity of the wires in the cable and find the ground. For this, an indicator or a multifunctional tester is used. The presence of a phase is indicated by the glow of a light bulb or a change in the readings on the display.
If the line is new, the wires have a certain color of insulation:
- phase - brown (black);
- zero is blue;
- grounding is yellow-green.
After examining the line on the ceiling, determine the polarity of the channels that connect to the switch contacts. If it is a standard single-key, there will be 2 wires (zero and phase). In two-gang products, 2 phases and 1 zero are displayed.
Novice masters believe that you can connect the wire to the switch in any order, not knowing what will happen if you mix the phase and zero when connecting the chandelier. If you insert the switch into the zero gap, the lamp will be under constant voltage, regardless of the position of the keys. This is fraught with electric shock when replacing burnt products and flickering LED lamps. Correctly connect only to phase discontinuity.
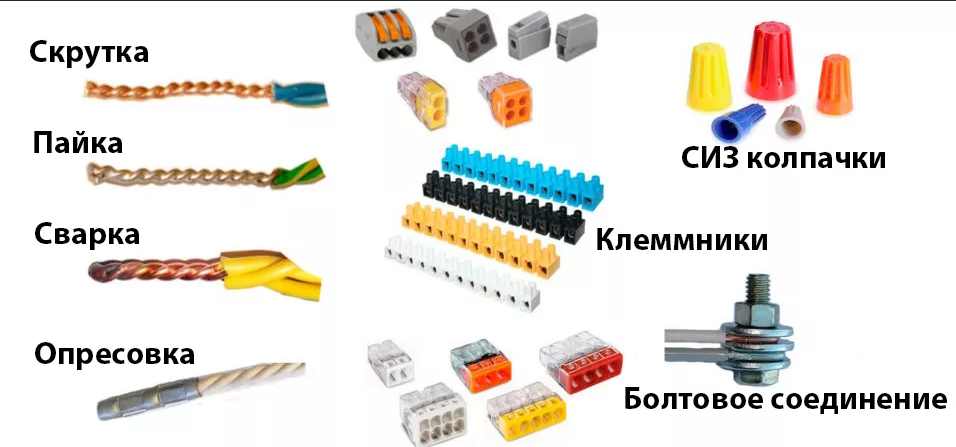
You can connect the wires in the chandelier in the following ways:
- Twisting. It is allowed in those cases when the cores are made of one metal. It is forbidden to combine copper and aluminum, as the result of an electrochemical reaction is corrosion that breaks the contact. The twist is closed with a plastic cap or wrapped with electrical tape.
- Bolt with nut and washers. The ends of the wires are inserted between the washers, after which the nut is tightened. The assembly is closed with insulating material.
- Mounting block. Compact and convenient fixture, which is a steel switch in a plastic case. It can connect up to 10 pairs of wires.
- Soldering. Applies to copper only.
Having decided on a work plan, you need to draw up a scheme, carry out calculations and purchase everything you need.
Required Chandelier Mounting Tool

To make the connection of the chandelier with your own hands, you will need such tools and equipment:
- step ladder or steady strong table;
- tester;
- indicator;
- hammer drill;
- curly and straight screwdrivers;
- nippers;
- pliers;
- stationery knife;
- soldering iron;
- marker;
- protective glasses.
To make a quality installation of the chandelier, the following materials are needed;
- solder;
- rosin;
- insulation tape;
- switching unit;
- cable with copper conductors with a cross section of 1 mm;
- fixture for fixture of the lamp (the expansion bolt shield with a hook, a steel suspension, a wooden bar).
In order not to hurt your head on the slab, it is advisable to use a construction helmet or a hat made of thick leather.
Preparatory work
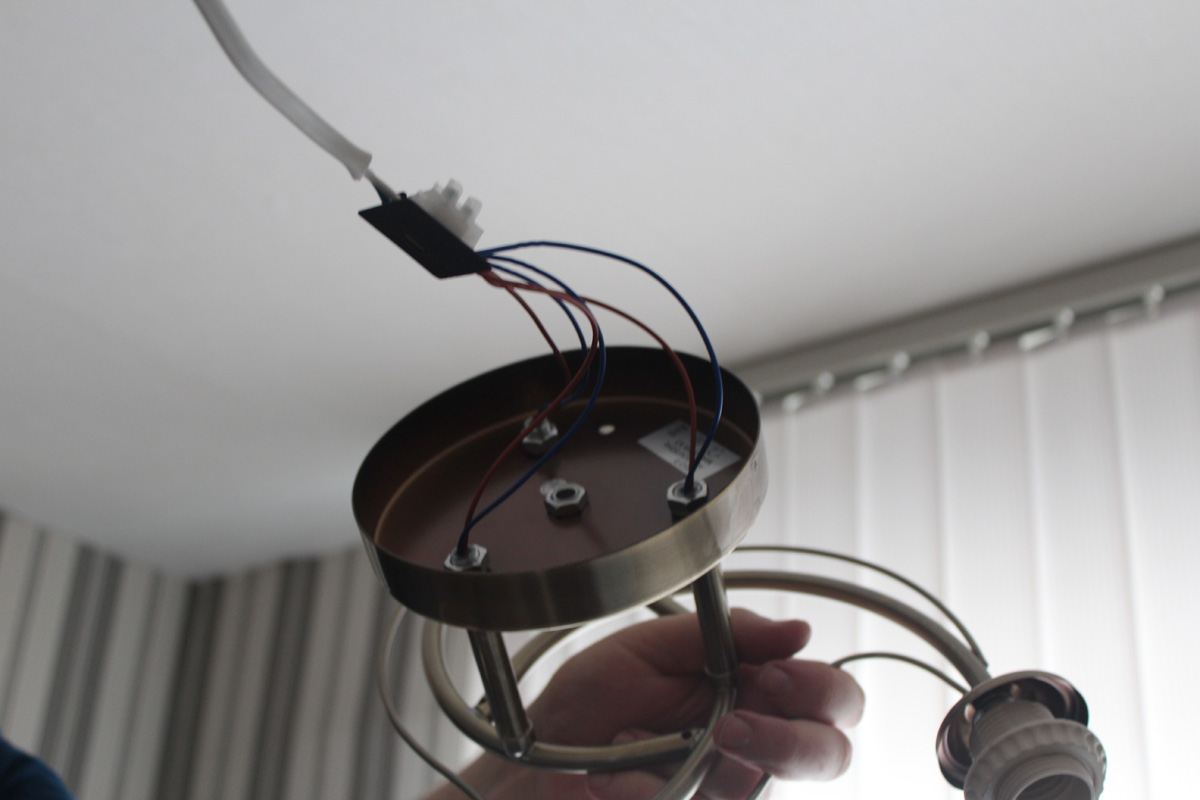
 Depending on the project, wires with or without grounding are installed in buildings. In all cases, there is 1 neutral wire and 1-2 with a phase. If there is no marking, before installing the chandelier it is necessary to determine the accessory of each core. This is necessary in order to properly connect the channels if a multi-track lamp is used.
In the old wiring, grounding can be found visually. Since products manufactured in the past did not have such contact, the excess wire was bent to the sides or cut off so as not to interfere.
When replacing a chandelier, you need to ring all the wires to establish their integrity, find zero and phase. The test is carried out under voltage. You should alternately bring the probe to each wire. The presence of current will be indicated by the glow of the indicator. To exclude the classification of stray currents as phases, it is necessary to duplicate the measurements with a tester. To do this, bring the probes to the zero and active channel. The device will show the voltage in the network. If it meets the standard parameters, the line is working. In conclusion, all wires must be marked in any convenient way.
Mounting the chandelier on the ceiling of the room
 Installation of the chandelier can be carried out by various methods. The choice of suspension is determined by the design of the ceiling and the lighting fixture.
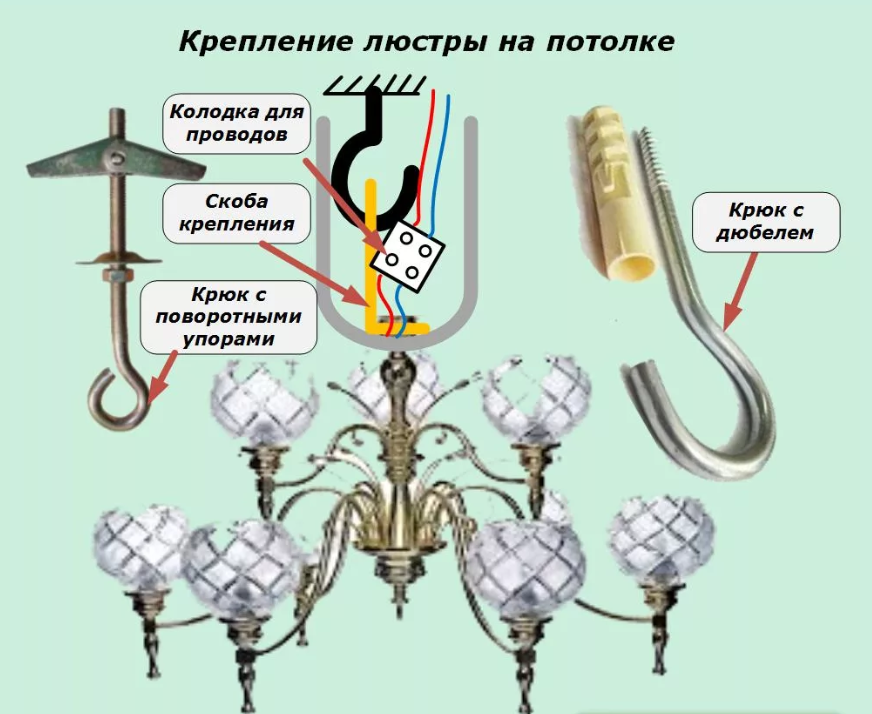
Hook hanging
In the majority of buildings constructed on standard series, hooks were initially provided by the project. If this product is available, it is necessary to check its strength under a load of 8-10 kg. If the fasteners are reliable, you can hang the lamp.
To fix the hook yourself, you need to perform the following actions:
- Determine the location for drilling. It should be remembered that the cable is laid only at right angles to the walls. In order not to damage it, you need to retreat from its exit by 3 cm towards the corner.
- Drill hole. Insert the dowel into it, screw in the hook. If you need to hang a heavy five-arm chandelier, it is better to use an anchor bolt, which has great strength.
- Wrap the hook with a thick layer of insulation tape.
After that, you can hang up the product and connect the wires.
Mounting on a mounting strip
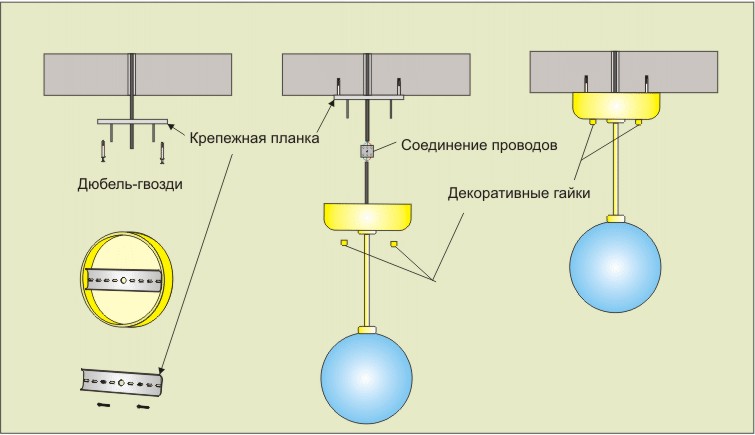
A mounting strip is included with wall and ceiling mount products.
Install the lighting device in the following sequence:
- Align the mounting bolts with the holes on the decorative cover. Tighten them with hooks (it is extremely difficult to do this at a height).
- Attach the bar to the ceiling, mark the drilling locations. Make holes, insert dowels into them.
- Screw the bar to the slab, check the fixation.
- After connecting the wires, screw the lamp to the bracket.
If the control panel is supplied with the lamp, the receiving device is pre-fixed in a decorative cap.
Features of fastening to the ceiling of drywall
Drywall is not designed for heavy loads, you can not hang a lighting device on it.
Options may be as follows:
- On a bearing steel profile in the place of its attachment to a vertical suspension. A hook or mounting plate can be attached to the metal frame. Screwing is carried out with metal screws.
- On the mounting platform. This design is assembled in advance, simultaneously with the assembly of the frame. After mounting the sheets, holes are made in them through which the device is screwed.
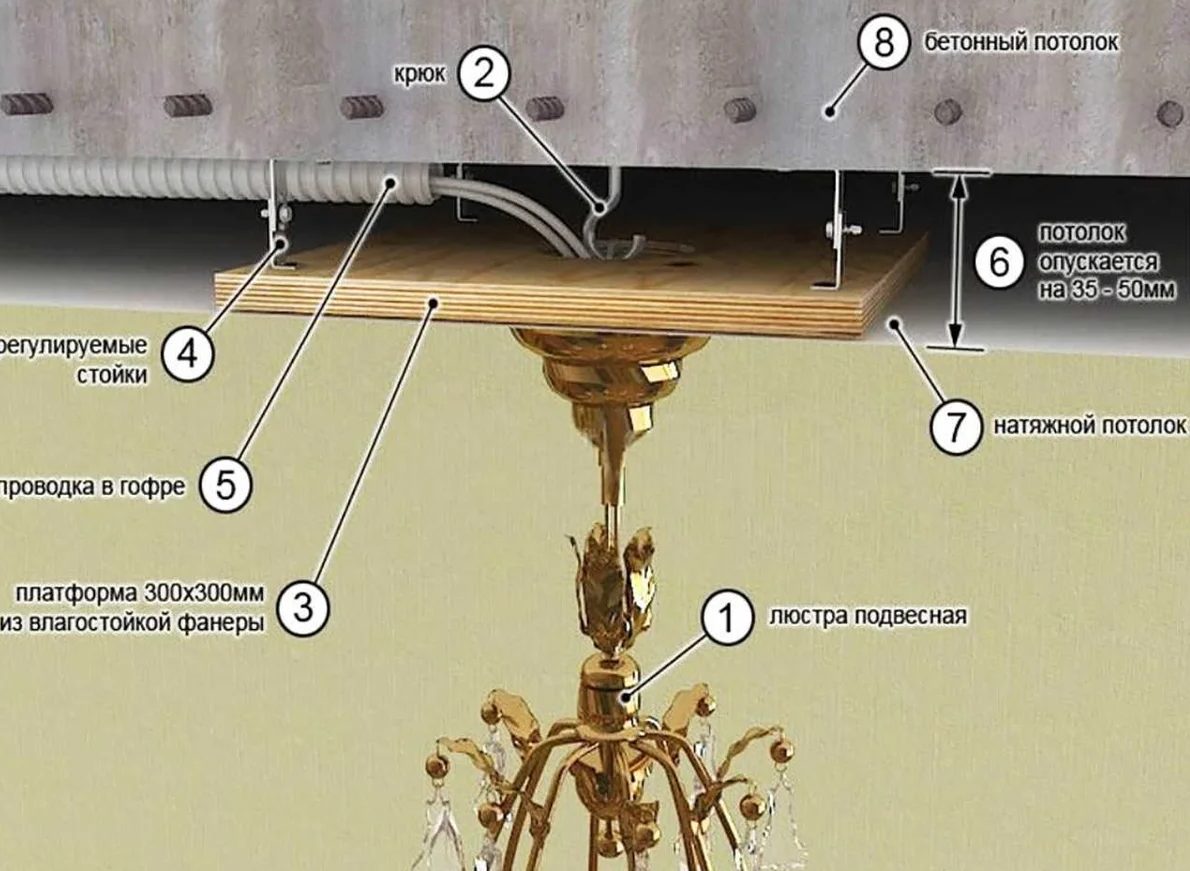
Ceiling Mount
To hang the lamp on a stretch ceiling, you need to make a base for mounting in advance.It is made of a wooden bar, several layers of plywood or suspensions for a steel profile. The level of the platform should be 1-2 mm higher than that of a stretched canvas. After installing and cooling the film, PVC rings are glued to it in the right places. Inside the rings, the canvas is cut out, through them you can connect to the network using one of the available methods.
Chandelier Connection Diagrams
 The luminaire connection diagram is made based on its configuration and the number of wires in the laid cable.
If a single switch is installed in the room, there can be only one installation option - an insert is made into the phase, and the wires of the chandelier wire are connected to a pair coming out of the ceiling.
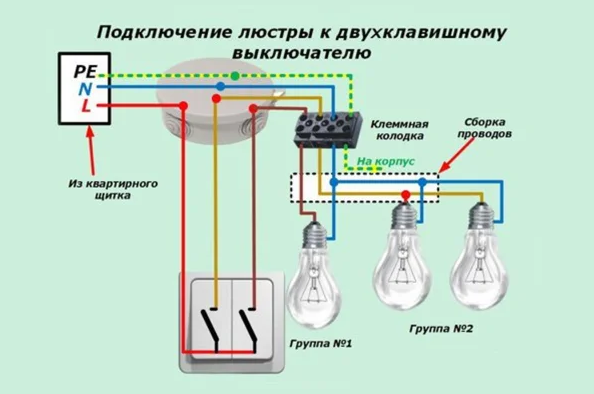
If the three-arm lamp has 2 wires, and the switch is double, you can disassemble the lamp and draw lines from each horn. This will make it possible to turn on all lamps or their groups. If there is no such desire, then the third wire (phase) is not involved, but is isolated.
To connect a chandelier with three wires, when there are 2 phases in the laid cable, you can connect the brown wires to the supply ends, and the blue ones to connect to zero. This will make it possible to include groups of fixtures at once or separately.
When there are a lot of wires on the chandelier, their connection to the three-wire cable on the ceiling is carried out by analogy with the previous case. All blue channels are attached to zero. Browns are connected to the phases in accordance with the plan (1 + 2, 2 + 2, 1 + 3, 2 + 4, etc.).
Connecting the chandelier to the switch unit with a socket begins with the determination of phases and zero. After this, the phases are connected to the contacts of the switch, and the zero line is attached to the corresponding terminal in the outlet.