Masters often use LEDs for spotlights. These small bulbs with minimal power consumption can produce good performance. In addition, they serve much longer than ordinary incandescent lamps. But when installing the lighting circuit, it is important to consider the polarity of the LED. Otherwise, it simply will not work on the supplied current or will quickly fail.
Details of the polarities of LED lamps

Such small lighting points work on the principle of current flowing through them only in the forward direction. From this arises the optical radiation of the bulb. If you do not observe the polarity when connecting, the current will not be able to lay itself a direct path along the circuit. Accordingly, the lighting device will not work.
Thus, before installing the LED, the master must find out the location of its cathode and anode ("+" and "-"). It is not difficult to do this, knowing certain principles of visual assessment of a light bulb or the operation of electrical appliances in combination with an LED element.
Polarity Detection Methods
There are several basic methods by which you can find out where the plus is in the LED, and where is the minus. The easiest way is to visually inspect the element and determine the polarities in appearance.
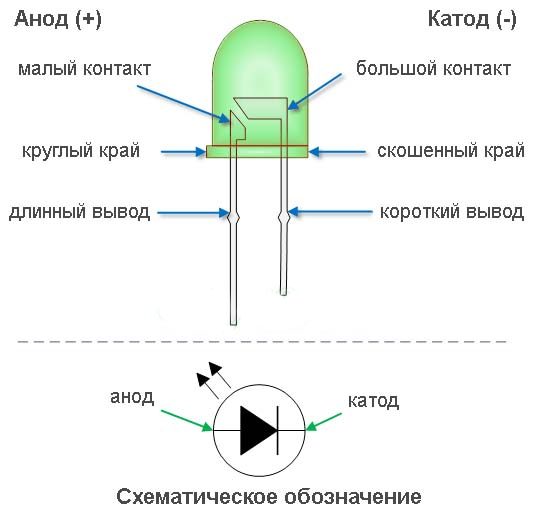
For new LED elements, a characteristic feature is the length of the legs. The anode (plus) will always be longer than the cathode (minus). As a reminder to the master - the first letter “K” from the word “cathode” means “short”. You can visually evaluate the bulb and bulb. If it is clearly visible, the master will see the so-called "cup". There is a crystalline in it. This is the cathode.
It is worthwhile to pay attention to the rim of the LED part. Many manufacturers prefer to affix a special marking in front of the cathode. It may look like a serif (risk), a small cut or dot. It’s hard not to see them.
A new option for marking LEDs is the “+” and “-” badges on the base. Thus, the manufacturer facilitates the work of the master, helps to determine the polarity. Sometimes marking with a green line opposite the plus is possible.
Using a multimeter
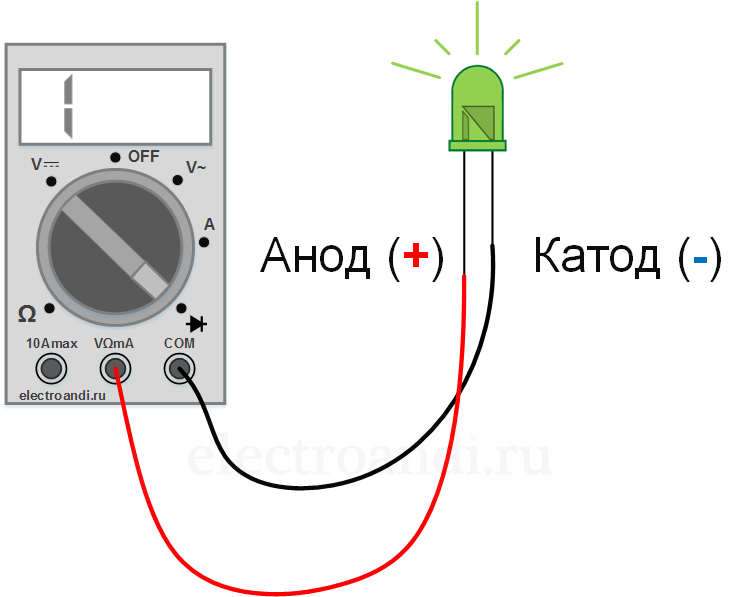
If you determine the LED - the anode / cathode - visually does not work, you can use special equipment. This is a multimeter. The entire verification procedure will take no more than a minute. Act in this way:
- The apparatus sets the resistance measurement mode.
- The probes of the multimeter are neatly connected to the legs of the LED bulb. Estimated plus put to the red wiring. Minus - to black. In this case, the touch is made short-lived.
- If the contacts are installed correctly, the device will show a resistance close to 1.7 kOhm. If connected incorrectly, nothing will happen.
The multimeter can also be operated in the diode test mode. Here, with the correct polarity, the bulb will give light. This recommendation works especially well with green and red diodes. White and blue require a voltage of more than 3V, so even with the right connection, they may not light up.
To check the elements of these colors through a multimeter, you can apply the transistor characterization mode. It is on all modern models of devices. Here they are:
- Set the desired mode.
- The light bulb is inserted into the special grooves C (collector) and E (emitter) with legs. They are designed for the transistor at the bottom of the device.
If the minus of the LED is connected to the collector, the light will give light.
Voltage method
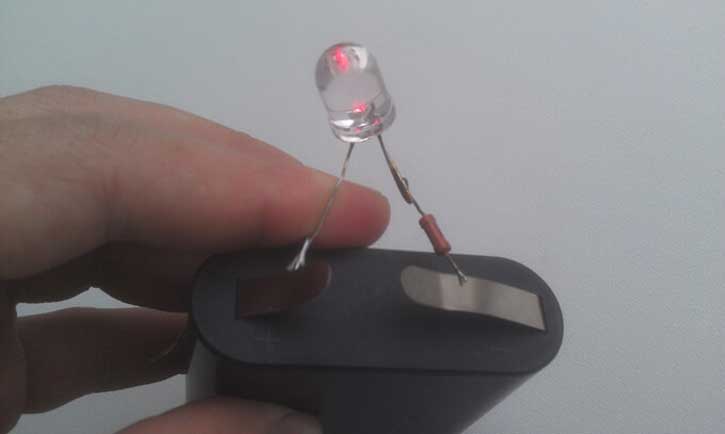
To determine the polarity of the LED, you can use voltage sources (battery) for this. But it is best to use a laboratory power supply with a smooth adjustment of voltage, as well as a DC voltmeter.
Act in this way:
- The LED bulb is connected to a power source and slowly increases the voltage.
- If the polarity of the element is observed correctly, the LED will give a color.
- If upon reaching 3-4 V the bulb still does not light up, plus and minus are connected incorrectly.
When the bulb is activated, it is not necessary to continue to increase the voltage. The element from such experiments will simply burn.
If the master does not have a power supply or a 5-12 V battery, several elements of 1.5 V can be connected in series with each other. A battery from a mobile phone or car is useful here. But it is worth remembering: when connecting LED elements to powerful devices, it is recommended to use a current-limiting resistor in parallel.
Determination of polarity using technical documentation
If the LED has just been purchased, it is accompanied by technical documentation from the manufacturer. Here are the basic data about the bulbs:
- weight;
- LED pinout;
- dimensions;
- electrical parameters:
- sometimes pinout (wiring diagram).
When buying items at retail, you can ask the seller to get acquainted with the information so as not to suffer at home and not to look for where the LEDs have plus and minus. A corresponding conclusion is made on the papers.
When polarity determination of LED bulbs is required

Small LEDs are widely used in various areas related to lighting and indication:
- street lighting: advertising signs, park lights;
- household elements of artificial light: lighting of working panels, perimeter of a suspended ceiling, built-in furniture, etc .;
- indication of electrical appliances on / off modes: home-made smart sockets, etc .;
- Kids toys;
- remote controls and more.
If the bulb fails, the master resorts to replacing it. In this case, it is required to determine the anode and cathode of the LED. Otherwise, the element simply will not give out lighting.
At various forums there is information that it makes no sense to look for where the LED “hides” plus and minus. It is often said that a light bulb can be connected without observing the polarities. There are nuances here. Even if the master is lucky and the element gives light, ultimately this will lead to the following consequences:
- The life of an incorrectly connected light bulb, declared by the manufacturer, will be reduced significantly. For example, with a guaranteed mode of 45,000 hours, the LED will work half as much.
- Productivity (intensity, brightness of light) will decrease several times from the one that should be. In the general chain, this will be visible to the naked eye.
Similar games with polarities and the probability of the diode element working directly depend on the characteristics of a particular semiconductor and the breakdown voltage.
The average duration of LED bulbs is 10 years. With their moisture protection, IP67 and more elements can be safely used with street lighting. In order for the LEDs to work the declared time, it is important to observe the polarities when connecting them and determine them before repair work, and not after.