Overhaul in an apartment of a multi-storey building in most cases is accompanied by the replacement of not only switches and sockets, but also all electrical wiring. This is done because the lines installed in Khrushchev and Stalin are not designed for modern loads, and over the decades of operation have worn out. Sometimes the installation of new communications is carried out in new buildings, where the power cable is routed only to the common shield at the entrance. You can do the electrical wiring in the apartment with your own hands, subject to the observance of security measures and the Rules of Electrical Installation Devices (PUE).
Distinctive features of modern wiring

New conductors of electricity are qualitatively different from products that were in use in the last century. The development of the technology was facilitated by a number of factors covering the areas of safety, reliability, usability and durability.
Modern wiring in the apartment is characterized by such aspects:
- Use exclusively copper wires. This metal has better conductivity compared to aluminum and good elasticity. When contacts are oxidized, the technical characteristics are practically unchanged, which allows you to include powerful electrical equipment in the network.
- Cable insulation. Polymer materials with excellent flexibility and insulating properties are used. The best products in contact with fire do not emit toxic substances into the air, are capable of independent attenuation.
- Plastic switching. The connection of wires is carried out in special boxes that provide reliable protection against mechanical stress and moisture. Installation of sockets and switches is carried out in plastic glasses, which differ in the best degree of fixation.
- The presence of grounding. In new panel buildings, three-core cables with an earth wire are laid. It is convenient and safe. But, it is necessary to install sockets and switches with three terminals.
Modern networks require a large number of automatic devices: stabilizers, fuses and residual current devices. Their purpose is to protect household appliances and people from electric shock.
What is the wiring diagram for?
Wiring is a collection of cables, wires, jumpers, junction boxes, protective and control devices, sockets and switches. All this equipment is needed in order to provide current to energy consumers who are in different places and have different capacities. Only the right approach and competent calculation can ensure a clear and trouble-free functioning of the entire system.
The wiring diagram in the apartment is needed in order to ensure that the following requirements are met:
- Unobstructed access to control, devices, switching places, sockets and switches.
- Laying cables whose power corresponds to the planned load. Settlements will help you not to overpay for powerful and expensive property, purchasing it in those parameters that are required.
- Calculation of the required amount of property and budgeting. Installation of electrical wiring in the apartment should not stop if the materials suddenly run out.
- Ensuring the optimal location of electrical devices. They should not interfere with people and spoil the interior of the room. At the same time, the rules for installing electrical appliances regarding openings, heating and plumbing fixtures must be observed.
The wiring diagram in the apartment is a document on the basis of which all subsequent repairs and modifications will be carried out. Knowing the locations of the lines will save time, effort and money when carrying out various works.
Where to start wiring electricians in the apartment
Wiring in an apartment is a complex and responsible event, which begins with planning. It must be remembered that the wires have been laid for decades, if it is not a question of an open method.
You need to start with a detailed drawing of the apartment indicating all the rooms, including the balcony and the vestibule.
Then it is recommended to carry out such events:
- Measure all furniture and household appliances. Transfer dimensions to paper.
- Draw window and doorways. Indicate the direction and width of opening the wings. They will close the part of the wall in which it is impossible to conduct the cable, install sockets and switches.
- Place electrical appliances in a free place. Observe building codes for distances from floors, corners, and radiators.
- Make a calculation of the predicted energy consumption for each point and room. This will determine the power of the cable, sockets and their number.
- Make an estimate. It should include not only consumables, but also devices for their installation. The cable must be taken with a small margin, adjusted for possible errors.
It is better to plan the installation of wiring in the apartment at the family council. There is always the possibility that one of its members may express an opinion that does not coincide with the project. On the other hand, someone has far-reaching plans for the purchase of new cabinet furniture or the installation of partitions in those places where it is planned to arrange appliances.
Wiring plan
 When drawing up a wiring plan in an apartment, it is necessary to comply with building codes and rules that govern the requirements for the installation of devices. It is forbidden to connect copper and aluminum conductors directly. For this, special switching devices are used. The project must be divided into several separate schemes corresponding to each room, making a detailed description.
The features of the documents are as follows:
- kitchen - several lines for powerful consumers;
- a bathroom - metering of increased humidity;
- corridor - a minimum of sources, as for a passage place;
- hall, nursery, bedroom - a large number of nests for household appliances.
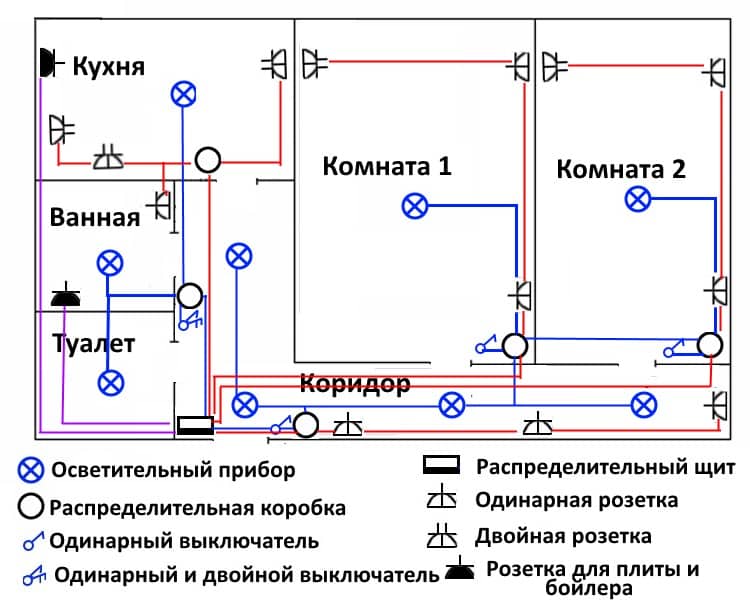
To make the circuits brighter and easier to read, the lines, switches, mounting boxes and sockets can be highlighted in different colors, making a footnote with symbols.
The wiring must be done with a marker, since a pencil on concrete is poorly visible, the marking is easily erased. The lines are drawn so that the switches and sockets are at the same horizontal levels.
In some houses, cable channels are provided by the project. It remains to lay plastic tubes in them and tighten inside the communication. If there are no channels, gating and drilling holes for the sockets should be done independently. For these purposes, a grinder and a perforator are used, equipped with nozzles with diamond spraying. The strobes are brought to a level of 20 cm below the floor slab, after which they are led off at right angles to the apartment panel. The cable is fastened with alabaster, but it is better to use plastic tubes for this. Products protect communications, help to draw lines around the apartment faster and easier. Wires are connected in plastic boxes.
For switching, buses, terminals are used. The soldering and twisting method is allowed, followed by insulation with tape or casing.
Wiring diagram in the apartment
 In accordance with the requirements of SNiP, an electrician in an apartment must comply with the GOST provisions for such parameters as resistance to moisture, corrosion, exposure to high and low temperatures.
Laying lines is possible only vertically and horizontally. It is forbidden to make diagonal or curved connections when carrying out the internal method of laying the cable. This is fraught with the fact that when drilling a hole, a drill can break through wires, which will lead to a short circuit. The consequence is a shock to a person and the subsequent replacement of communications.
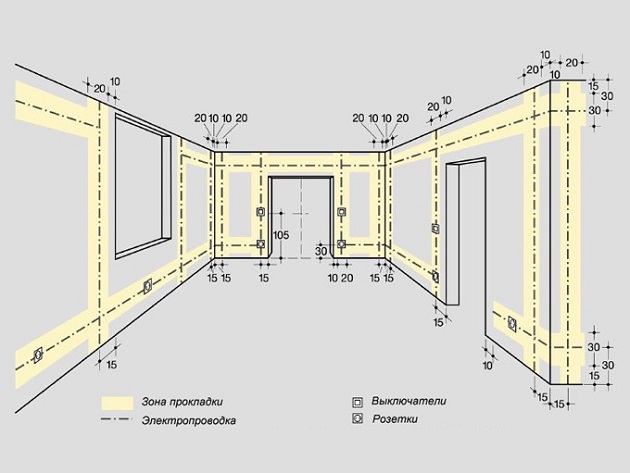
It is necessary to observe such distances between the electrical elements in the circuit and the interior:
- floor - 30-120 cm;
- ceiling - 20 cm;
- angles - 20 cm;
- sinks, bathtub - 100 cm;
- heating radiators - 10 cm (bottom);
- electric and gas stoves - 50 cm;
- openings - 10 cm.
The cables must be laid so as not to damage the supporting structures. In addition, the devices should not, after checking in, be behind cabinet furniture or open doors. Free access requirements are dictated by convenience and security.
Wiring Methods
 To correctly choose the layout for the apartment, you need to consider the technological features of each room.
Bathrooms are characterized by the presence of powerful consumers and high humidity. To eliminate the slightest likelihood of electric shock, it is necessary to connect each device through a separate machine with the obligatory use of grounding. Sockets must have a protective cover to prevent water from entering them.
For the kitchen, a fan circuit is required, since this room has a lot of household appliances located in different places. For powerful products (air conditioning, oven), a separate line should be provided from the mounting box.
The lighting group includes central chandeliers and spotlights. Depending on the configuration and area of the room, one or two main lamps are installed in it. A two-phase line is connected to the switch. Next, a single wire is launched to each device, forming a closed loop.
 You can draw up a diagram using one of the following methods:
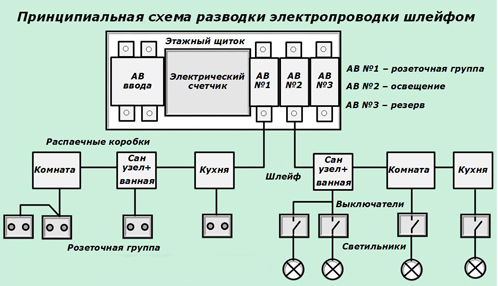
- Consistent. Consists of fragments arranged one after another. Node blocks are not used. The advantage of this option is the saving of materials, since they are spent at a minimum. There are also disadvantages - the load on the line is distributed unevenly, if the integrity of one element is violated, the entire system is de-energized.
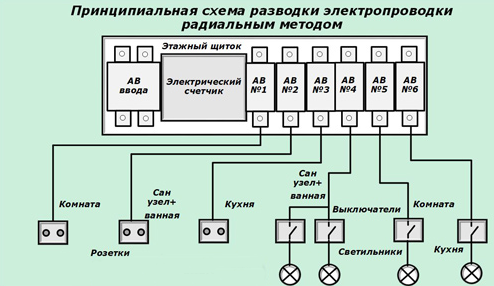
- Parallel. A separate unit is arranged for each direction. The scheme implies a large consumption of cable and mounting boxes. Plus in its reliability - in the event of failure of one direction, the rest continue to function. An extension cord can be extended from one of them.
- Combined. It combines a parallel and sequential way. Parallel is used to supply current to the boxes, wiring on the ceiling and walls. Consistently connected lighting devices and sockets of the same group.
The choice depends on the area of the premises, the number and capacity of consumers.
Circuit Examples

Cable routing from the shield and meter to sockets and lighting devices is carried out on the wiring map. The studio is a one-room apartment, which has demolished piers that do not perform a supporting function. The presence of free space makes it possible to install a large number of electrical installations of various capacities. Proceeding from this, it is necessary to divide consumers into groups and output individual lines to them through batch switches.
An example of grouping directions:
- Powerful devices - 32 A.
- Household appliances - 16-25 A.
- Lighting group - 10-16 A.
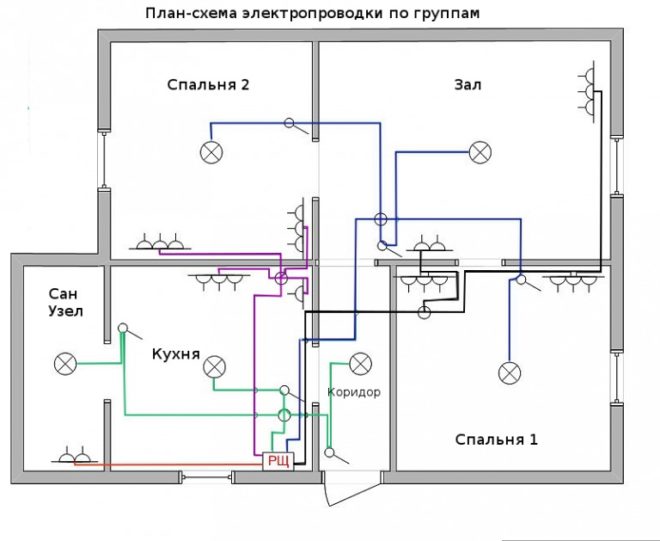
Similarly, the installation of electricity for multi-room apartments.It is advisable to allocate a place for the input panel, in which the package switches are installed, from which there is a line to each room.
Wiring directions and their characteristics:
- Living rooms - 16-25 A.
- Kitchen - 32 A.
- Bathroom - 25 A.
- Corridor - 8 A.
- Balcony (loggia) - 8 A.
Such a solution is good in that you can de-energize one room, if there is a need to hang a chandelier, replace the outlet or switch.
Self-designing and wiring diagrams
To make a real estate electrification project, you do not need professional knowledge and skills. Anyone who has mastered a high school physics program can do this.
Step-by-step diagramming instructions:
- Drawing a housing plan.
- Switchboard
- Batch switches.
- Sockets and their type.
- Key switches
- Stationary lighting devices.
- Mounting boxes.
- Cable and wire routes.
When designing, you need to take into account that only internal walls can be gated. Touching the load-bearing walls is prohibited.