When performing repair work, changing old power points to new ones, the diameter of the undergrowth is extremely important, since under it you need to make an appropriate socket in a concrete, brick or plasterboard partition. Knowing the standard parameters of the part, the wizard performs work quickly and without problems.
Appointment of Sockets
Special plastic boxes for the outlet are used to securely fix the power points in the wall with a hidden wiring device. Additionally, the part has a fire function. If a short circuit occurs in the wiring, the thick polymer wall of the socket does not support combustion. This is especially true for clapboard-clad wooden walls.
Sizes and types
Special wiring boxes are classified into several categories:
- The form. More common round products. Less often - square. The second option is used when installing non-standard power points.
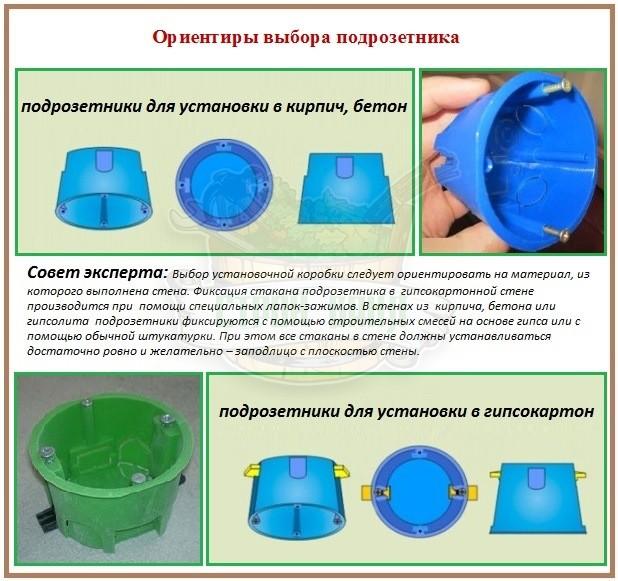
- The type of wall into which the part is mounted. These types of undergrowths are distinguished here - for a concrete, brick, block wall or drywall product. The latter are equipped with special locking tabs. In addition to panels made of gypsum plasterboard, such sockets are placed in walls and partitions made of chipboard, plywood, and LSU sheets.
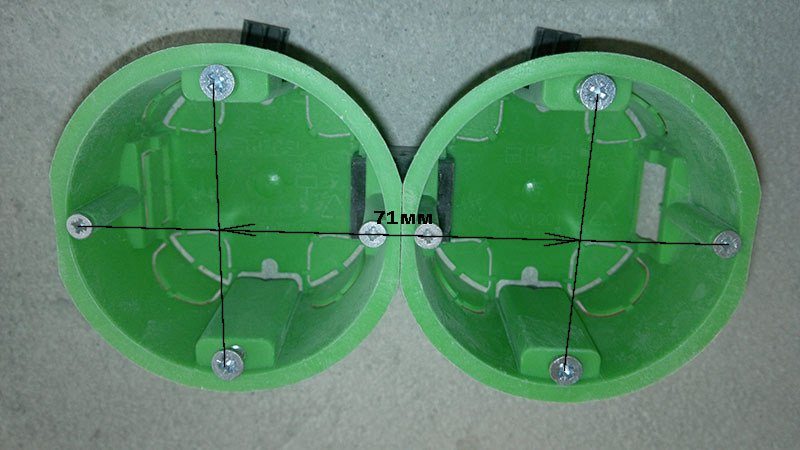
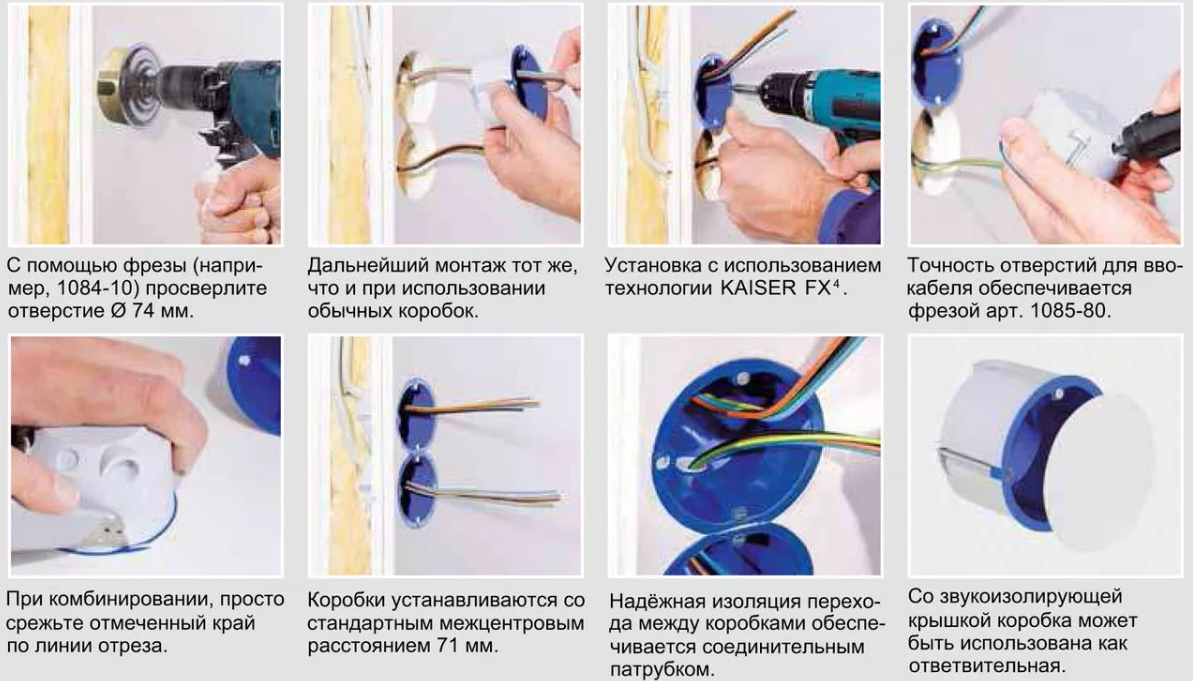
- Type of part. There is a single socket, and there is a block element of 2-5 boxes, interconnected by a common frame. With the help of blocks, several sockets or switches located in a row vertically / horizontally can be mounted simultaneously. For any block boxes and single elements, the center distance is always equal to 71 mm, which corresponds to the standards.
Additionally, sockets are classified by size.
Standard box options
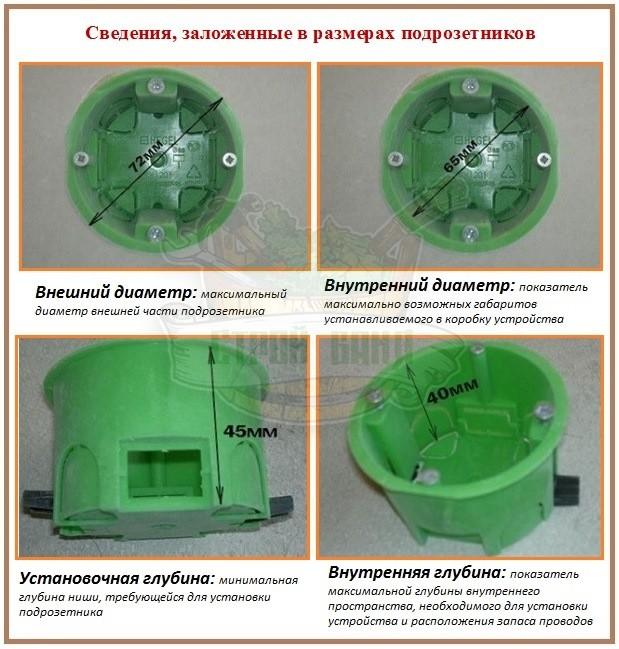 It is believed that any podrozetnik has standard sizes. Here, the diameter is equal to 68 mm, and its depth - to 45 mm. But the master needs to know that we are talking about the external dimensions of the product. The internal section of the box will be equal to 65 mm, and the internal depth - only 40 mm.
There are also smaller installation parts on the market. Their depth is equal to 25 mm. In the most voluminous sockets, the parameter can reach 80 mm. In this case, the diameter sometimes changes by 60 mm. The shallow depth of the sockets is especially useful if you need to install two power points in one thin wall on both sides. Standard elements here simply will not enter or will protrude above the level of the plane of the partition.
For the formation of the landing nest in the wall, you need to take a crown with a section of 70 mm for a perforator. These parameters allow you to freely set any diameter of a standard undersocket using the right amount of fixing solution. The master remains 0.5-1 cm from the circumference of the mounted element.
The dimensions of the box for a square type socket are 70x70 mm. Less common are products with dimensions of 60x60 mm.
70 mm refers to the parameter of the part at the base. That is, its protruding edges, edges and borders are often not taken into account. Sometimes the master has to clean them with a sandpaper to mount the box in a nest.
Mounting boxes in concrete and brick walls
There is no clear regulation for the diameter of the sockets, in which partition they need to be placed. The value of 67-70 mm is equally suitable for any outlet, and even more so for the cross section of a diamond crown.
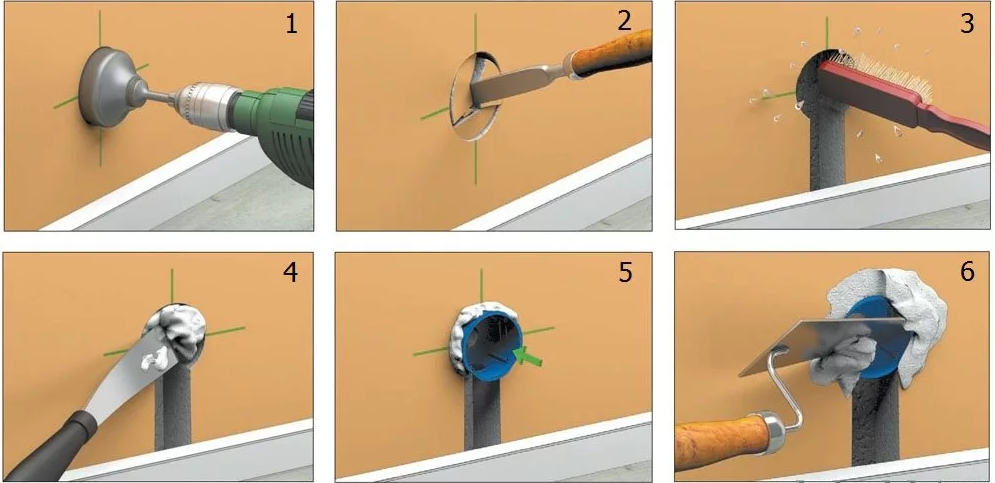
Before forming the nest, you need to dismantle the wallpaper section (if the installation is already done according to the finish) and mark the panel. Then the crown is attached to the hammer, set its axis clearly in the center and perform drilling. In this case, the tool must be held strictly at an angle of 90 degrees with respect to the wall. During drilling and sampling of concrete, it is necessary to adjust the nest so that the depth of the undersocket matches it. The best option is one in which the round edge of the installation box is flush with the wall. All this is measured out by the building level.
When forming a nest in a brick wall, the principle of drilling looks the same. The difference is only the depth of the nest. The installation box must be mounted so that its edges fit perfectly with the finish of the brick walls. And it can be gypsum plasterboard sheets, lining, plastering, etc. Probably it will be more correct to use a deep socket. The main thing is to calculate the thickness of the finishing layer. If this is difficult to do, it is better to drill after relatively finishing work.
Tiled wall mounting

If you install the box on a wall tiled, the diameter of the hole for the outlet remains standard - 68-70 mm. Experts recommend making a nest before laying tiles. Here, markings are preliminarily applied to the panel and to the selected tile block. First make a nest in the wall. Initially, its depth is not made very large, since it will increase due to the tiles laid on the adhesive. And this is an additional 1.5-2 cm.
Tiles are drilled on the floor, laying a special shield made of wood or drywall. For cutting tiles, you can use a puncher with a diamond crown, a hand saw or a jigsaw with a tungsten thread, a ballerina, and drill bits. The most even cut is obtained when working with punching scissors or a nozzle on a perforator. Before performing work, it is advisable to soak the ceramic block for an hour in cold water. This enhances the strength of the material.
If the wall is already tiled, the cut needs to be done only with a crown.
It is undesirable to put the outlet at the junction of two or four tiles. When the nest is formed in this way, the strength of the ceramic decreases. Tiles on the wall may crack.
Installation of a socket box in drywall
For walls made of gypsum plaster, the master must buy a special box with locking tabs. It does not need to be fixed with self-tapping screws. It is simply placed in the panel due to the side fasteners.
When forming the nests in the drywall wall, they work with a special GKL crown. It is not recommended to press hard on the punch, as the panel is relatively fragile and can simply break.
As soon as the master reaches the main wall of concrete or brick, you need to change the crown to the appropriate one and continue drilling to a given total depth.
How to choose an installation box
 When buying a podrozetnik, you need to pay attention to such parameters:
- Appointment: in what wall sockets will be put (in concrete, a brick, gypsum cardboard, wooden boards, etc.).
- Depth. This parameter is especially relevant if the master intends to install two parallel sockets on the same wall from two of its sides. Here it is worth paying attention to shallow glasses of 25 mm.
- The form. The most popular is considered round. If the master deals with non-standard power points, there is a reason to apply to square boxes.
- Type of block sockets, method of their connection in one panel. Sometimes the sockets are connected with specially purchased connectors. But it’s good if the product already has special slots for fastening.
- The wall thickness of the product. The larger it is, the less susceptible to melting and burning the part. On the market there are varieties of glasses for this parameter from 2 to 4 mm.
Price and manufacturer are not the latest criteria when buying an installation box. The consumer prefers to buy products from Kaiser (Germany), Courbi (Greece), SEZ (Slovakia), Schneider-Electric (France) or Kopos (Czech Republic).
Frequent installation box installation errors
During the execution of work, masters often admit such flaws:
- They forget to skip the wiring cable into the technical holes of the socket. As a result, it is necessary to dismantle the product already fixed in the wall.
- Mount the element before applying the finishing coat (plaster, decorative panels). An exception is tile.
- Use mounting foam instead of mortar to fix the installation box.
- Carry out installation with a deviation from the axis of the cup holder in relation to the wall. In this case, when filling a niche with a solution, it “floats”.
- Wrong nest depth (more, less). And if the minimum can be increased, then too large in diameter or depth will have to be filled with a large amount of solution.
A properly installed socket will remain stationary in its socket. This provides further full fixation and feeding points.