In the modern world it is impossible to imagine ourselves without the benefits of civilization, and if the mixer fails, we immediately feel discomfort. The malfunction must be eliminated as quickly as possible, and almost always, this can be dealt with independently.
The mixer device is quite simple and even without any professional skills, you can quickly figure it out.
Types of mixers and their device
 Single lever mixers are a modern option for the bathroom or kitchen. At the moment, there are only two types of single lever mixers:
- Ball type. The mixer got this name due to the presence of a special metal ball inside, which has several holes. One is necessary to supply hot water, the second is cold, and the third is mixing, to create the required temperature. The space inside the ball in which the mixing takes place is called the “mixing chamber”. Rubber seals work closely with the inner ball.
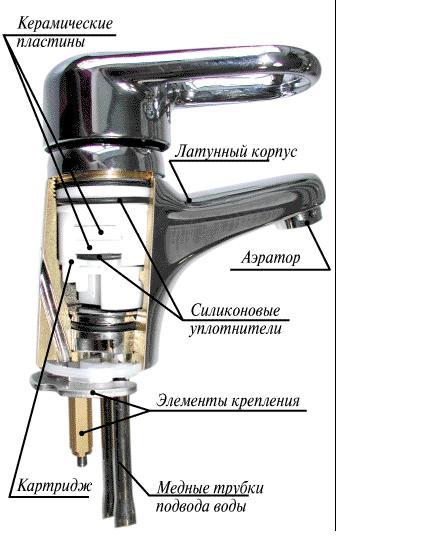
To supply water, an adjustment rod is used that controls the pressure that passes through the ball. The operation system is as simple as possible and consists in the following: the larger the area of the contacting holes, the smaller the flow of water and vice versa. This is the most popular and reliable option, which rarely fails before its allotted service life. - Cartridge design. In this device, instead of a ball, 2 ceramic discs are used, which are located in a special cartridge. The upper part of the cartridge is designed to mix water, and the bottom has 3 holes, again for hot, cold and mixed. As soon as the upper hole coincides with the lower one, the necessary water temperature is supplied. Both plates should fit snugly together. Small parts of sand or scale in water can cause a breakdown of the device, therefore special filters are most often purchased for such mixers.
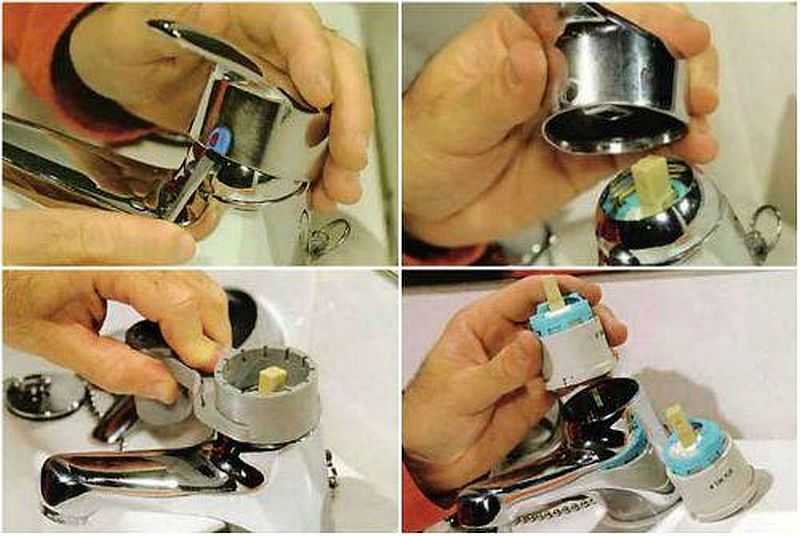
Step-by-step mixer parsing algorithm
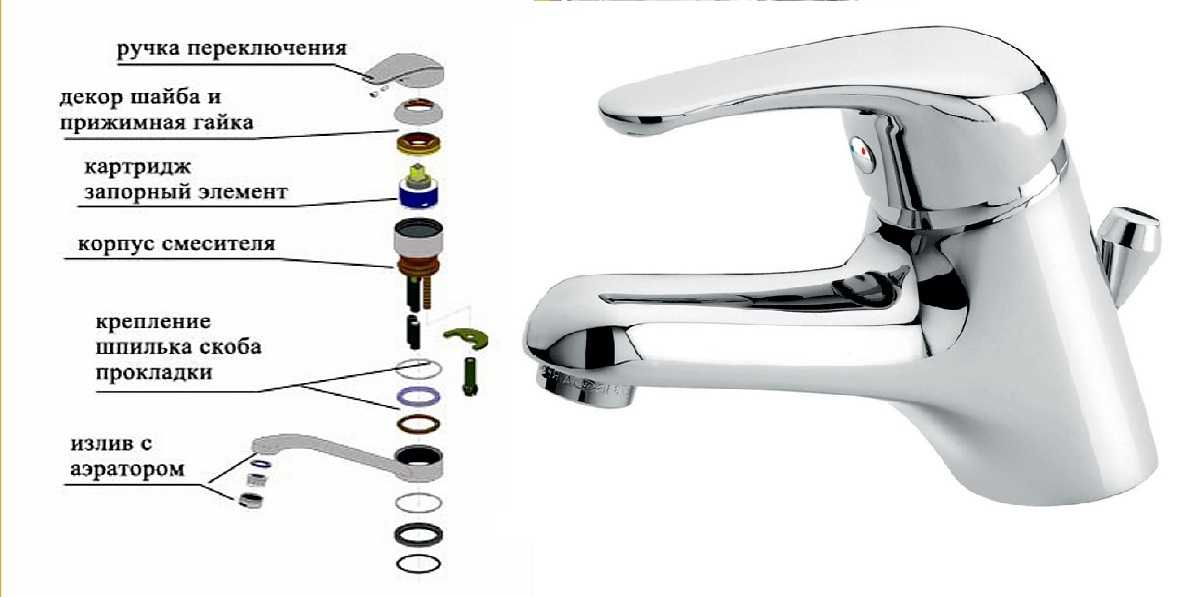
 Before proceeding with the analysis of the disk mixer, it is necessary to understand what it consists of:
- water supply rod;
- handles;
- retainer;
- pressure regulator;
- housing;
- cartridge.
The process of disassembling the mixer is as follows:
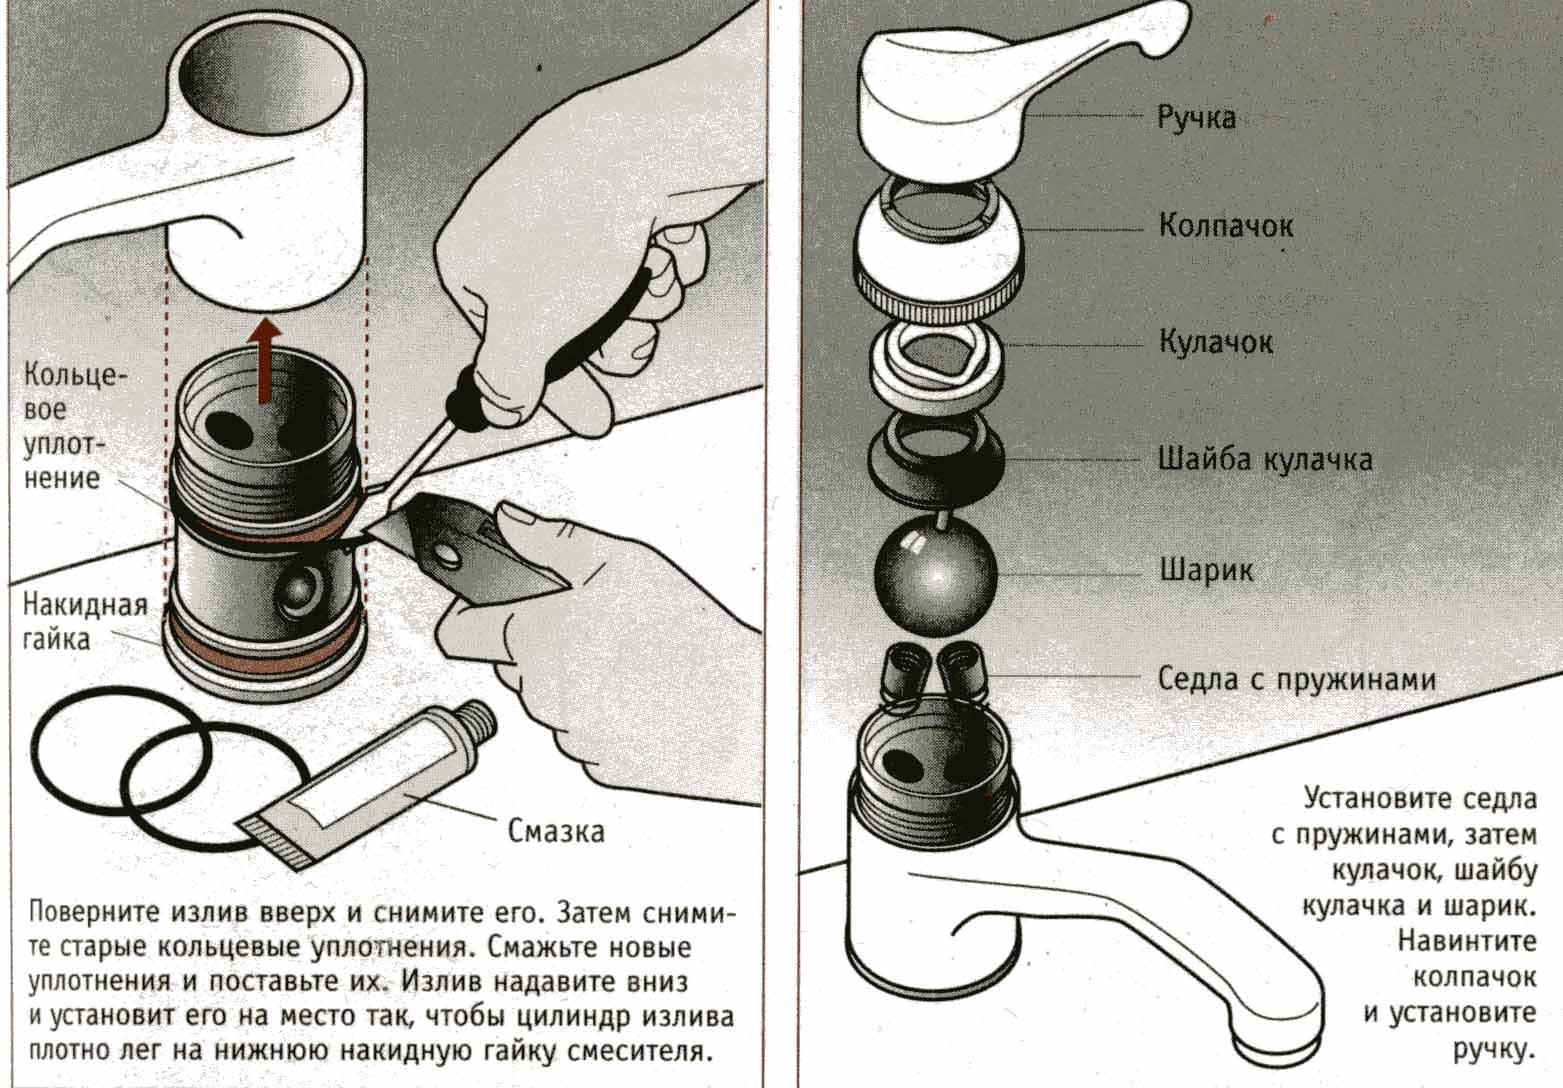
- Using a screwdriver, pull out the plugs. To avoid confusion with the determination of water temperature, each of them has its own color.
- Using a small Phillips screwdriver, you need to unscrew the screw to disconnect the stem from the joystick.
- Now it's time to start phasing out all the details. First, the adjustment knob is removed, which is attached to the crane. Remove the nuts from the top plate of the joystick. First, the ceramic is removed, then the clamp. Moreover, the clamping can have small funnels, so its removal must be carried out as accurately as possible. Ceramic can be twisted manually without much difficulty.
- The final step in the analysis is the removal of the mixing disk.
- If a replacement cartridge is necessary, then a new one is installed in place of the worn-out design and assembly occurs in the reverse order.
Dismantling the ball mixer is essentially not very different from the previous one. The only thing you need to know before disassembling it, in case of serious damage, you often have to completely replace the mixer with a new one.For example, if the water pressure worsens, you can try to figure out the reason yourself, often the problem lies in the grid, which is located inside the tap at the drainage site. It is enough to clean it and put it in place.
In case of other problems, for example, replacing rubber seals, the analysis is carried out as follows:
- Remove screw and remove lever.
- Remove from thread the connections inside. Unscrew the screw with a screwdriver. If there is dirt on it, it is necessary to clean it.
- A ball is removed, along with gaskets, to replace from with new ones.
- After installing new rubber seals, the ball returns. Seals are secured with a plastic nut.
- The lever and screw are locked back. Now it remains to check the operation of the crane.
What problems will disassembly and repair help?
 As already mentioned at the beginning, not all breakdowns can be eliminated on their own by repair or replacement of parts, but there are a number of others that you can do yourself:
- cartridge leakage;
- breakdown of a push button switch;
- low pressure when turned on at full power;
- water is simultaneously supplied to the shower and spout;
- a puddle flows under the sink;
- damage to the thread on the nozzle;
- when the lever is closed, the spout flows.
Such problems can be dealt with independently, but if the case or internal thread is damaged, you will have to change the entire mixer.
What parts can be replaced during repair
 The classic repair kit includes:
- water pointer button;
- spout rubber ring;
- bolt;
- lock ring spout;
- eccentric gasket;
- valve head gasket;
- check valve gasket;
- valve head washer;
- locking gasket.
Spout and valves are almost never replaced, because in case of failure, it is advisable to purchase a new mixer. Often only cartridges and crane boxes change, because in fact, there is nothing more to change in the crane device than seals.
When choosing a new cartridge, you need to bring an old disc with you to select the new item as accurately as possible. It is best to choose a structure made of silicone material, as it is more reliable in operation.
Problem Prevention and Care
Breakage is always better prevented than eliminated. Oddly enough, the water itself creates the most problems. Most nodes fail because of it. The service life is directly proportional to the quality of the water and the cleaner and softer it is, the plumbing product will last longer.
The easiest way to extend the life of the mixer is to purify the water. For these purposes, filters are installed in the water supply system that do not allow small particles to pass, which is often the reason for repairs, tearing rubber gaskets and leaving scratches on adjacent planes of parts.
In the event of the first smudges or unstable operation, it is necessary to deal with the problem as soon as possible. Often this avoids more serious problems.
The scum that forms when the water is heated is also a common cause of breakage, but fighting it on your own is quite difficult. You can install a special filter softener, but it requires additional space and financial resources. Modern manufacturers create high-quality faucets using high-quality materials that, even in conditions of high intensity and poor water quality, can last for many years. That is why it is best to look at quality manufacturers.