A modern kitchen is no longer just a place for cooking, but also a beautiful, neat, functional corner of an apartment or house. Every housewife wants it to be beautiful, and during cooking, steam and odors did not fill not only the room, but did not spread to the rest of the house. A modern, quiet and efficient cooker hood can help solve this problem.
To install such a device in the kitchen with your own hands is affordable even for a beginner. Just need to choose the right materials, tools, do everything carefully and use a few tricks. And then the cooker hood will not only function reliably, but will not spoil, but will even decorate the interior.
Types of cooker hoods
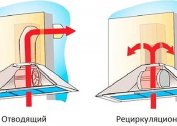
Regardless of which version of the kitchen hood will be selected, installation is generally the same. There are three varieties of such electrical appliances:
- recirculation, which do not need an air duct, they use carbon filters or, in the cheapest option, grating, which can be removed and cleaned;
- with an air duct, designed to be connected to the ventilation system of the house, but not having a hard channel outlet for the discharge of air flow;
- domed or mantelpiece. Equipped with a tough, beautiful case, such kitchen hoods look very presentable, but they have a fairly long duct that imposes requirements on the placement of the appliance.
Many models of hood hoods provide mounting to the ceiling. There are several options, such installation in the kitchen is better to entrust to specialists. We are interested in models that you can install yourself without any special skills. In the next video, you can see the varieties of cooker hoods that are most popular in the market.
What tools and materials will be required
We describe a complete set of materials and tools that will allow you to correctly install the hood in the kitchen with your own hands. So, you need:
- impact drill or punch (high power, if it comes to installing a kitchen hood on a reinforced concrete wall);
- drills and drills;
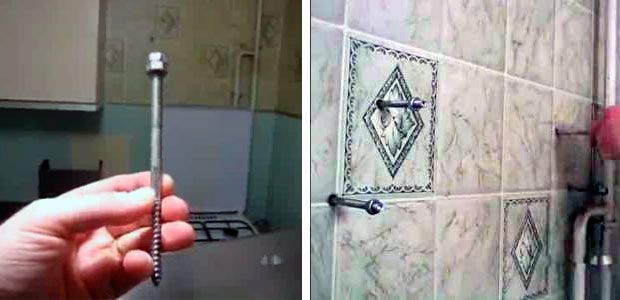
- fasteners. Both Novosel mounting kits (plastic plug and screw) and Euro-nail fasteners can be used. But optimal results are achieved when using the so-called expansion fittings.
- screwdrivers and keys (depending on the type of fastener used);
- small hammer;
- roulette;
- building level;
- means of marking - marker or pencil.
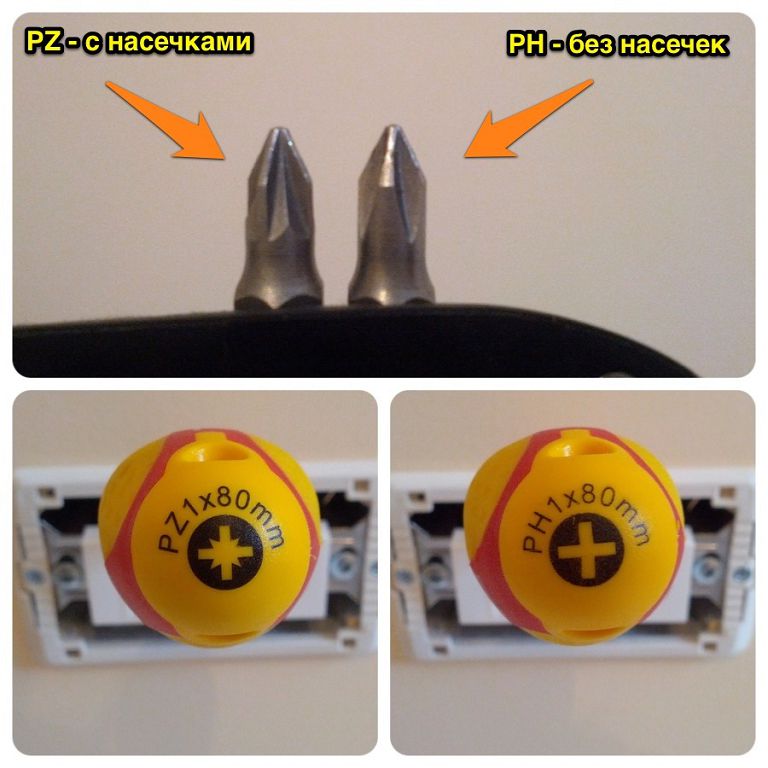
Small tricks to work with the tool. Experienced craftsmen use screwdrivers and bits according to the type of screw heads. For beginners who want the screwdriver to not slip and the fasteners spin smoothly and clearly, you need a little advice. Wood screws (black, with a cross-shaped recess on the head without additional notches) are twisted with bits marked PH. Self-tapping screws for dense materials (chipboard, plastic, metal) are usually white or yellow, have notches on their heads located at a 45-degree offset relative to the main recess for a Phillips screwdriver. This type of fastener is ideally screwed using bits marked PZ or screwdrivers of a similar shape. Using the right tool, you can significantly speed up the work and tighten the fasteners more tightly without damaging the heads.
Varying the types of fasteners, you can correctly do it yourself on any walls.So, for a brick wall in the kitchen, “new settlers” or “euro nail” sets are ideal (it needs to be hammered, so some models of hoods will not be able to provide enough space in the housing for the hammer to move, this must be taken into account), it is better to work on reinforced concrete using spacer tubes , on a wooden wall there will be enough black screws.
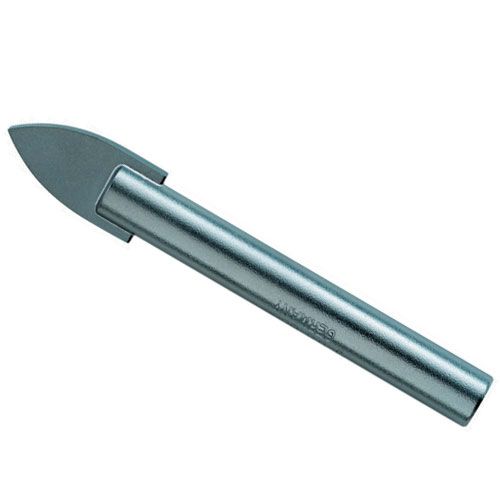
A little trick. For work in the kitchen on the wall trimmed with ceramic tiles, you can not work immediately with a punch - it will split the decor element. First, you should pass the tile with a drill on the glass, and then put the puncher into the hole to deepen it through the adhesive and the wall material itself.
What you need to connect the hood
To install the kitchen hood with your own hands correctly and achieve a neat appearance, you will need:
- clamps for connecting ducts, if a corrugated sleeve will be used;
- metal screws or a rivet gun with consumables of the desired type, if a plastic or tin box is used as the duct;
- decorative grille on the ventilation duct of the house in the kitchen;
- in the case of installing a cooker hood with a rigid duct, adapters (angles) are required for mounting the air passage channel.
If there is no outlet in the kitchen near the hood, you will have to make a connection.
Mains connection
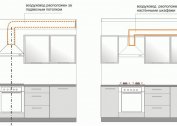
In any case, whether there is a socket next to the hood or not, it is correct to place the power cable with the approach from above. This ensures that it does not overheat with heat from the stove, and also reduces the possibility of accidental damage. It’s ideal and correct to lay the cable behind the duct, placing it on the wall in the mounting boxes. This type of connection is invisible and guaranteed to be safe. The following video shows the cable connection and wiring.
We attach the hood to a flat wall
In order to properly mount the kitchen hood to a flat wall, it is enough to perform a few simple steps:
- Mark the locations of the fasteners in accordance with the location of the corresponding holes on the cooker hood body.
- Drill recesses of the required depth.
In the case of a wooden wall, it is not worth drilling holes for the full length of the screw. Enough depth of 1 \ 3. However, working with a drill is still worth it - it’s right, the self-tapping screw will not create excessive mechanical loads in the surface area and at the same time rigidly fix the structure.
- Make the necessary communications for the electrical connection of the cooker hood.
- Install the fastener or immediately fix the device case with their help.
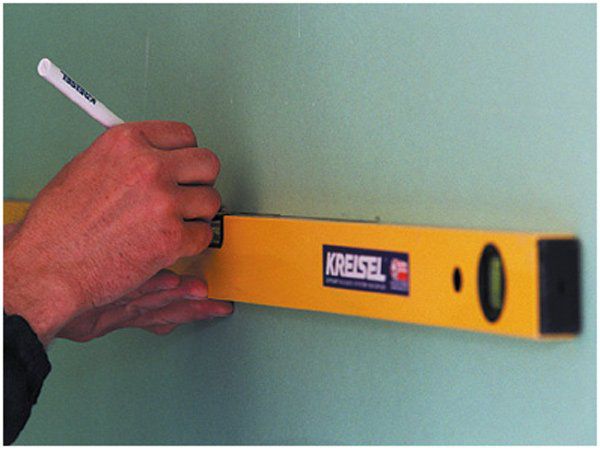
The subtlety of the markup is that the hood is located clearly horizontally. To do this, mark the extreme point to the wall directly along the body of the device, for example, after applying a kitchen hood to the wall. The rest of the markup is done using the building level and tape measure, correctly marking the location of the fasteners and observing the level of the device.
After the hood is screwed “rough”, without tightening the bolts or screws, you can set the body in the ideal position by checking the horizontal and vertical. Only after completing this operation can fasten the fasteners tightly.
Tricks of fasteners. The body of the kitchen hood is made of thin metal. Therefore, fasteners when tightened with maximum force necessarily deforms the wall of the housing. To avoid this situation and to guarantee a good clamping force with a uniform distribution of force over a larger area, a plastic lining can be placed under the flat head of a triangular screw (sold in any hardware store, widely used in furniture as a lining for fixing the handles).For a flat surface of the heads of fasteners (it’s right to choose exactly this type of bolts or screws), you can put a wide washer with an external diameter of 16, 22 mm or more, under which (on the device body) a rubber lining is applied, for example, designed for cranes, flexible hoses or other water fittings.
Duct installation
Installing a duct in the kitchen is the easiest. If a corrugated sleeve is used, it is put on the exhaust outlet pipe, carefully laid to the ventilation hole in the apartment wall. A decorative grille is installed there, to which a corrugated sleeve is attached. It is right to draw the channel first, check that the corrugated pipe is not pinched and not deformed, cut the desired length and then fix the inlet and outlet part with clamps on the socket of the kitchen hood and decorative grille on the ventilation of the apartment.
A plastic or tin box looks neater, can be laid more quietly. First, you need to cut off the parts of the desired length, which are sequentially installed in their places, connecting with each other with angular or straight adapters. The following video shows the assembly process of a rigid duct.
Installing the hood on an uneven wall
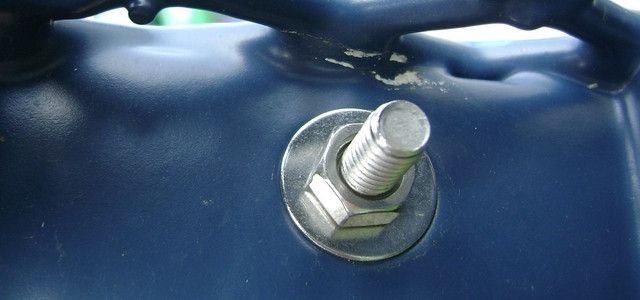
If there is a gas pipe or ledge on the wall, you can resort to tricks. As fasteners, bolts with two thread zones (studs) are used. One side of such an element is screwed into a plastic stopper located in the wall. On the other side is a support nut.
The nuts on several mounting bolts are positioned so that they form a single surface, located at different distances from the wall. After completing this work, the hood of the kitchen hood is put on the fasteners and it can be fixed using another set of nuts, using the tricks described above.
If the distance to be compensated is very large, you can correctly install the cooker hood on metal corners. However, with such difficulties, it is better to consider the option of using the built-in hood, when all the irregularities of the wall are compensated by the design of the cabinet in which it will be installed.