Installing a hood in the kitchen is not a mandatory measure and is carried out on the initiative of property owners. The presence and use of this technique allows you to absorb most of the steam, heat from the furnace, oil and grease fumes. Even if the food on the stove burns out, the installation will prevent the smoke of the apartment, removing combustion products. Proper installation of a kitchen hood will ensure a longer service life of furniture and decoration, which will always be clean and presentable. Installation of the product is not particularly difficult and can be performed independently. The devices are accompanied by an understandable diagram, a headset and a description of the rules for fastening. In this case, it is necessary to ensure an influx of clean and exhaust air, otherwise the equipment will be useless.
Rules for installing the hood in the kitchen
The selection and connection of the hood is based on the layout and size of the room, the location of the stove and the characteristics of the device itself - type, shape, size, weight, set of options. Various models can be hung on a wall or ceiling, built into a headset or countertop. According to the principle of operation, the products are divided into exhaust, where pollution is removed through pipes, and circulation, equipped with filters. In the first case, cleaning is more efficient, but the structures are more difficult to install and require additional investment. Mounting the circulation system is simpler, but it does not remove heat, and it does not retain all the fumes and moisture.
When installing the hood, it is recommended to adhere to the following rules:
- correspondence of the strength of the supporting wall or element of the kitchen to the weight of the product;
- design and size, combined with the interior of the room;
- lack of contact with the gas pipe;
- the distance between the hob and the appliance within 65-80 cm;
- screen size equal to or larger than the surface of the plate;
- power providing high-quality ventilation of the room;
- ease of maintenance and operation;
- the ability to connect independently.
You should take into account the growth of a person. The protruding screen should not be at the level of his head, otherwise cooking will be uncomfortable and dangerous to health. But if you attach the equipment too high, its effectiveness will decrease. In addition, to turn the device on or off, you will have to use a stool.
DIY installation features
Installation in a private house does not imply any significant restrictions, since the landlord himself chooses the layout of the object. The choice of design is largely determined by the material from which the building is built, and its height.
Mounting Features:
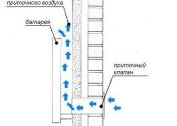
- Lack of ventilation shaft. It is necessary to lay an additional channel. In this case, you can choose any option that is most suitable from an aesthetic and practical point of view.
- Low building height. Because of this, there is no sufficient natural traction. It is necessary to install a mechanical system, which in a wooden house is connected with the complexity of laying the power grid.
- Compliance with fire safety regulations. If in apartment buildings they are initially taken into account, then the private owner needs to develop a project on his own.
It is much easier in technical terms to install an extractor hood in the kitchen of a city apartment. Initially, the project provided for vertical shafts passing through all levels of the building.You can connect to them without obtaining special permission from the management companies. The owner of the housing remains to choose the hood, fix it on the base and connect to the general communication.

In this case, the following nuances should be taken into account:
- Do not carry gas pipes on your own. If there is a need to put the stove in another place, a certified hose can be pulled to it from the riser.
- Vent shafts can have different purposes. They serve to remove combustion products, sewer fumes and emissions from residential premises. It is not allowed to connect different constructions to prevent the penetration of exhaust gas into the mains passing through the halls and bedrooms.
- To ensure high-quality fasteners in brick houses, it is necessary to use anchor bolts with a thickness of 8-10 mm.
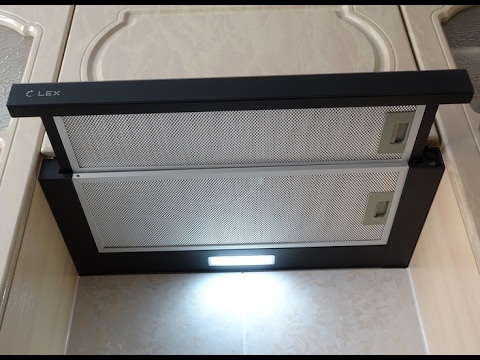
Since island-type hoods are practically not used in urban apartments, it is advisable to dwell on the assembly technology of products of built-in, inclined and suspended type.
Site selection and tool preparation
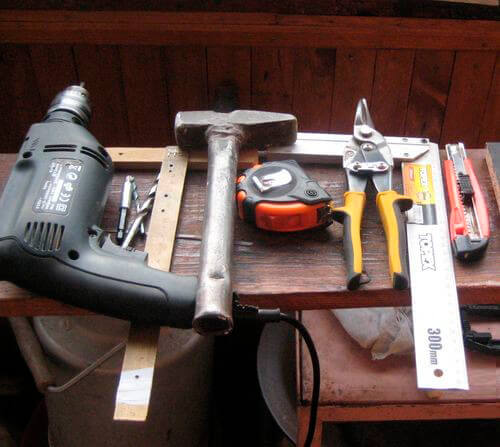
To mount the ventilation system for the stove, you do not need special skills and special equipment.
To work, you will need:
- rotary hammer, electric drill, jigsaw;
- level, tape measure;
- hammer, screwdriver;
- hacksaw, file;
- adjustable spanner or plumbing pliers;
- silicone;
- pencil;
- masking tape;
- construction gloves, safety glasses;
- tow or fum tape.
Since you have to work at height, it is advisable to prepare a stable foundation. Then you need to think through the preparatory phase. Before you hang the hood, you need to put it on something. For this, cardboard, plywood or chipboard is suitable.
If you have to assemble the exhaust duct, it is advisable to prepare a small stepladder. During installation, it is better to move the plate to the side. This will avoid damage to its surface and cover in the event of a drop in the hood or heavy tool.
Fasten the equipment only on a solid and stable base. This requirement is due not only to the safety of equipment. A product falling is fraught with a rupture of the gas pipe and power cable. The combination of fuel and sparks will inevitably cause a fire and even an explosion.
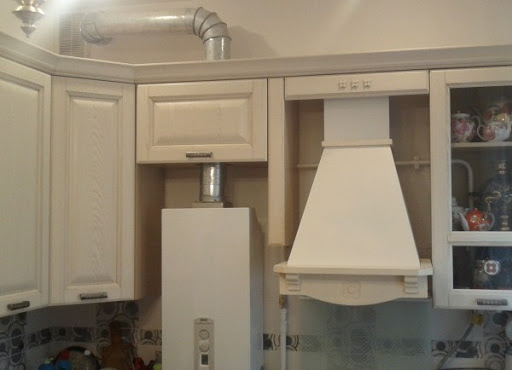
Modern hoods are equipped with fixing strips and decorative boxes for masking pipes, if their design does not combine with the interior of the kitchen. Thanks to this, it became much easier to install the equipment than it was before when dowels, screws and hooks were used.
The best option is to integrate appliances into the kitchen wall. This method saves space. It should be noted that the distance from the appliance to the refrigerator and the sink must be at least 50 cm. Such rules are subject to safety requirements for handling electrical appliances.
If the walls are of drywall, you will need to do the installation. Stainless steel profile tubes are best suited for this. Metal can not be decorated, but left as is. If the supporting structure does not fit into the interior, it is painted to the color of the walls, glued with tiles, wallpaper or is made into a makeshift box of non-combustible material.
In large kitchens, the work area is sometimes located in the middle of the room or against the wall in front of the headset. In the first case, an island-type hood with ceiling mount is selected. The device is equipped with filters or a separate exhaust duct. To hide communications, you can install a suspended ceiling by lowering it 1-2 cm below the duct. In the second case, the best solution would be a fireplace hood with wall fixation.To connect it to the ventilation shaft, a channel of plastic pipes of round, rectangular or square section is used.
The main stages of installing the hood in the kitchen

If safety requirements allow, it is better to install the stove and the hood opposite the outlet to the general ventilation system. If this is not possible, you will have to buy pipes and lay them. The option with filters can be considered as temporary, since the circulation system does not differ due to the proper efficiency of air purification and removal of contaminants.
Regardless of the type of equipment, any work begins with its unpacking and inspection. The product may have suffered internal and external damage during transport. Then it is necessary to carry out a test start-up of the device in order to check its performance. It often happens that the screws and brackets included in the kit do not meet the required strength. If their reliability causes even the slightest doubt, the products must be replaced.
Step-by-step installation of mounted models:
- Markup. A vertical line is drawn from the center of the plate and a horizontal line marking the bottom of the screen. Then a second horizontal line is drawn along which the bracket is attached.
- Suspension installation. First, holes are drilled, then dowels are clogged in them. If there is a layer of protruding apron trim below, a wooden rail with through holes is used to compensate for the vertical drop. Lastly, the horizontal is checked and the mounting plate is screwed.
- Mounting hoods. This must be done slowly and carefully so as not to lose balance and not to drop the product. The slots on the back cover of the case are combined with the tabs on the bar, after which it must be lowered down to touch the wall.
The final step is to fix the filters in the seats.
Embedded models require more time and effort to install. To integrate the hood into the wall of the kitchen, you will need to perform the following manipulations:
- Use the level to check the horizontal of the cabinet to which the equipment will be attached. Correct if necessary.
- Remove the cabinet, disassemble it so that you have easy access to the bottom and lid. It is better to remove the door so that it does not interfere with work.
- Glue the template to the bottom with masking tape, transfer marks on it under the holes for the bolts and the duct. Repeat the operation on the cover.
- Using a drill and a jigsaw, make holes of the desired diameter, treat them with a primer or acrylic paint to protect against dampness.
- Install an adapter on the hood for supplying the ventilation duct.
- Put the cabinet on the appliance, align the holes, connect the objects.
- Hang the assembled structure onto the fasteners on the wall.
- Install the ventilation duct.
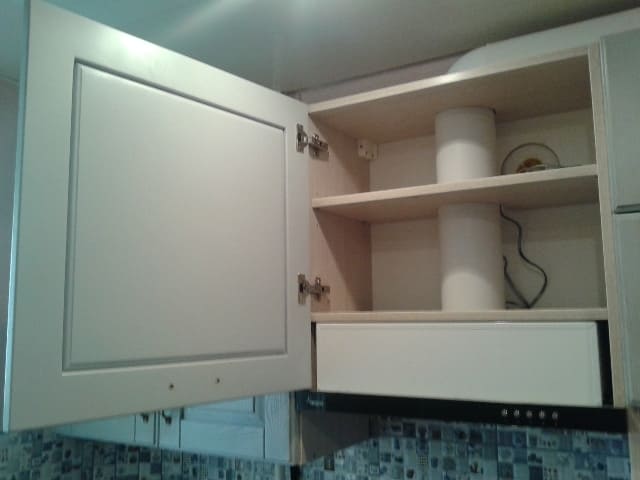
A cabinet with a pipe passing through it is not a decorative element. It can be used to store dishes, spices and other household items.
Duct installation
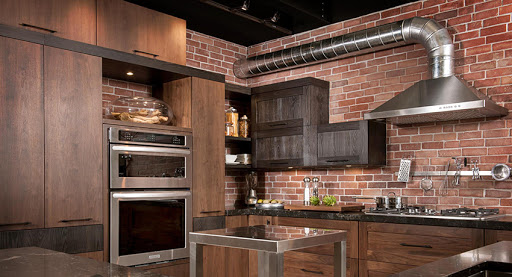
The air duct is designed to remove heat from the stove, food fumes, smoke, moisture and fuel combustion products. The design is a pipeline, one end of which is connected to the hood, and the other is led into the ventilation shaft or to the street through an opening in the wall of the house.
There are such options for arranging the duct:
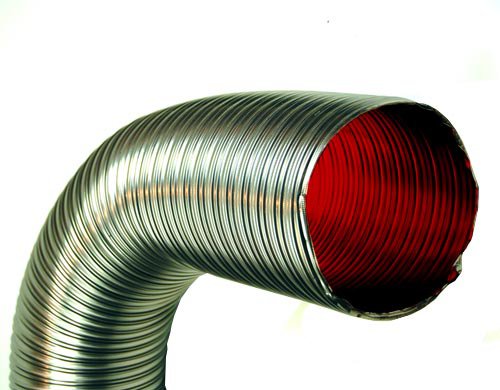
- Aluminum corrugation. The product is inexpensive, easy to install and resistant to corrosion. He also has enough cons. The corrugation is very noisy, dirt accumulates in the folds, aesthetics leave much to be desired.
- Plastic boxes. Parts with a length of 50-200 cm are sold.The section is round, square and rectangular. Complete with couplings, elbows, adapters and straps.
- Iron pipes. As a rule, they are produced in square form with a side size of 10-20 cm. The connection is carried out in a bell, subsequent decoration for furniture or decoration of the kitchen is possible.
To assemble the duct for the kitchen hood, you must perform the following measures:
- Take measurements, draw up a drawing of communication. Based on the data obtained, make the calculation of the necessary materials.
- Attach a bracket to the wall through which the pipe will exit.
- In accordance with the scheme, cut out fragments of the channel, remove burrs from the edges, slightly round the outer corners.
- Assemble the duct, starting from the hood. Eliminate defects, if any.
- Disassemble the structure, decompose the fragments in the order of connection.
- Reassemble the duct, but using silicone to seal the joints. Remove excess solution with a damp cloth or sponge.
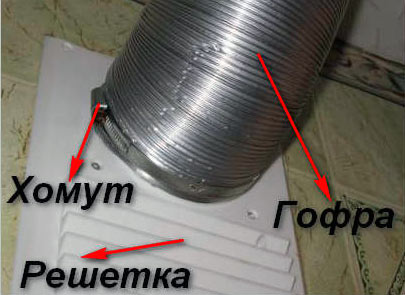
If the ventilation hole in the kitchen is the only one, it cannot be completely covered with a pipe. This will disrupt the air circulation in the room. In such cases, you need to use a combined grill, where the upper part is closed by a removable mesh, and the lower is equipped with an opening for the entrance of the duct. To prevent the entry of neighboring odors into the housing, it is better to purchase a check valve grille.
Cooker hoods are not very powerful and safe in terms of the likelihood of electric shock. They can be connected to a standard outlet without grounding. If the cable is not long enough, you can replace it or bring an additional outlet to the device. To mask the cable, use a plastic box or pipe.