Electric water heaters are installed in private houses, cottages and in many city apartments. These appliances, providing people with hot water, give them independence from the unpredictability of public utilities. However, the idyll can be easily destroyed if the boiler suddenly spills. This is a serious problem that needs to be addressed competently and promptly, as the consequences can be disastrous. It is possible to diagnose and solve this problem independently, without involving hired workers. To do this, you need to know the causes of malfunctions and how to solve them.
Reasons for a water heater

If a boiler leaks, immediately disconnect it from the network and shut off the water supply to it. To reduce pressure, open the hot water tap on the mixer. These actions will eliminate the risks of electric shock and flooding. After that, wipe the product with a dry cloth and carry out its external inspection. It will help determine the source of the problem and assess the possibility of its independent solution.
If a boiler is flowing, the causes of this phenomenon may be as follows:
- Incorrect installation. During installation, a new device could be hit or dropped. As a result of such actions, cracks appear in the tank or seams between the pipes and the body diverge. If the boiler has flowed from below, there is a likelihood of poor connection quality.
- Lack of maintenance. It consists in periodically cleaning the tank, replacing worn parts. The formation of sediment makes the gasket solid, gradually penetrating into the cracks, thereby causing leakage. Another reason may be rubber pads and FUM tape at the joints, which over time lose their original characteristics.
- No overpressure relief valve. This part is designed to maintain the working pressure in the tank and discharge the liquid when it rises to critical values. When there is no safety valve, the tank constantly shrinks and expands due to changes in temperature and pressure. All this leads to its rapid wear.
- Incorrect grounding or its complete absence. The consequences of violation of the rules for connecting the appliance becomes electrolytic corrosion, which corrodes even parts made of non-ferrous metal.
- Corrosion of the internal parts and walls of the boiler. This occurs when water quality is poor and there is no anode. The salts deposited on the flask first destroy the enamel, and then the metal. Leak can occur anywhere - from above, from below and from the side of the bulb.
- Long service life of the unit. If the boiler flows even from the bottom of the drop, this may indicate the wear of one of the parts - the heater, thermostat cylinder or tank. The possibility of repair depends on the nature of the malfunction. With prolonged downtime, water blooms inside the tank, as indicated by an unpleasant odor emanating from drips.
When a boiler leaks, you have to spend time and effort to restore its efficiency. However, first you need to get ready for work, so as not to be distracted from it at the most crucial moment, when it turns out that something is missing.
Tools and materials for work
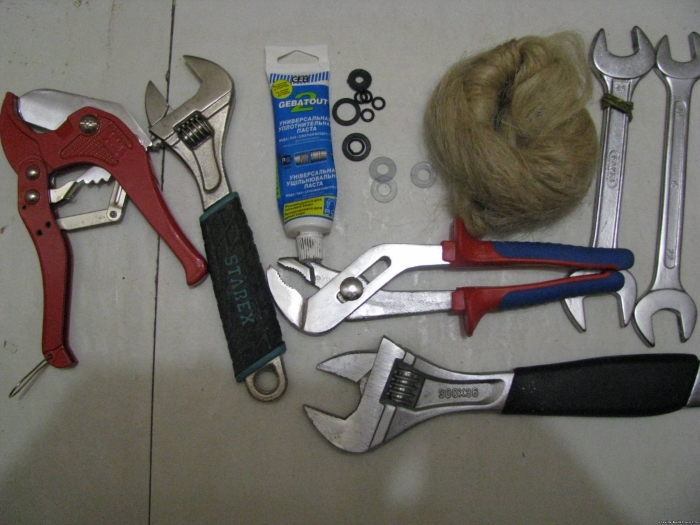
To carry out diagnostics, disassembly and repair of the water heater, a standard set of devices is enough, which is even in the pantry of a beginner home master.
You will need such tools, fixtures and supplies:
- adjustable spanner, pliers, screwdrivers;
- indicator;
- scissors, steel scraper, pliers;
- brush;
- flexible hoses, caps for pipes;
- latex gloves;
- FUM tape or tow;
- rubber pads;
- check valve;
- Lantern.
Since disassembling the boiler is accompanied by the discharge of a large volume of water, care should be taken about the possibility of its rapid collection in case of unforeseen situations. This will require basins, buckets and rags. If the appliance hangs over the bath, it is advisable to cover it with dense material to protect the enamel from damage from objects falling from above.
Recognition of problems and their elimination
When disassembling the boiler, all of its actions should be fixed to the camera so that there are no problems with the reverse installation and connection to the network.
The work is recommended to be carried out in the following sequence:
- Remove the cover, unscrew the wires, pull out the rheostat, assess its condition. If in doubt, an inexpensive part is best replaced.
- Disconnect the pipe for draining hot water, screw a flexible hose to the tank.
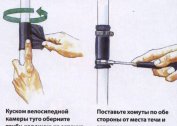
- Unscrew the cold water supply from the ball valve. Separate the check valve. Attach a second flexible hose to the nozzle. Now water will flow freely from the tank.
- If the valve and tap are very dirty, soak them in an aqueous solution of citric acid (10: 1).
- Loosen and remove fasteners that presses the heater to the boiler body. Different manufacturers use their own method for this.
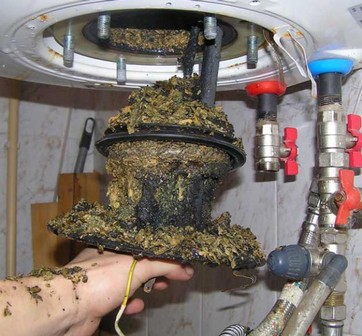
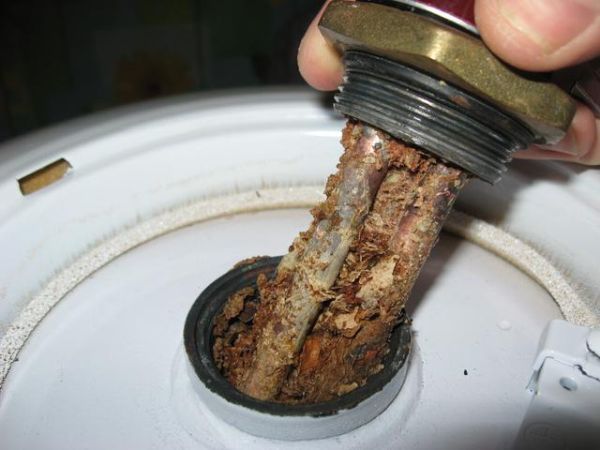
- Carefully remove the heating element. You need to be prepared for the fact that there will be a thick layer of sediment above it. In this case, the element needs to be lifted above the hole and freed from debris by directing it into the bucket.
- Empty the tank. In order not to remove it, since it is rather difficult, you should plug the cold water supply pipe with a stopper, open the tap and rinse the container with a strong jet using a shower head.
After disassembling and gaining access to all parts of the device, you can proceed to the diagnosis and repair.
The inside of the tank is inspected using a flashlight. Holes from rust on the side and top will be clearly visible. It is impossible to eliminate such a defect. The defective product must be disposed of. Some craftsmen remove the outer casing and insulation, after which they weld holes. To do this at home is extremely difficult, but real. However, after repair, it is necessary to fix the insulation on the tank, otherwise it will strongly heat the air in the room, and the water will cool quickly.
When the cause of the leaks is in the heating unit, it is advisable to replace it. Such parts are inexpensive; buying will not hit your pocket. Sometimes the right block is simply not on sale, and hot water is urgently needed. If the matter is a shriveled gasket and a lime coat on the heater, you can get out of this situation quickly and without loss.
- The spiral must be lowered into the tank with citric acid, connected to the network and boiled for 15-20 minutes. Scale residue is easily scraped off with a knife.
- Both rubber gaskets are abundantly greased with heat-resistant sealant.
- The heater is inserted into place and pressed into the socket by fasteners.
You can not be afraid that the restored connection will leak. The mastic will ensure the tightness is not worse than that of the factory version.
Preventative measures
Leaks and associated boiler repair can be easily avoided if the rules for its operation are observed, starting from the moment of installation:
- transportation and installation of the device must be carried out carefully, avoiding its fall and shock;
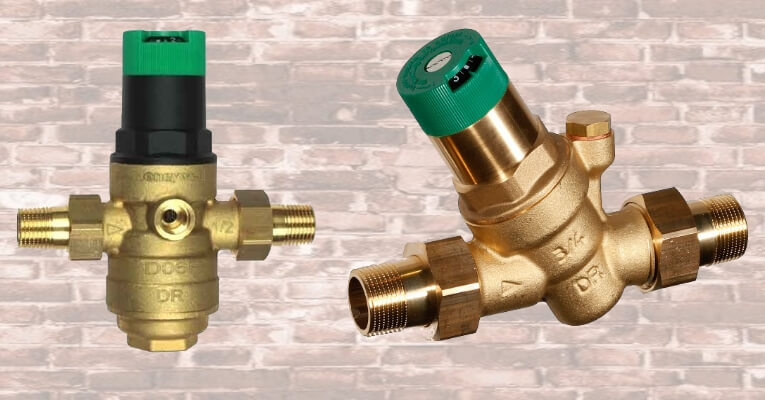
- if the pressure in the system exceeds 2 atmospheres, a special pressure regulator must be installed;
- after installation, equip the boiler with a safety valve;
- put a good filter at the water inlet to the house, which will remove salt and calcium from the liquid;
- timely change the anode to prevent corrosion of the tank walls;
- regularly clean the boiler and the heater from scale and lime deposits;
- periodically update consumables - gaskets, coils, flexible hoses.
Proper operation of the device will minimize the risk of leaks and extend its life.