Due to the fact that external insulation with the help of sheet heat insulators is easy to perform independently, the owners actively use this method. Among a large number of heaters, foamed polystyrene is considered the most optimal option. When choosing polystyrene for the walls of a house, one should take into account not only positive, but also negative qualities of the material.
Advantages and disadvantages of polystyrene foam
 Polyfoam is a polymer insulation, which is available in white plates. It is distinguished by a pronounced granular structure and numerous voids filled with air. This gives the material positive thermal insulation properties. Among the advantages of expanded polystyrene it is worth highlighting:
- the warming process is not difficult, and can be performed independently;
- relatively low consumption;
- no additional vapor barrier is required;
- long period of operation;
- low thermal conductivity;
- light weight;
- affordable cost;
- not susceptible to microorganisms.
It was not without drawbacks either:
- flammable with toxic smoke;
- non-indifference of rodents to polyfoam.
It must be remembered that the facade foam is different types, thickness and density.
Choosing the best foam
 There are various types of materials used in the insulation of external walls. Each of them is different:
- The size of the plates. Manufacturers offer three main types of heat insulator: 1 * 1, 0.5 * 1, 1 * 2 meters. Given that the material is easy to cut, this does not pose any particular problems. The choice is based on the surface area to be insulated. Foam slabs 0.5 * 1 meter are suitable for loggias and external walls of apartment buildings. For private houses with a flat wall surface, use plates 1 * 1 meter.
- Density. When conducting thermal insulation, a material of various densities is used, which depends on the place of insulation and the objectives pursued. For external walls, it is recommended to take foam, the density of which is 25 kg / m3. Material of lower density is used when warming technical buildings, open balconies, verandas.
- The thickness. The choice of thickness is influenced by a combination of individual factors: climatic conditions, material and wall thickness, and others.
- Quality. Having decided on the remaining parameters, it is necessary to assess the quality of the foam, intended for insulation of the facade. To do this, it is advisable to familiarize yourself with the quality certificate, which indicates the brand of material, the date of its manufacture and other parameters.
Particular attention should be paid to the size and location of the granules, as well as the presence of voids. If the granules fall off without additional efforts, it is difficult to call a material of high quality.
Thickness calculation
 When choosing a heat insulator, you need to consider the thickness of the walls and the material from which they are made. With insufficient thickness of the insulation, freezing of the walls and the transfer of the “dew point” to the room are possible, which can provoke increased humidity with the formation of condensate. Accordingly, a competent calculation of the required thickness of thermal insulation will save heat in the house and save money.
The thermal insulation thickness is affected by the thermal resistance (R), the value of which is constant, and represents the ratio of the temperature difference to the heat flux passing through the insulation. The higher the R value, the higher the quality of the material.If a brick wall, with a thermal conductivity of 0.86 W, has a thickness of 0.5 meters, then dividing 0.5 m by 0.86 W, we obtain the indicator R.
Attention! Having determined the required thickness, it is necessary to calculate the amount of foam for home insulation. This will protect against unnecessary expenses.
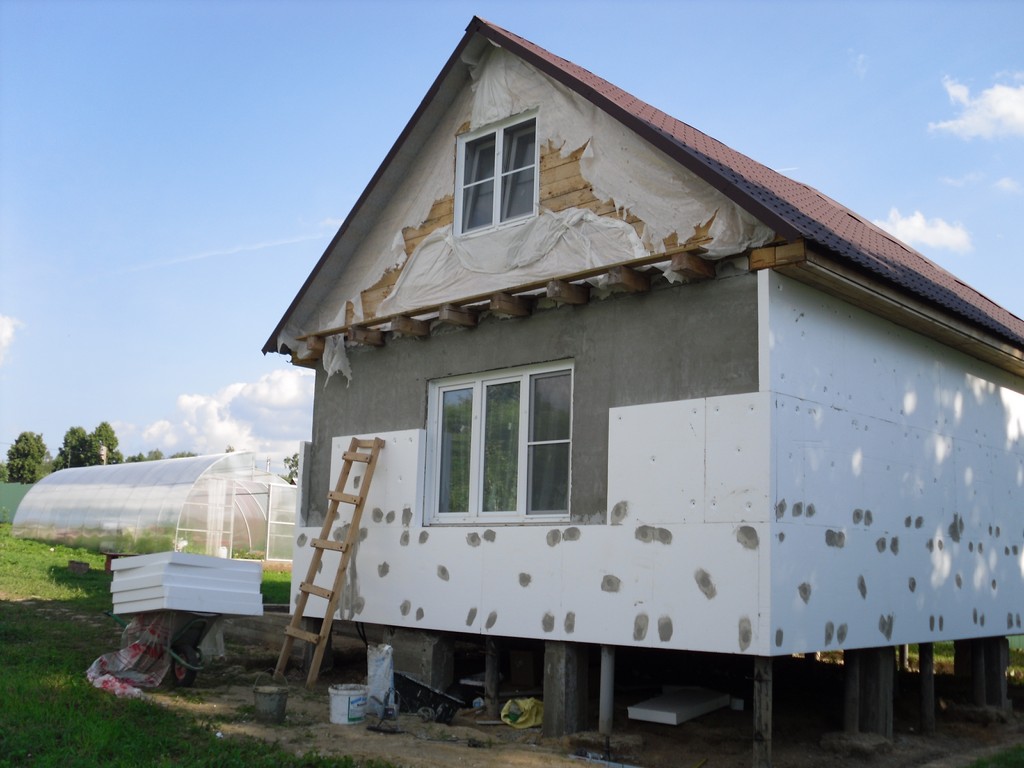
Preparation of external walls for insulation
All finishing and insulation work is carried out after preparation of the surfaces, which should be cleaned, leveled and primed. This is a fairly lengthy process, but the result is worth it. First of all, the walls must be tapped to detect falling fragments. For a smooth fit of the foam, the protruding sections knock down. Grease stains with a solvent, and scratch painted walls to improve adhesion.
Step-by-step instructions for wall insulation from the outside with foam
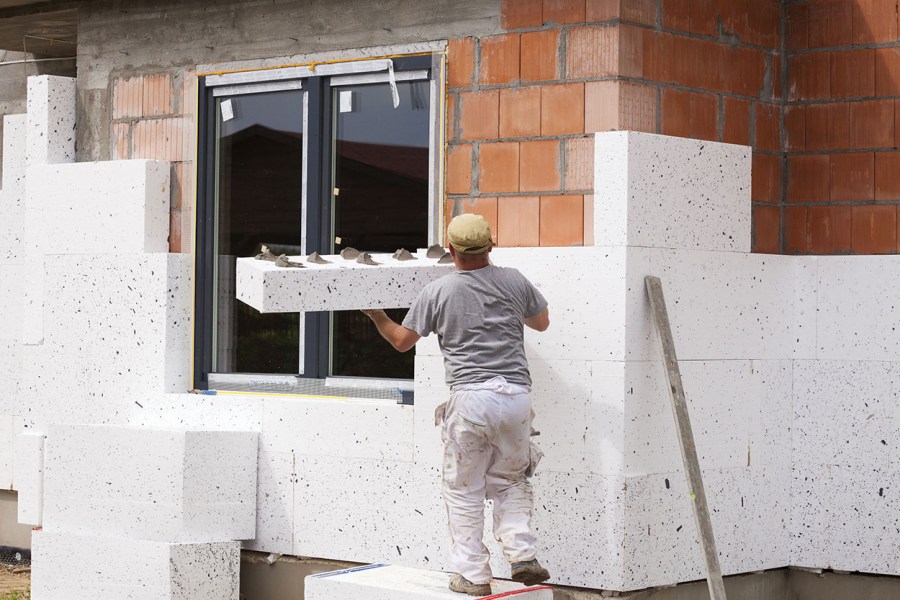
 Do-it-yourself insulation of the facade of the house with foam is carried out in several stages, the implementation of which is mandatory.
The first step in the work will be the marking of the walls. Given that the angles may have some deviations, it is not worth comparing them. It is better to use the old-fashioned method using a plumb line or a lighthouse. To do this, tie a rope with a load at a distance of 5-6 mm from the wall, and fix it. Cross marking is carried out using twine and hydraulic level.
In order for the slabs to be supported, a horizontal profile is fixed by horizontal marking, the width of which should be equal to the thickness of the foam. Corners need to be joined by means of corner connections or by an oblique cut. Fastening is done through 30-35 cm with 6 mm dowels. In addition to support, the profile protects the insulation from rodents.
Having prepared the adhesive for mounting on the facade of foam boards, use one of the methods of applying it to the sheets:
- if the walls are uneven, a large amount of glue is applied around the perimeter and in the center of the panel;
- with even walls, glue with a notched trowel is spread evenly with a thin layer on the entire surface of the sheet;
- • you can use a special adhesive designed for foam, distributing it in the center and perimeter of the plate.
Attention! Remember that the technology of wall insulation with foam from the outside involves working with a dry surface. When gluing wet walls that have not dried out after winter, an unstable joint is created, due to which thermal insulation worsens.
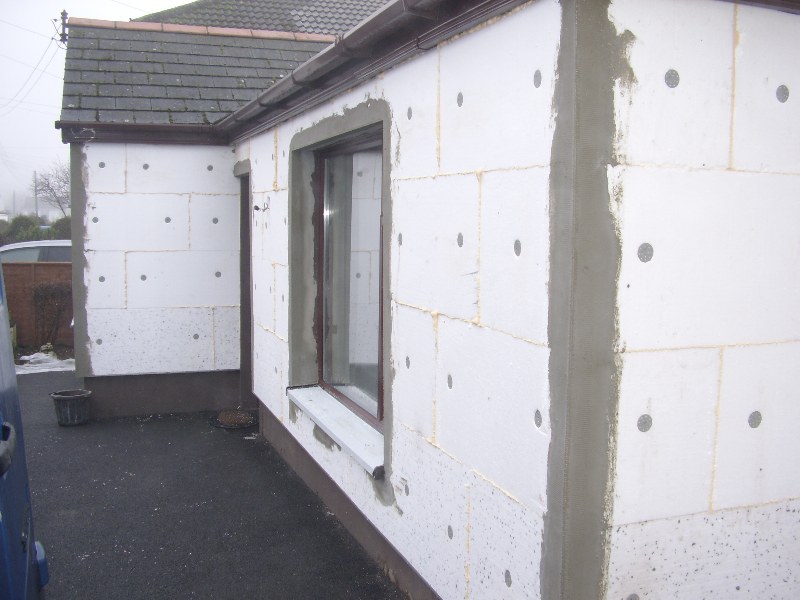
Warming process
 It is desirable to carry out warming of a private house with polystyrene in the spring, after turning off the heating. It is not recommended to perform work during the wind, since the glue will dry too quickly directly on the sheets. Do not use a too fragile heat insulator, the density of the foam for insulation should exceed 20 kg / m3.
Gluing is performed after a day from the moment of priming. Foam wall covering begins in the lower corner, with a long edge down. The laying of the second row is carried out with a slight offset, reminiscent of a brickwork dressing. The most convenient when insulating the facades of cottages with foam is the use of sheets with a thickness of 5 cm and a size of 0.5 * 1 meter.
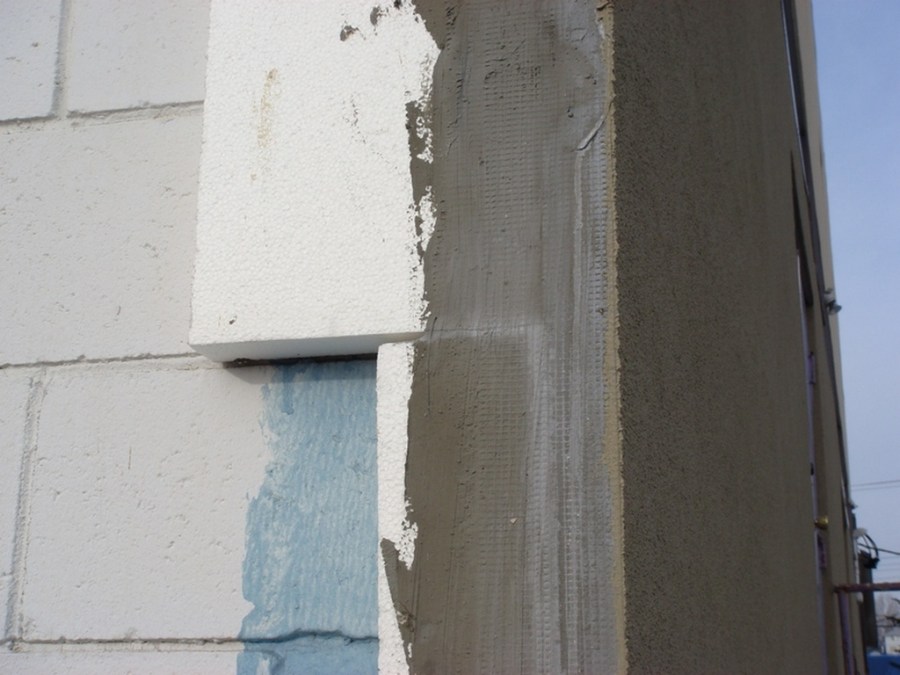
Corner insulation
When performing thermal insulation of the corners of the house, the foam is connected by "dressing". To prevent the formation of vertically long joints that lead to cracking, the insulation should go on the adjacent wall. At the corners, as well as slopes, the foam is glued with a margin that allows you to make a dressing. Surplus plates are cut off after the glue dries, using a wide knife or a small hacksaw.
Insulation of window, doorways and walls next to them
Performing insulation of slopes, insulation sheets are laid close to openings. In this case, an adjacent profile or a sealing tape made of polyurethane is used. The tape is glued directly to the door frame. When applying a seal, it contracts, decreasing by a third.When warming a window located on the facade, the heat insulator is put on the frame previously glued with polyurethane tape.
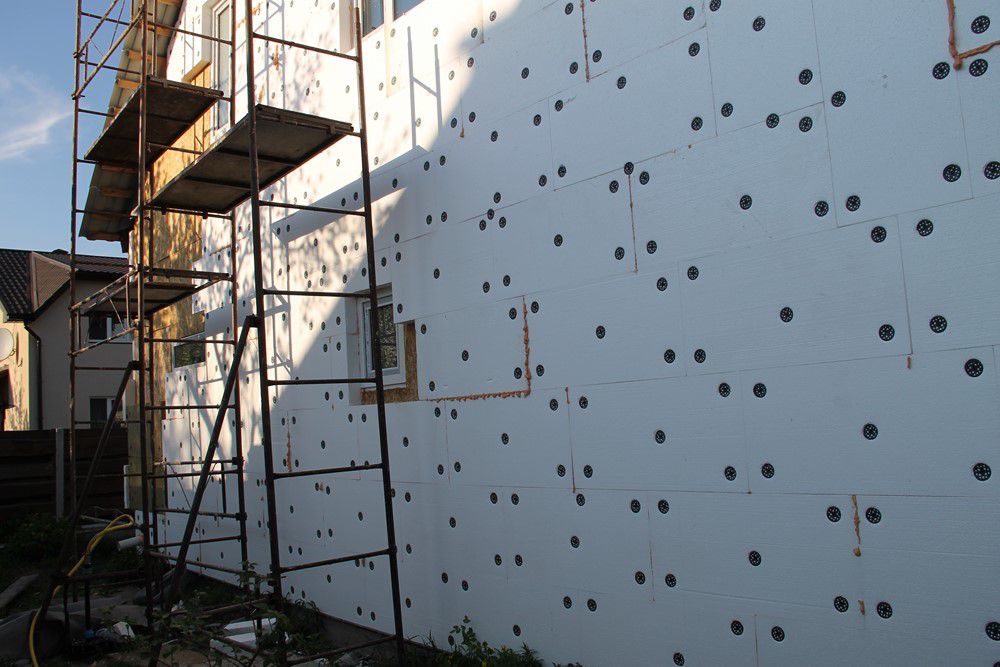
Installation of mounting umbrellas on foam
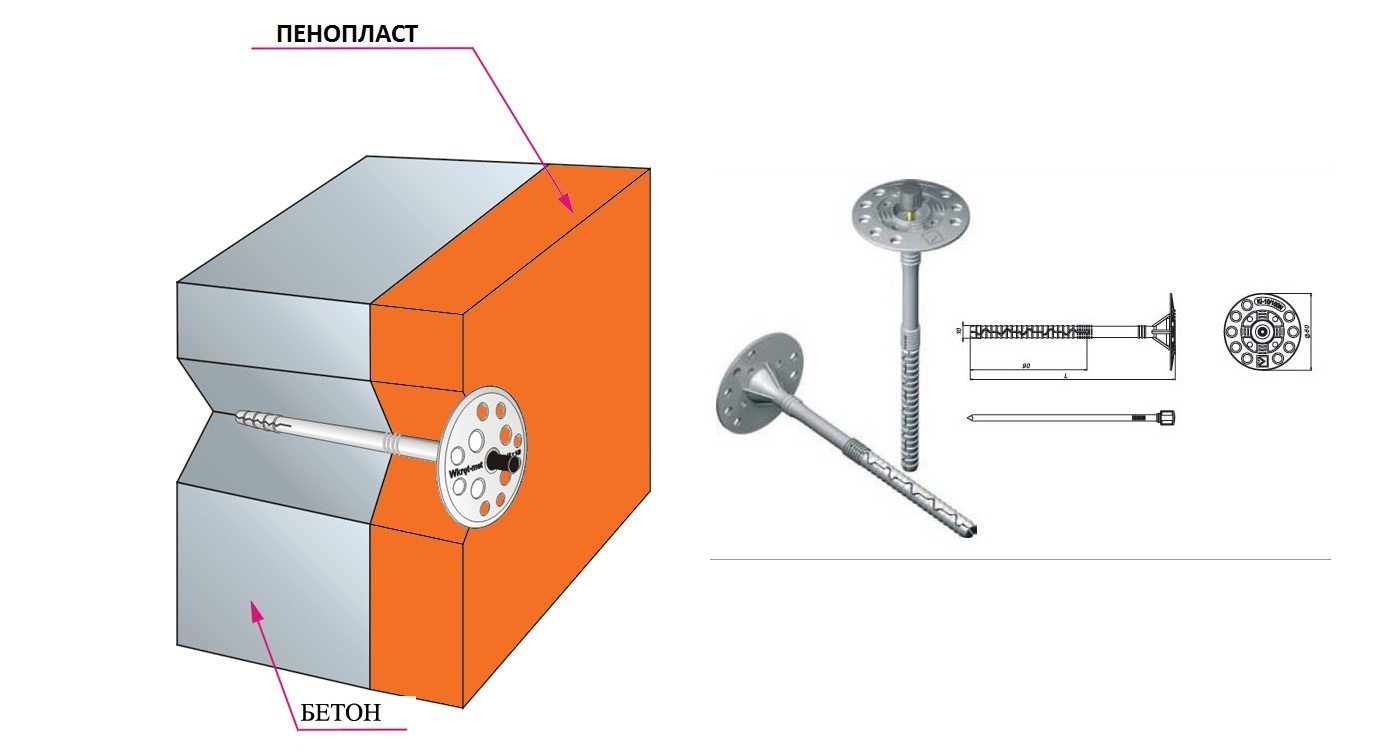 Additional fastening of the foam during installation is performed with special dowels - "umbrellas" having a plastic head. The length of the fasteners is selected based on the thickness of the plates. To install the dowel in the wall glued with foam, drill holes of the required depth are made with a drill. The immersion depth of the fasteners in the foam should be about 1.5 mm. The dowel should be immersed 9 cm in brick, 12 cm in cellular blocks, and 5 cm is enough for concrete.
Dowels are fixed in the center of the plate and in the corners. At least 6 fasteners are consumed per square meter. Near the door and window slopes, along the base and at the corners, more is required.
Attention! The use of dowels containing metal rods is fraught with the formation of cold bridges.
Insulation reinforcement
 If after gluing the insulation a day has passed, it is possible to perform reinforcement using a special mesh, which is cut into strips of the required width. The adhesive intended for reinforcement is applied to the wall so as to drown the net in it. Having fixed the reinforcing material, it is leveled with a spatula and excess glue is removed.
To strengthen the slopes, decorative elements and corners of the building, special perforated corners made of aluminum or plastic are used. To fix them, they are lubricated with glue together with the adjacent mesh, and pressed to the insulation with a spatula. The glue coming out through the perforation and the mesh must be smoothed.
Each subsequent strip of the grid should overlap the previous centimeter by 10. After reinforcing the thermal insulation, the walls are re-coated with adhesive mortar, not more than 2 mm thick. Considering that the adhesive composition dries quickly, in a day you can start filling up irregularities with putty.
Such a method of thermal insulation requires the use of appropriate materials. In the work, it is necessary to use not tile glue, but special for foam. This will allow you to get the desired result, and the walls finished with insulation will last a long time.