Stove heating has not lost its relevance, since not all houses can install a boiler. In addition, gas with electricity is constantly becoming more expensive. Stoves are placed in private cottages, in summer cottages and in baths. An option with good heat transfer due to the free movement of hot gas is a bell-type furnace. Due to the simplicity of the design, even a layman can assemble it with his own hands.
Design and principle of operation
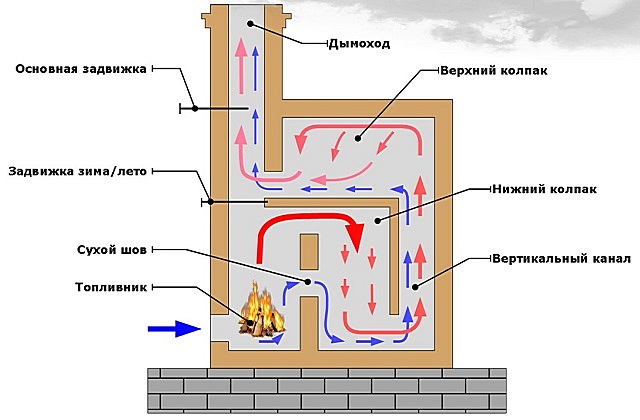
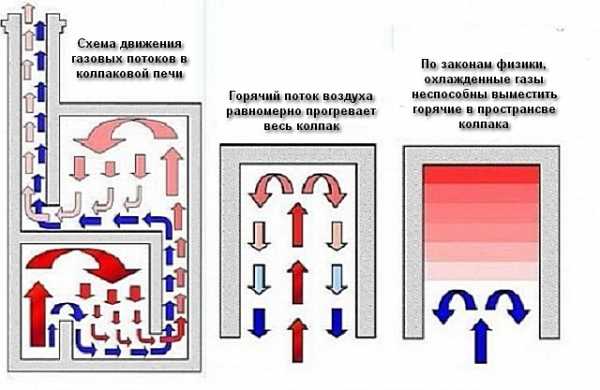
The stove with a hood was developed by engineer Igor Kuznetsov in the early 60s of the last century. Subsequently, the Russian metallurgist Leonid Kotlyar improved the design so that it retained heat until 19 hours. The feature of the “blacksmith” is that the heated air does not leave the pipe, but is removed under the hood. Slowly it cools, and is replaced by rising hot streams. In saving heat, there is the advantageous difference between the bell-type furnace used for heating the house from the channel, where hot air, under the influence of traction, freely goes to the street.
The design of a two-meter height with a base of 1m * 1m can reach a thermal power of 3.5–4.5 kW. Enough of such a bell furnace for heating a house of 50 square meters in a temperate climate zone, if you heat it twice a day.
The inventor improved the design by adding another cap. In a two-bell Kuznetsov heating furnace, the first covering element is connected to the furnace compartment and separates the cold and heated streams. The second hood is located in the upper furnace part, holding up hot air, which before entering the chimney, gives heat to the bricks for a long time.
A two-bell oven consumes less fuel and is usually equipped with a hob. This allows you to cook delicious dishes without the consumption of electricity or gas. An extractor hood is already provided in the design of the stove - there is no need to mount an additional ventilation system.
In a classic stove, the heat exchanger is located below, which makes heating more high-quality. Moreover, such an installation does not lead to the formation of a large amount of soot.
Advantages and disadvantages
Kuznetsov constructions have many advantages. One of them is increased efficiency - 93 percent. For comparison - in Russian ovens it is about 80. At the same time, the “blacksmiths” have uniform heat transfer, less temperature fluctuation.
Other design advantages:
- There is no soot left, and therefore the stove and smoke channel can not be cleaned for several years, which greatly simplifies maintenance.
- The device can be built anywhere - in the corner zone, in the middle of the room, near the wall. Often, a two-bell oven heats several floors of a house on one tab.
- The chimney can be shortened to save bricks.
- "Kuznetsovka" is easily combined with a stove, fireplace, stove bench, differing in a variety of modifications.
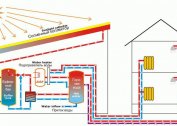
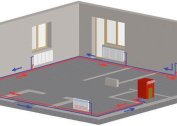
- It is easy to connect a water circuit to the stove and run heated water through the pipes for bathing or heating.
- Thanks to the increased level of pyrolysis, fuel is saved, which can be any.
- Masonry will last longer, less risk of cracking.
- With a briefly open valve, it is almost impossible to cool the stove, because the hood is always filled with warm air, and the cold one is pressed down.
“Blacksmiths” have few drawbacks, for the most part they are associated with the construction: stove-makers who are ready to inexpensively implement such a project are not easy to find. In addition, the units are quite large in size, but slightly inferior to Russian stoves.
Construction of a bell furnace
 First of all, you need to choose a convenient place for the furnace structure. Kuznetsovka is unpretentious in this, the main thing is that it is convenient for the owners to service it. However, the position of the chimney should be taken into account, since it is laid through the attic between the beams, moving away from them by at least 15 cm.
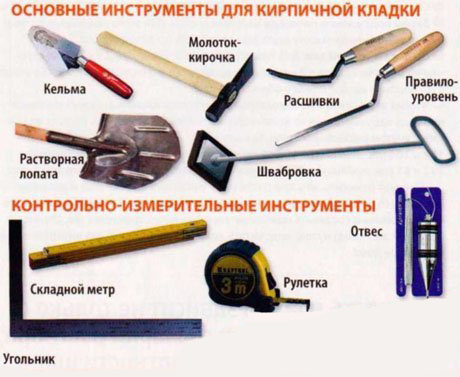
Tools and materials
From professional tools for the construction of the stove you need:
- hammer pickaxe and trowel;
- mallet;
- paint cord of considerable length;
- building level, rule and plumb;
- roulette;
- angle grinder;
- Stitching for seams.
For the stove itself, you need to acquire solid and fireclay bricks, a grate, steel plates. Safety will be provided by gloves and goggles to protect against flying dust when sawing brick blocks. To replace the solution you need a drill mixer, a special container.
The styling solution is easy to prepare on your own according to a time-tested recipe or buy a modern option in construction products. Self-masonry composition is done on the basis of clay, sand and water, sometimes manure is added for plasticity. The proportions depend on the quality of the components. The resulting solution should be soft, viscous and not crack when laying.
Preparation and construction
For self-construction, you need to find high-quality drawings and instructions with order from experienced stove-makers or on the Internet. After that, you can start building the stove.
First of all, the foundation is laid:
- Dig a hole with dimensions of 100x150 cm and 0.8 m deep. In general, its dimensions should be 10 cm larger along the perimeter than the furnace itself.
- Pour sand at the bottom 20 cm.
- When the sand cushion settles, expose the formwork and reinforce the bottom with a mesh.
- Pour cement mortar 20 cm above floor level.
The foundation needs to stand for about a month. Only then can you start masonry. Before erection, it is necessary to cover the base with a layer of reflective foil slightly wider than the foundation, in order to further reduce heat loss. If the house is made of wood, an asbestos sheet is laid before the foil coating. When everything is ready, the edges of the foil can be cut off.
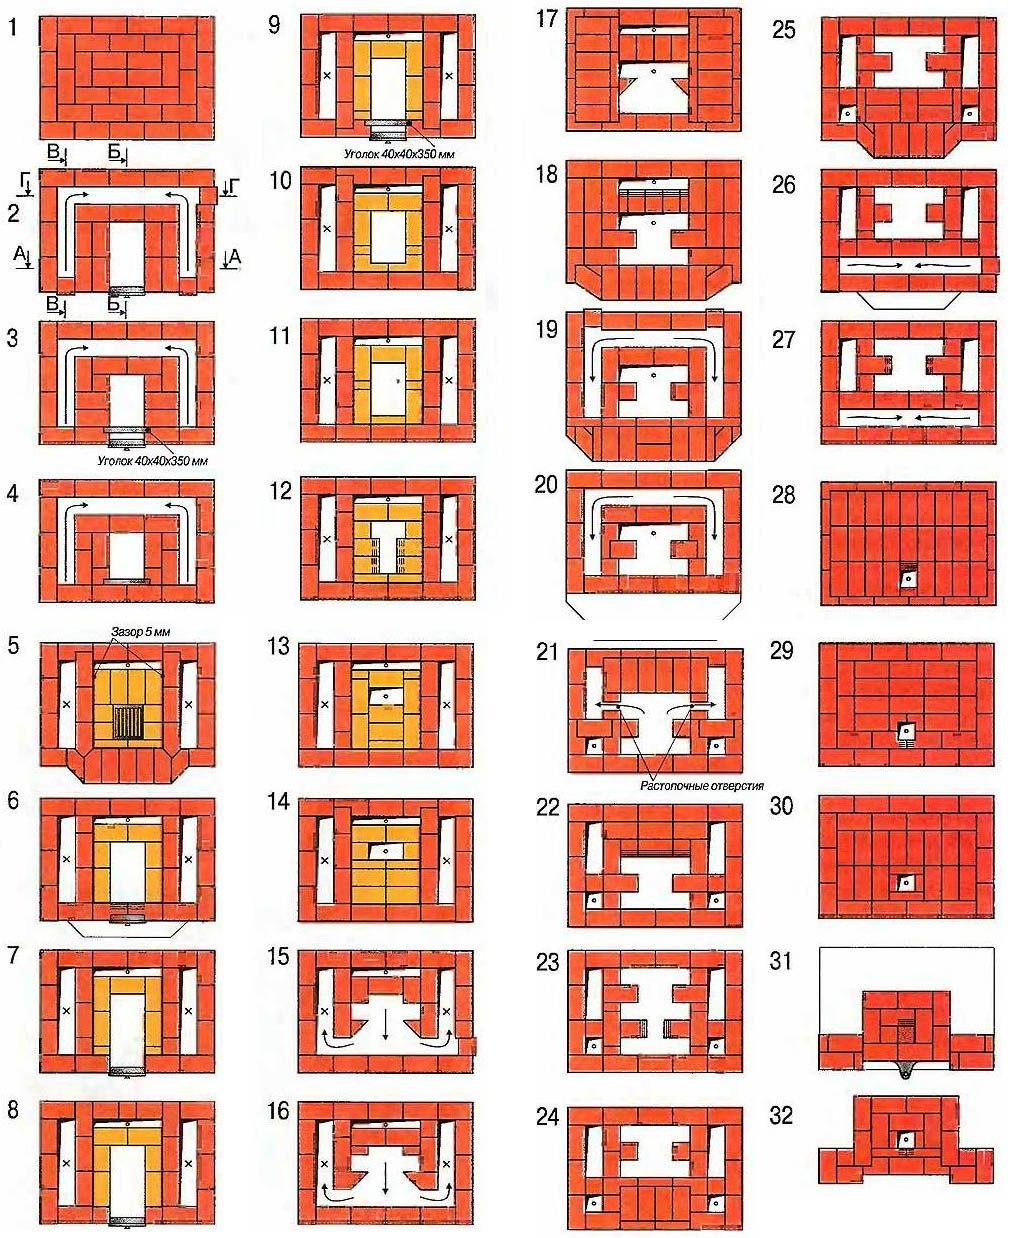
The classic bell-type stove is built in 30 rows, although their number can be reduced or increased, the main thing is to follow the instructions. To build it, you need to follow the following plan:
- The first row of bricks is laid out evenly, the side walls are shifted from right to left using a spoon method. As a result, the back and front sides will be laid in four bricks, the right in two, and the left in three.
- On the second row, a blower door and a window for cleaning a single-bell stove are mounted. It can be done anywhere, but with one condition - its location should be below the compartment of the furnace. The next row fits in the same order.
- Further, the connector for the disposal of combustion waste is reduced. In width, it should be approximately half a brick. In the far row from the furnace, a partition is installed leading to the upper compartment.
- Rows are laid according to the scheme, but the edges of the reset hole must be covered with fireclay bricks, and put the grate on top. The next row lies in the same order.
- In the seventh row, a chimney from the furnace pipe is discharged into the half-brick so that it exits into the adjacent air compartment. By a similar principle lay the next level.
- Now the furnace compartment is covered with a full-bodied brick, and chamotte is encased inside. The tenth and eleventh row are placed unchanged.
- At the twelfth, a crate of refractory bricks is laid out. The row itself is put in half a brick. Laying of the thirteenth row is carried out according to a similar scheme.
- On the fourteenth row, the movement of smoke is blocked by a plate of metal, a chimney bar is assembled from bricks. As a result, a single channel should be formed, remaining during laying in the fourth row.
The first building block is completed.To form the second, final level, the masonry is conducted in the same way as before. The intake plate must be fixed with a solution on one side. Laying the nineteenth row, put in the middle of the smoke collector a brick block for the base of the column under the roof of the structure. For tiles leave a space of a width of one brick. Up to the twenty first row lay out the blocks according to this scheme.
Then it is necessary to block the channel leading to the pipe, since the smoke will come from the space left below. In the 22nd row, the walls of the air hole are strengthened with steel plates. You can purchase a finished rim with doors, then equipping the oven will be easier. At the same time, they lay out a hood in a quarter of a brick.
Laying according to this scheme is carried out up to 24 rows, then they create a step and attach the steam collector to the chimney, close the channel. In the 27th row they put a fence plate, and in the 28th they cover the device with a brick roof. The masonry is completed by attaching a pipe with a section of one brick.
A similar scheme creates a two-bell Kuznetsov furnace with his own hands.
At the end of the construction, at least a day should pass for complete solidification of the solution. After that, a check is carried out, igniting a small amount of fuel. If it is found that the structure is leaking at some point, the problem is eliminated.
Kuznetsov’s stove in ready-made routines can even lay out a beginner. But you need to strictly adhere to the instructions so that the design is durable and safe.
If there is no desire to lay out a brick stove, you can buy a metal counterpart. Its cost is from 33 thousand rubles. For industrial purposes, dome furnaces are used that are created according to a similar principle. Their cost starts from half a million rubles.