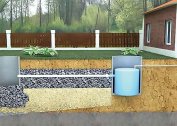
Properly completed installation of the drainage system will be able to provide not only trouble-free operation of the roof, but also the safety of walls, the foundation of the structure. Do-it-yourself wastewater disposal is in no way inferior to systems made by professionals, provided that all stages of the manufacturing process are carried out with care and accuracy.
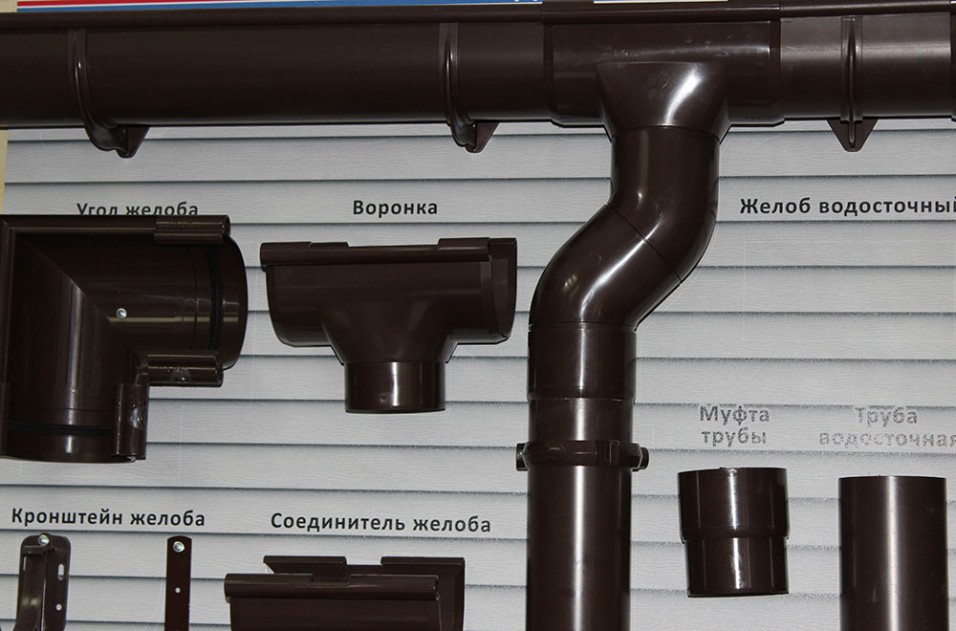
Installation of polymer gutters
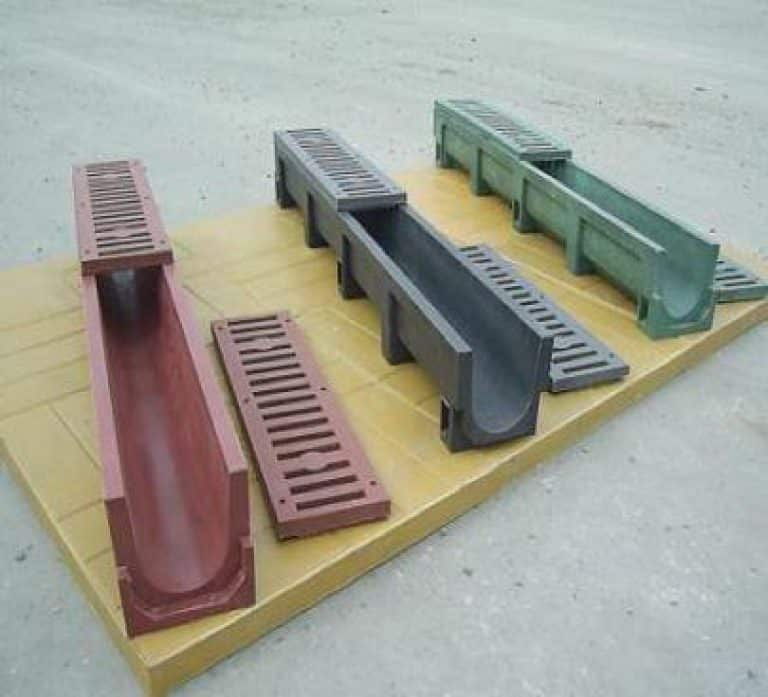 A modified polymer is widely used to mount wastewater, able to withstand harsh operating conditions - high temperatures in the summer, winter frosts, loads from rain, rain and snow.
Manufacturers endow their polymer products with the following characteristics:
- frost resistance - the components of the systems do not undergo deformation and do not crack at temperatures up to -50 degrees;
- durability - the service life is approximately 15-30 years;
- high degree of throughput (with proper installation);
- sound absorption - silent movement of all types of precipitation through pipes;
- wear resistance - not amenable to corrosion and chemical attack;
- light weight - the ability to perform installation on lightweight buildings;
- decorativeness - retains an attractive appearance throughout the entire period of operation;
- availability - the cost is lower than that of metal counterparts.
One of the advantages of polymer systems is simplified installation, which does not require special skills and equipment, especially when the structure is assembled using rubber seals. All parts have snap locks, and fasteners are mounted to the windshield and walls using hardware. Each set of polymer gutters is equipped with detailed assembly instructions, but there are general recommendations that must be followed during installation:
- although the material can withstand fairly large frosts, it is not worth assembling at a temperature lower than +5;
- the slope for the polymer trough should be 3-5 mm per linear meter;
- the maximum gap between the intake funnels is 24 meters;
- position the brackets at the same distance;
- the optimal clearance from the wall of the house to the pipe is 3-8 cm;
- the gutter should protrude 1/3 part above the roof level.
The assembly of the polymer gutter begins with the installation of a drainage funnel, which is also a connecting element. The tilt level is maintained with a cord or level. Then mount the brackets under the gutters, starting from the opposite side relative to the funnel.
Brackets and extras are attached to the windshield using 5 × 30 mm screws. The gutter is installed in the connecting elements and latches in the grooves. Provided that the assembly recommendations are followed, the drainage system will receive high efficiency during its operation.
Galvanized Systems
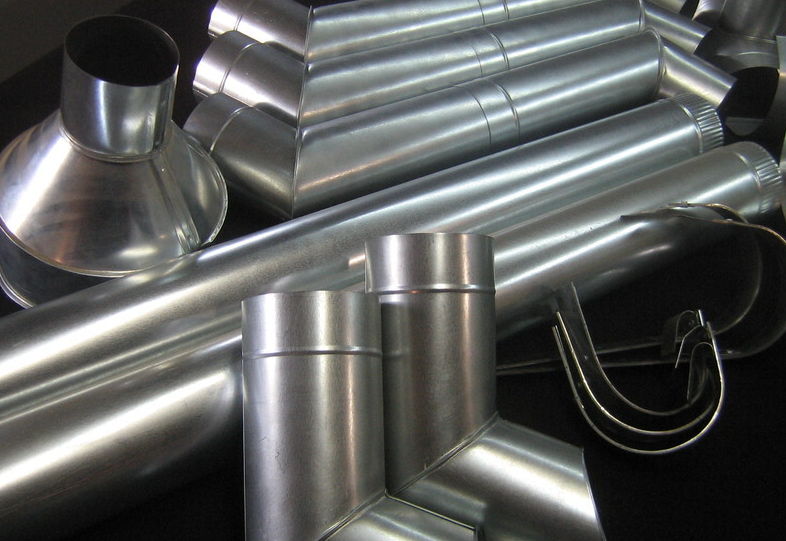 Galvanized drainage systems are characterized by ease and practicality, long service life and simple manufacture. The finished gutter system made of galvanized steel includes all the necessary fasteners. Their task is to ensure the tightness of the water drain in the right direction. Therefore, it is possible to install such a drainage system on a reinforced concrete, brick or wooden wall, of any configuration and in the right direction. Installation of the system is quick and easy. There are also such advantages:
- it is steady against deformation, temperature differences, humidity;
- fire resistance when exposed to direct flame;
- light weight;
- reasonable price with pretty good technical specifications.
The disadvantage of galvanized gutters is the low degree of sound insulation.Therefore, it is necessary to observe the technology in the manufacture of the system, namely the fastening of elements to the roof and facade.
Plastic pipes
 Of all the materials used in the production of drains, the most budgetary is plastic. Such systems are available in various colors, have an aesthetic appearance and are easy to install. Plastic products are lightweight, so these gutters and pipes can be installed on different types of roofs. It’s quite easy to work with plastic gutter elements:
- Since this material is more pliable than galvanized steel, fastening is more frequent here and the load is distributed somewhat differently. With the same assembly scheme, the number of parts is much larger.
- The distance between the brackets should not exceed 0.5 m, while in the steel structure 0.8-1.3 m. Brackets are mounted on the wall of the house, roof rafters, windshield.
- The number of pipes for the drain is calculated in the ratio of 1 to 8 m of the gutter. Diameter over roof area: 1sq. m to 1 sq. cm section of the pipe.
- The gutter is installed in accordance with the angle of the roof: water flowing from the slope must fall on the center line of the drainage channel.
- It is important to choose the depth of the gutter correctly. Otherwise, water will pour over the edge and the drain will lose its functionality.
- The slope of the gutter is at least 2 cm per linear meter.
- The gap between the wall and the drainpipe corresponds to a distance of 3-5 cm.
- The connection of the components is overlapped and always with the use of gaskets.
- The distance between the drainage system and the soil should be no more than 15 cm. In winter, freezing of water and the formation of icicles are possible, under the weight of which the plastic is damaged, therefore the distance here is 2 times less than on a galvanized gutter.
- The structure is cleaned with a jet of water or air, as metal objects can deform the surface of the gutter and other elements.
It is not recommended to use reinforcement such as a 90 degree elbow to bypass corners and protrusions. In these parts of the drain, garbage is constantly accumulating, and it will be difficult to clean this element with water and air. Therefore, it is better to take a knee with an angle of 115, 135 degrees.
Plastic bottles
 The cheapest and most unusual version of the drainage system is to create it from plastic bottles. Accumulating the required amount of such material will not be difficult. The design will require 1.5-2 liter straight-shaped bottles, as well as wire and brackets. The main element of the drainpipes will be the middle parts of the bottles, the length of which should be 15-20 cm. The bottoms are useful as plugs for rotary structures.
You will need a furniture stapler - a tool that is necessary to create this type of drainage system, as well as a screwdriver or drill for attaching brackets to a wall or roof. Installation of a drainage system from the roof of plastic bottles consists of several stages:
- To prepare a sketch of the future design. It will make it possible to determine the number of bottles and the slope of the gutter for its functionality.
- Remove labels and traces of glue from improvised material using any detergent.
- For the manufacture of the gutter, use the central parts of the bottles without a bottom and a lid, having previously spread them in two halves.
- Fasten the prepared parts with a lap stapler, the width of which is 1-1.2 cm (usually three brackets are enough). The connection of elements can also be performed using wire, having previously made small holes in the workpieces.
- For sealing use ordinary plasticine or some inexpensive sealant.
- Having made the gutters, you need to fix them along the edge of the roof. For this, holes are drilled in a slate or other roofing material with a screwdriver or drill at a distance of 20-30 cm. At the same distance, holes are made in the gutter with an awl.Next, wire is passed through the holes, fastening the spillway to the roof.
Then you need to collect the vertical drainage. If the house is small, 2-3 pipes will suffice, sometimes they install one at all. First, a cylinder is cut out from the central part of the bottle, then the bottom and neck are cut off at the second so that the tapering part can be inserted into the prepared cylinder. According to this scheme, continue to install containers until the drainage system has acquired the required length. For strength, the parts are fastened with a stapler or wire. With the help of brackets, the home-made pipe is firmly fixed to the wall.
Following the recommendations and the sequence of work performed, it is easy to make a gutter system from plastic bottles.