Sooner or later there is a need to put new switches. This may be required not only at home, but also at work, in the garage. The process of replacing electrical equipment does not cause difficulties, but it saves the family budget on the services of an electrician.
Basic requirements for replacing electrical equipment
Before starting work, you need to familiarize yourself with the main range of requirements for repairing electrical equipment. Their strict observance will guarantee the safety of the entire work process.
- The most important condition is that when you start working with electrical appliances, you must first disconnect the room.
- It is not enough just to turn off the power, you need to use an indicator screwdriver to make sure that there is no voltage at the output.
- Only after compliance with the first two requirements can you begin to dismantle the old electrical structures and install new ones.
Each type of switch has its own design features, therefore, has its own installation features.
Dismantling the circuit breakers
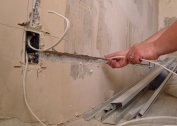
Dismantling should not cause difficulties, the main thing is to pre-prepare the working tool and consumables. The master will need autonomous light sources to illuminate dark places, a voltage indicator, high-quality insulating material, a set of screwdrivers, an office knife and pliers.
The old key switch is dismantled according to the following sequence:
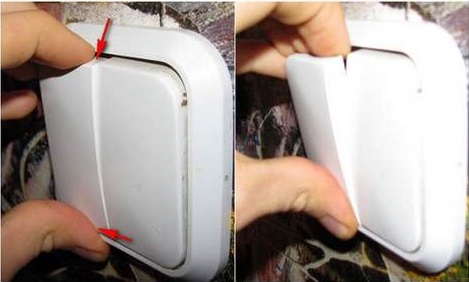
- The keys are removed from the switch. This can be done using an ordinary flat screwdriver, prying the keys with it. Double and triple keys are removed alternately.
- Using the same screwdriver, the external panel of the electrical device is removed.
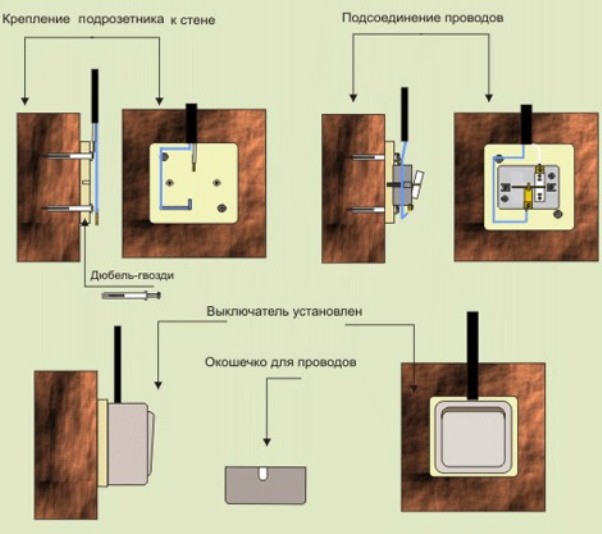
- As soon as the panel is removed, the wizard will have access to the screws with which the switch is attached to the wall itself. They need to be unscrewed.
- The switch is removed from a niche in the wall.
- All wires are disconnected. It is important to remember the connection order of the wires, since the connection principle is the same everywhere.
If such work is performed for the first time, you can take a photo of the wires so that in the future there is no confusion when connecting a new device.
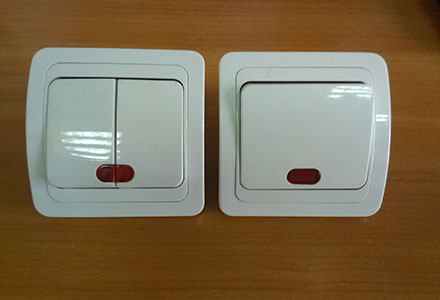
So far, the most common types of switches are traditional patchwork and built-in designs. Replacing the on-board switch with a built-in switch and vice versa does not cause difficulties, since their design features are identical. The main difference is that the built-in models are mounted directly into the wall, and the external ones are attached to its surface.
How to change the light switch with one key
Dismantling and installation of this type of structures is considered the simplest. The single-key switch must be removed in the following sequence:
- Remove the key with a screwdriver or any other flat object.
- Remove decorative cover frames.
- Screws are unscrewed from the fixing socket.
- All the insides of the electrical structure and wires are removed from the wall.
When installing a new design, the algorithm is identical, only all actions are performed in the reverse order.
Replacing a one-button with a two-button
There are no fundamental differences and features in the installation of two-key switches in comparison with single-key designs.
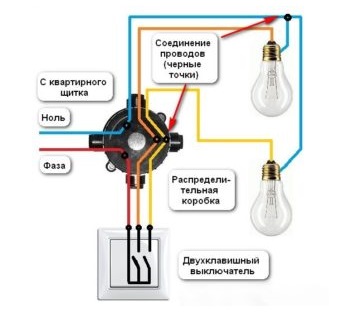
When installing a switch with two keys, the correct connection of the wires is taken into account. One phase conductive core approaches it, its beginning is laid in the automatic switch of the input shield. You need to find it before the voltage is removed from the switch.
There should be two lead wires to the load from the switch. An individual conductive core is conducted to the lighting devices, at the end of the installation, the current from the switch will go through them.
The installation sequence of such a variety of electrical structures has the same algorithm with the replacement of a one-button switch in a room.
How to change the switch to touch

If it was decided to install touch switches at home, a strict sequence of actions must be followed during the work.
- Disconnect the room.
- Remove the old electrical device.
- Remove the top of the panel.
- Connect the wires according to the location of the terminals.
- Installation in a special box - a socket box with the subsequent reliable fixing. Screws and spacers are used.
There are various modifications of touch switches, some of them have specific features, so before proceeding with the installation, you must familiarize yourself with the information in the accompanying documentation.
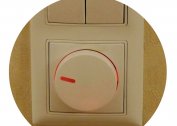
Mounting a dimmer switch
Switches equipped with a dimmer are gaining more and more popularity. This device allows you to adjust the brightness of the lighting.
There are no fundamental differences in the device, therefore, the installation technology is not much different from previous cases. The only requirement stated by the manufacturers is that all the rules for connecting conductive conductors to the load on the switch and phase terminals are observed.
Replace with a sound device

First of all, you need to familiarize yourself with the varieties of sound (cotton) switches. They are of two types:
- Sound switch that is mounted in place of the old switch.
- A sound switch that is built into the lighting fixture or a person installs it there himself.
Installation of the first type of devices is not difficult. It is enough to dismantle the old design and install a new one, the algorithm has no fundamental differences with the replacement of other types of switches. However, it is better to familiarize yourself with the accompanying documentation before work, as the models are constantly being improved, which may cause new requirements for the installation.
To connect the second variety, it is not necessary to dismantle the old switch. Such constructions are most preferably installed in the office or guest room. For continuous operation of the structure, the switch on the wall must always be in the on position.
At the planning stage, you need to find the most suitable place for installing the cotton switch in the lighting device. Such designs are equipped with a pair of wires, which must be connected in series directly to the lighting device and electrical communications. Once the device has been installed, you need to correctly configure its sensitivity to the optimal sound level.
There are many types of switches that are made in different design solutions. However, they have almost the same structural characteristics, the installation and dismantling process are almost the same. The specific requirements for a particular device should be described in the accompanying documentation.
When performing work, do not forget about personal safety precautions, otherwise serious health damage can be caused, and death can be possible.