The rope switch is one of the oldest lighting control designs. Such devices are still installed in interiors due to aesthetic qualities and ease of use.
Return retro
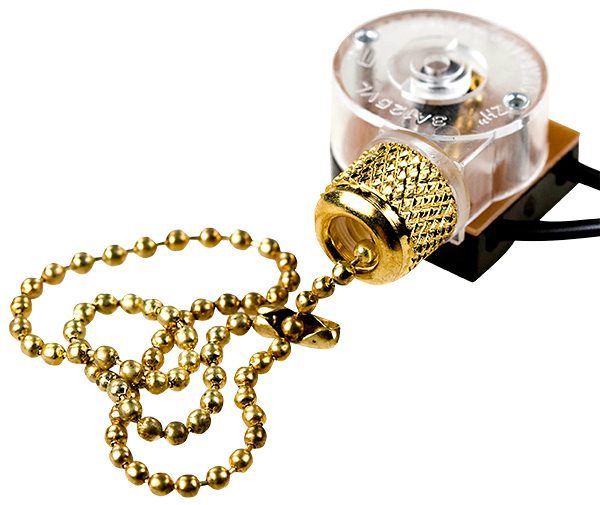
A switch with a rope was used to control lighting even before the distribution of electric lamps: a bell was attached to the rope, the maid came to the sound to extinguish the candle. When electricity firmly entered everyday life, the rope switch in a modified form (a design sharpened to open the electric circuit) for a long time continued to remain part of the interior, not least due to the design capabilities provided by such a configuration.
Models with the design of the handle and capsule for the lace are designed for use in a certain interior style (classicism, rococo, empire, etc.). Chains and cords began to equip not only switches for ceiling lights, but also wall and table appliances.
In British homes, the clutch switch is still the only type of lighting control device that can be used in bathrooms. The country's specialists believe that only this type of device, which does not even allow unintentional contact with parts carrying electrical loads, can provide sufficient security in a room with high humidity.
In Soviet times, power supply employees often received orders for the installation of push-button switches in apartments instead of rope ones that went out of fashion. Starting from the 90s, designs with yoke arms are gaining popularity again. It can be a ceiling chandelier that illuminates the entire room, and a separate small lamp, aimed at lighting a small area of space.
Fields of application
The installation of a light switch with a rope is possible as part of various lighting structures, each of which is sharpened for a specific task.
Hall and corridor lighting
Due to the fact that a significant part of the dirt brought by the pedestrian from the street is delayed in the hallways and corridors, pollution on the push-button device along with fingerprints soon begin to issue a statute of limitations for repair work. Using a switch on a rope will help prevent this from happening. Residents will not need to get dirty buttons and touch the walls in an attempt to find the switch.
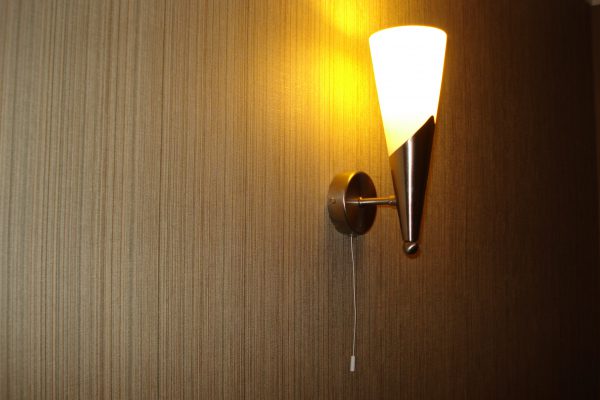
Wall lighting
In the case of using a wall-mounted device for zonal lighting of a living room, the user also has the advantage of not having to touch the wall. In addition, the handle or chain can be a decorative element that maintains the unity of the interior of the room - you can choose the option that stylistically combines with the main chandelier or with furniture.
Glowing ceilings

In the case of equipment for ceiling lighting, the main advantage of yoke boxes is that their installation does not require wiring to the wall. This is a rather time-consuming operation, in addition, not too suitable for arranging lighting for finished wall decoration. When installing the jumper, the capsule with the mechanism can be hidden by the ceiling guide or plasterboard box, and the cord itself is lowered along the wall.
Furniture lighting
The combination of compactness and good distinguishability of the rope structure switch makes it an excellent option for installation in the kitchen in order to illuminate the lower parts of wall hanging cabinets of a furniture set. Thinking about its location, you need to take care of the sufficient remoteness of the switch from the ventilation devices.
The installation process is very simple: the duralight strips are attached under the edges of the hanging cabinets, and the device capsule is placed inside one of them. A hole is drilled in the bottom, a cord is passed there, and electrical power is brought to the structure.
How to choose a connection point
Before connecting the rope structure, it is necessary to consider the location of the lamp. Fans and other devices that could touch or pull the rope should not be located nearby. If you plan to mount a wall sconce, it should be located at a height of about 1.5 m from the floor. When placing a pair of suspension devices, you need to pay attention to the symmetry of their positions. You also need to think about how to wiring as discreetly as possible.
Mounting Features
 Before you start connecting the device with the jumper to the mains, you must prepare the necessary tools. The correct selection of installation accessories determines the success of the procedure. You also need to pay attention to the instructions that came with the product - usually there are recommendations that are tied to a particular type of model.
To connect, you need to prepare the following items and tools:
- a step ladder, if the device is located high;
- well sharpened knife;
- pliers;
- an electric drill with a set of drills (the latter are selected, focusing on the material from which the walls are made - wood, concrete, etc.);
- two types of screwdrivers - with a cross-shaped nozzle and equipped with an indicator;
- a simple pencil.
The installation of equipment is carried out in the following order:
- Turn off the current in the room by unscrewing the plugs or by putting the switch in the inoperative position.
- Check the absence of voltage on those wires that are planned to be connected to the lamp. They are tested in turn with a screwdriver with a current indicator.
- The back panel of the sconce is brought to the placement area and pencil marks are made on the wall in places where the fasteners will be located.
- I drill holes in the marked places with a drill and fix the panel using dowel nails.
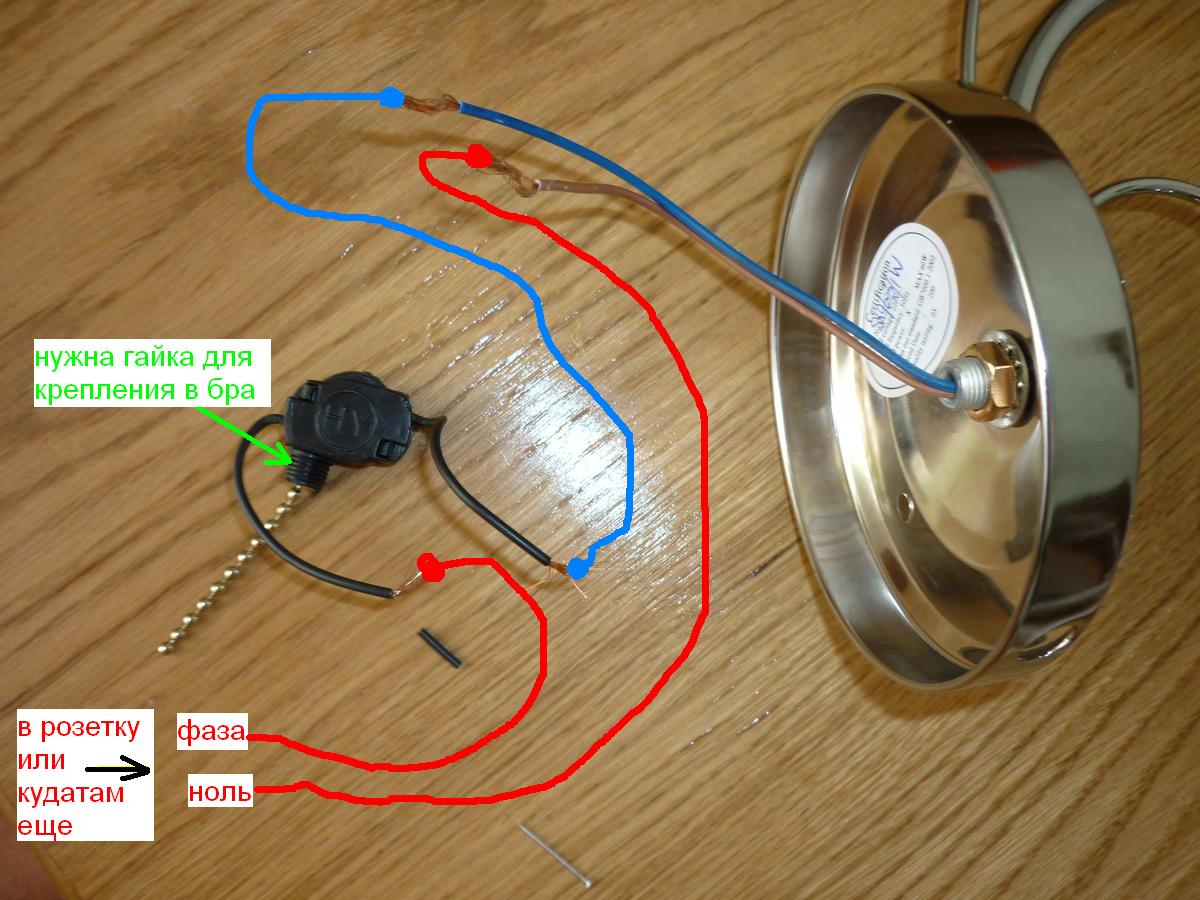
- From the ends of the input contacts, remove with a knife 0.5 cm of insulation.
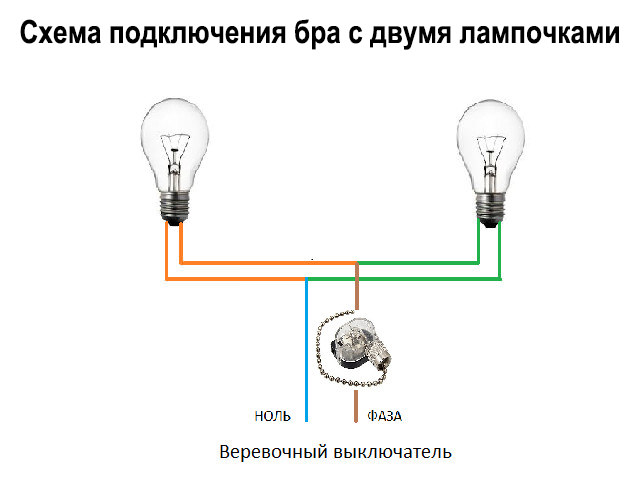
- Guided by the wiring diagram, they connect the conductors of the wiring of the room and the lighting device.
- The body of the device itself is attached to the panel. Fix with fasteners included in the kit to the lamp. If desired, you can fix the lampshade, using the stairs if necessary.
- Screw the bulb of the preferred type (LEDs, fluorescent, etc.).
- Check if the device is fixedly fixed.
- Turn on the current in the room through plugs or a knife switch.
- Turn on the device using a rope mechanism and check whether it works correctly. The contact points of the wires must not generate sparks.
The process of connecting a rope switch does not require complex manipulations, which are connected with the connection of a chandelier, so even a person with little experience in construction and installation works can put such a device.